web 2.0

Saturday, May 1, 2010

PSDTUTS Updates

PSDTUTS Updates

Link to Psdtuts+

Best of the Web – April 2010

Posted: 01 May 2010 05:25 AM PDT

Once again we have another month filled with great content for our readers. This month features some awesome tutorials that will cover all types of design topics from advertising, typography, to cinematic photo manipulation. Once you get done with the tutorials, you can move on to a great selection of free fonts, wallpapers, and textures. Finally, you can read about Photoshop CS5, as well as some great articles about branding and freelancing. So lets get into the April roundup.

Tutorial Wrap

  • Create Shattering Text Effect

    This tutorial is an awesome typographic one. The author focuses on explaining how to first create some cool looking 3d text and then import it to Photoshop to give it some color as well as texture. If you are someone who is interested in these types of 3D typography tutorials then this is definitely for you.

    Visit Tutorial

  • Creating 3D Type With CS5

    If you want to get a sneak peak at what Photoshop Cs5 has to offer, then you should definitely check this tutorial out. In this tutorial Nik Ainley goes over his signature typographic effect and adds some new twists to the design. If you still are not convinced, then check out the final result, which will definitely entice you to read through this great tutorial.

    Visit Tutorial

  • Master the Layer Mask

    Those new to Photoshop might shy away from the layer mask tool, and this is definitely something they should not do. This tool is a useful, non-destructive way of adding patterns to certain shapes and layers without having to delete anything. This tutorial will show you how to master the layer mask after a bit of practice.

    Visit Tutorial

  • Design Laptop Advertisement

    Our next tutorial will show you how to create an out of this world laptop advertisement. There are many elementary techniques employed in this tutorial, but no one will argue with the results, and that is why this is a perfect tutorial for the Photoshop newbie’s out there; you will learn a lot from this tutorial so make sure to try it out.

    Visit Tutorial

  • Create illustration using Pro Masking Skills

    If you are feeling very comfortable with your layer mask skills from the tutorial mentioned earlier than you might want to take a crack at this tutorial. The author focuses on using some professional grade masking techniques to make an awesome cartoonist illustration using various stocks. This is a great tutorial for the advanced users.

    Visit Tutorial

  • Create an Avatar like Scene

    Avatar had the best visuals anyone has ever seen in a movie. Experiment in Photoshop to mimic some of these awesome scenes. This tutorial does just that by showing the reader how to create realistic looking floating islands. This is a great tutorial because you can always use this as a base and expand on it to further enhance the scene. So check this one out.

    Visit Tutorial

(FREE!) Download Picks

  • 40 Dark Desktop Wallpapers

    If you are in need of a wallpaper change, and you prefer something dark compared to a colorful desktop, then check this post out. The author of this post rounds up 40 awesome dark wallpapers. It covers grunge designs to just dark photos, so you will most likely find something you like in this pack.

    Visit Download Site

  • Vector Skyline Set

    This is a very cool set of vectors that are brought to you by Wegraphics.net. This pack features 15 great shots of various city skylines that were then turned into vectors for your using pleasure. So definitely download this, as you will probably find a use for it soon enough.

    Visit Download Site

  • Free Web 2.0 Fonts

    This freebie is a pack of 30 very creative fonts. These typefaces are all extremely high quality and they all look great. So look through them and download the ones you like.

    Visit Download Site

  • 20 Free Groovy Fonts

    Our next font pack focuses on a more specific topic, which is groovy 60’s and 70’s inspired fonts. So if you see yourself trying to do some retro art then these fonts will definitely be of use to you. Check them out and download a few.

    Visit Download Site

  • Texture Tuesday Grab bag

    Bittbox’s Texture Tuesdays has changed its normal packs up a little bit and dropped the themes. This week will have a bunch of random textures all in one, you are still guaranteed some high quality ones that you can definitely use in a lot of your art so check them out.

    Visit Download Site

  • Free GrungeFolio Template

    Our last freebie of the month is for those who are looking to create a portfolio for themselves but do not know how to start. This freebie is a simple basic layout of how a portfolio should look. If you are in need of one, go ahead and download it. You can then tweak it until it fits your purpose.

    Visit Download Site

Article Wrap

  • Adobe Cs5 Q&A Press Session

    With Adobe’s latest project CS5 coming out, designers around the world have flocked to the internet to find any information about what is to be included in their new design software. This article highlights some important points that were mentioned in the recent Adobe panel.

    Visit Article

  • 20 Reasons You Shouldn't Be a Freelancer

    Personally I’ve seen tons of articles over the years about being a freelance designer, but this is probably the first one that flat out gives you reasons why you shouldn’t become one. This is a great read for all because it gives some perspectives that you might not have considered. So freelancer or not, check this great article out.

    Visit Article

  • Branding, Identity, Logo Design, Explained

    Just like the title says, this article breaks down each of the three important terms and shows you how unique each one is. I can not stress how important this is for some of the newer designers who wish to work in creating logos and ads for companies. These terms will come up a 100% of the time, so this is another must read.

    Visit Article

  • Why Branding Yourself Is Important

    Now that you know the proper definition for branding from our last article, you can go about properly branding your own image. This article will give you six concrete reasons why you should brand yourself as a designer.

    Visit Article

  • Graphic Design Dream Team

    This article makes a great analogy to the Dream Team of sports in the introduction, so why not go through the most prominent work of the pioneers of graphic design? This two part article rounds up some of those designers and gives a look into some of their best work over the years.

    Visit Article

  • The Optimal Work Environment

    Those who are comfortable in their environment are more likely to produce high quality work than those who cant stand where they are; and that’s why this article focuses on ways to optimize your work environment. Discover several good suggestions to reduce distractions and clear up space so you can crank out the best work possible.

    Visit Article


Create a Knife in Photoshop

Posted: 30 Apr 2010 06:22 AM PDT

Photoshop is a fantastic app to use to manipulate photos but it is also a great app to use to illustrate still life objects. In today’s tutorial we will demonstrate how to create a semi-photo-realistic knife in Photoshop using vector drawing tools, layer styles, textures, and effects.


Step 1

In new document (size 1000px x 1000px), create a new layer and call it “knife”. Use the Pen Tool and draw a shape as in (1a) and fill it with any color (1b). Then apply the layer styles as shown in (1c).
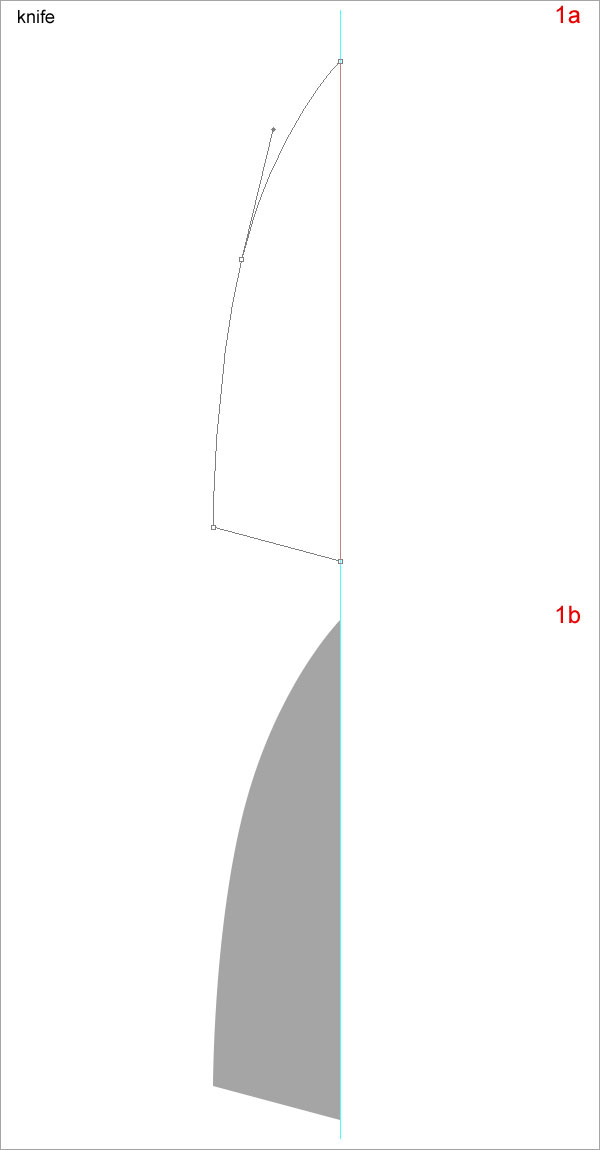
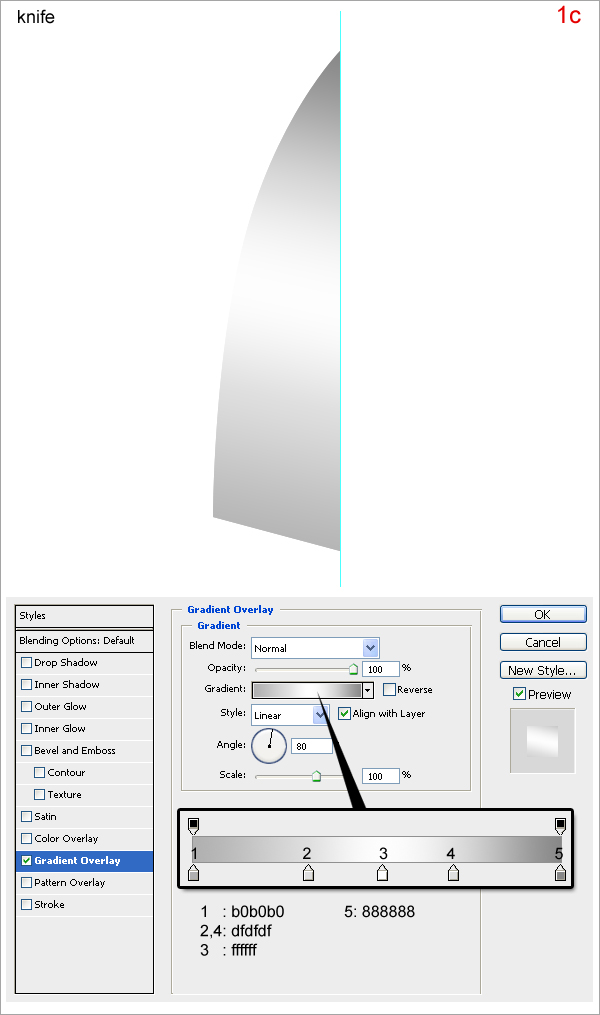

Step 2

On the “knife” layer, use the Pen Tool and draw a shape as in (2a). Press Command + Enter to make the selection. Press Command + J to duplicate this selection. Rename the new layer “knife 2” then apply a layer style as shown in (2b).
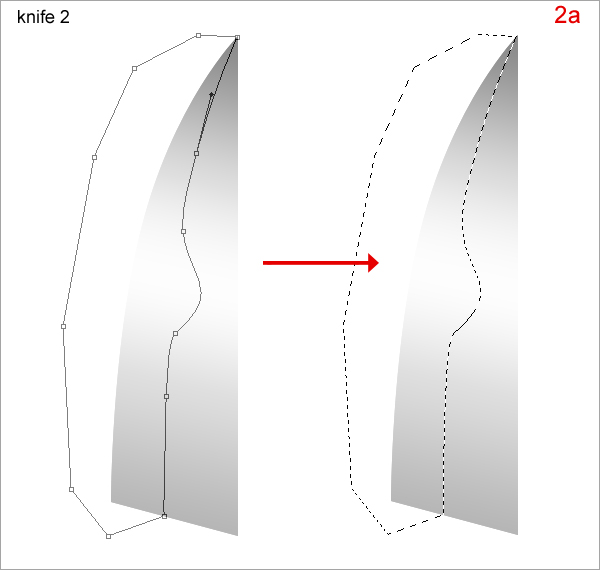

Step 3

Press Command + J to duplicate “knife 2” and delete its layer style and rename this new layer “knife 3”. While holding down “Command” click on “knife 3” to obtain its selection. Go to Filter > Noise > Add Noise, set as in (3a). Go to Filter > Blur > Motion Blur and set as in (3b). Then change its Blending Mode to Overlay and reduce Opacity to 40%.
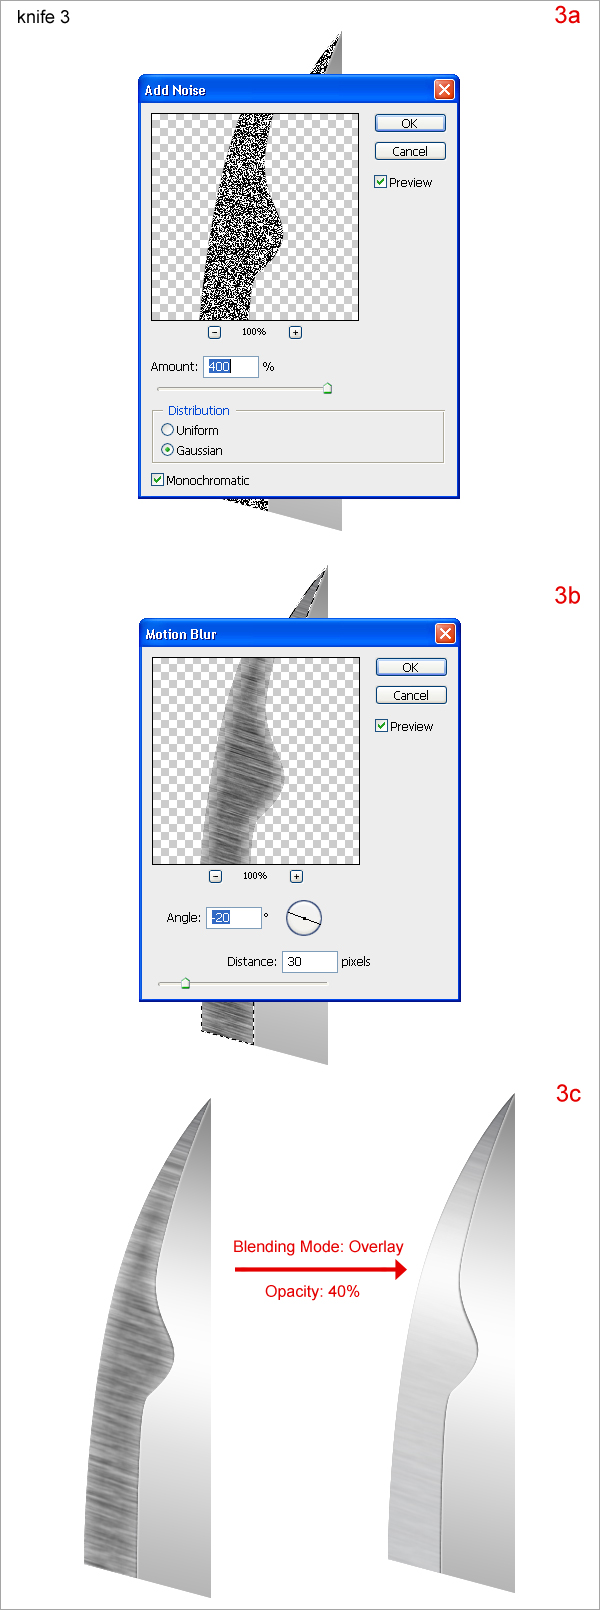

Step 4

On “knife 2”, use the Pen Tool to draw a path as in (4a). Press Command + Enter to make the selection. Press Command + J to duplicate this selection and delete its layer style. Rename this new layer “knife 4” then move it on top of “knife 3”, fill with white color and reduce its Opacity to about 70% (4b).
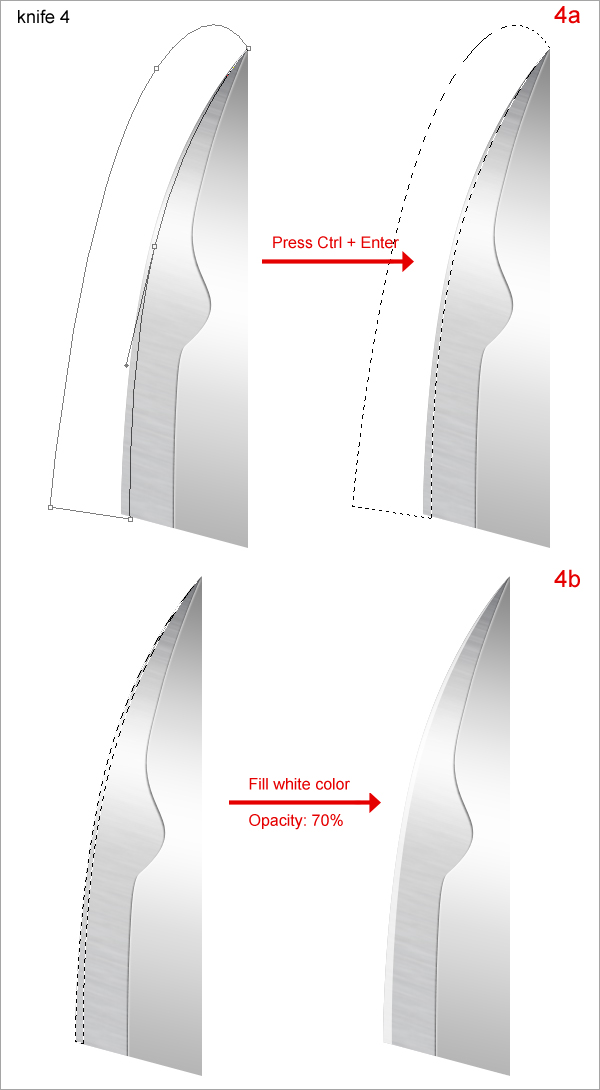

Step 5

Select “knife”, “knife 1”, “knife 2”, “knife 3” and “knife 4”, press Command + E to merge these layers into one layer. Rename this new layer “silver knife”. Create a new layer on top and call it “hole”. Use Pen Tool to draw a shape as in (5a) and fill it any color. Keep the selection of “hole”, choose “knife” and press Delete (5b). Select Rectangular Marquee Tool then press the down arrow key 3 times and press left arrow key 1 time to move the selection as in (5c). On “hole”, press Delete (5d).
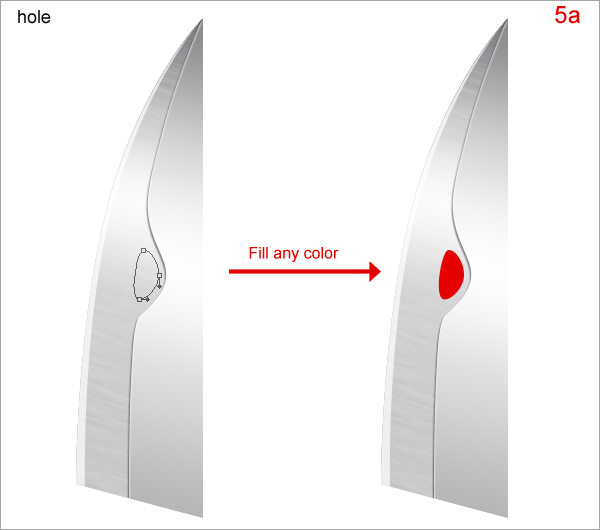
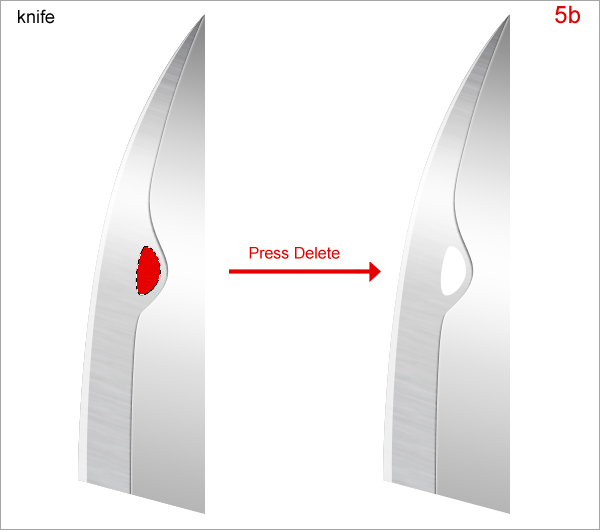
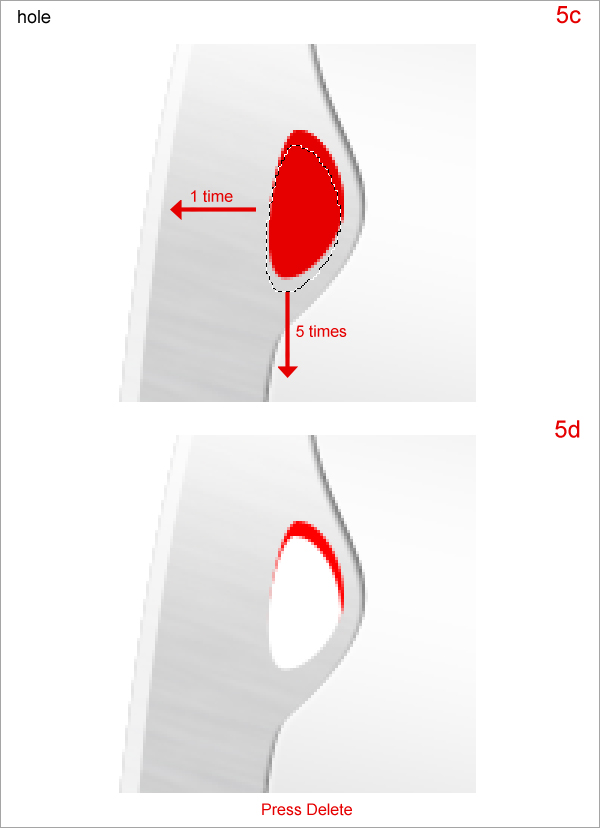

Step 6

Open the layer style menu for “hole” and adjust the settings as shown below.
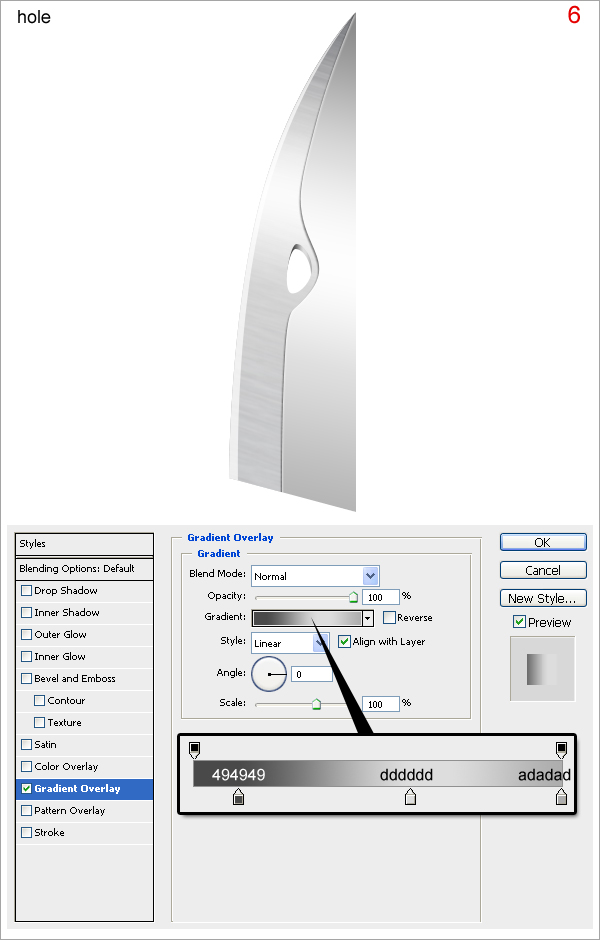

Step 7

Create a new layer on top, call it “hilt”. Use Pen Tool to draw a shape as in (7a) and fill it with any color. Then open its layer styles and use settings as shown in (7b).
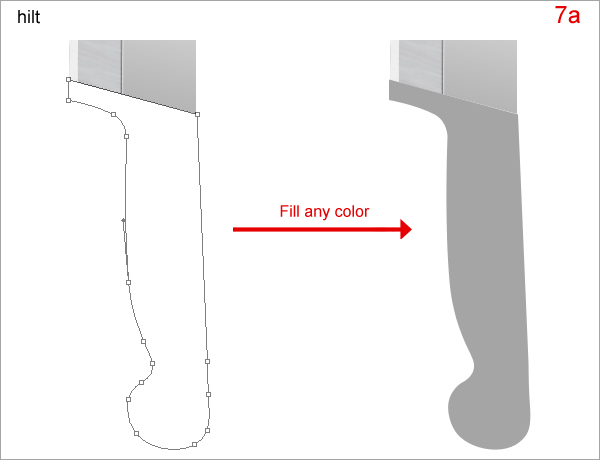
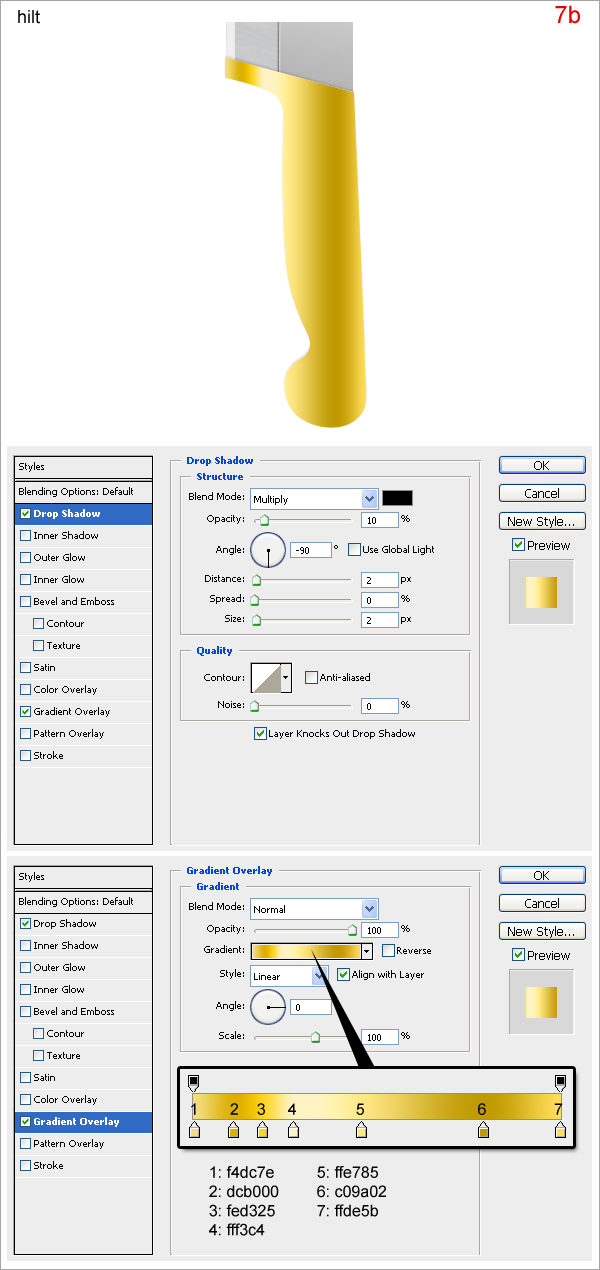

Step 8

Press Command + J to duplicate “hilt”, rename the new layer “golden hilt”. Delete layer style “hilt” and place as shown below.
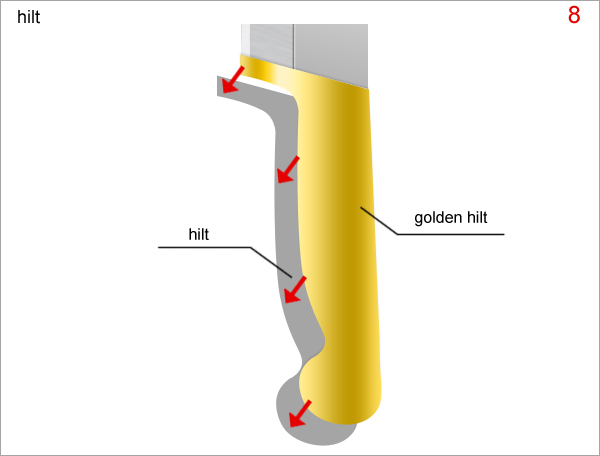

Step 9

Create a new layer between “hilt” and “golden hilt”, call it “golden hilt 2”. Use the Pen Tool to draw a shape as shown below.
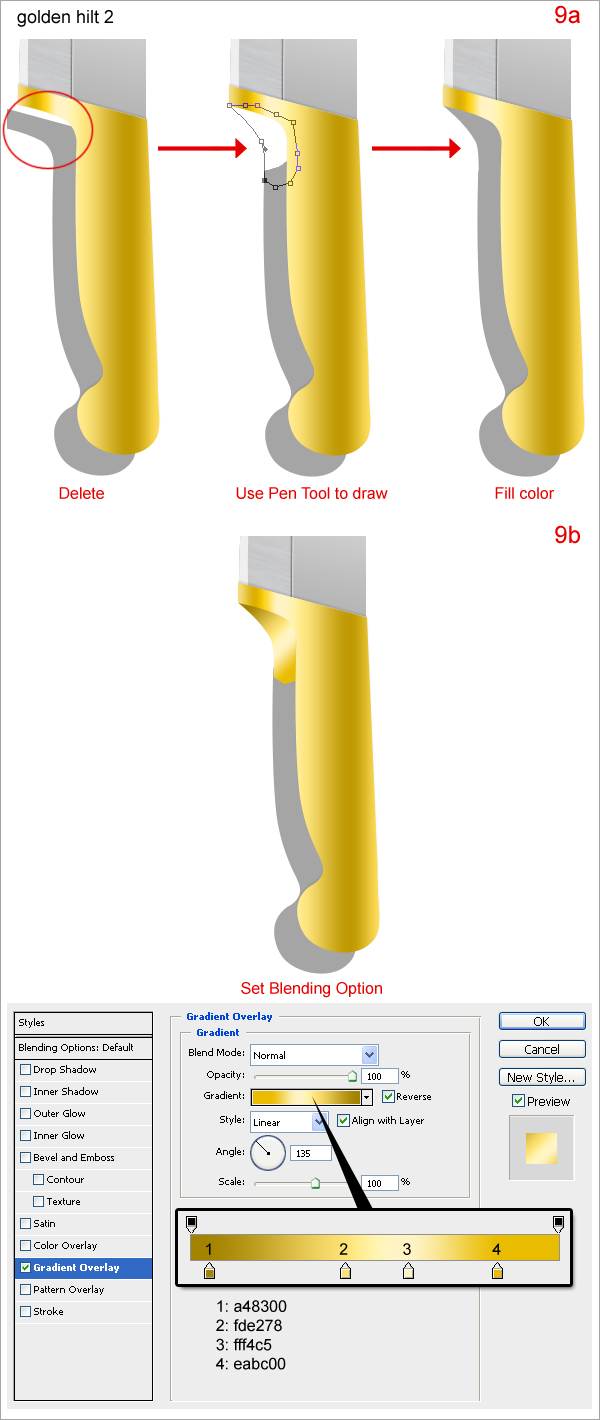
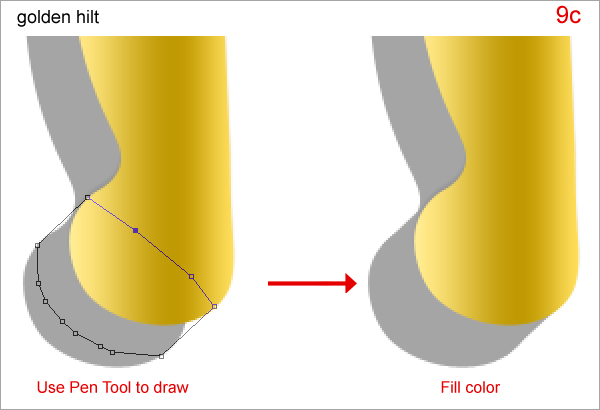

Step 10

Merge “hilt” “golden hilt” and “golden hilt 2” into one layer, rename new layer “golden hilt”. Place texture on top of “golden hilt”. While holding “Command” down click on “hilt 2” to obtain its selection. On the texture layer, press Command + J to duplicate this selection. Rename new layer “texture hilt”.
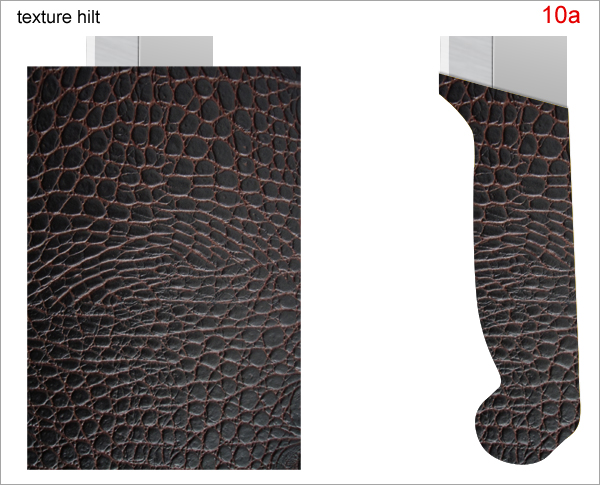
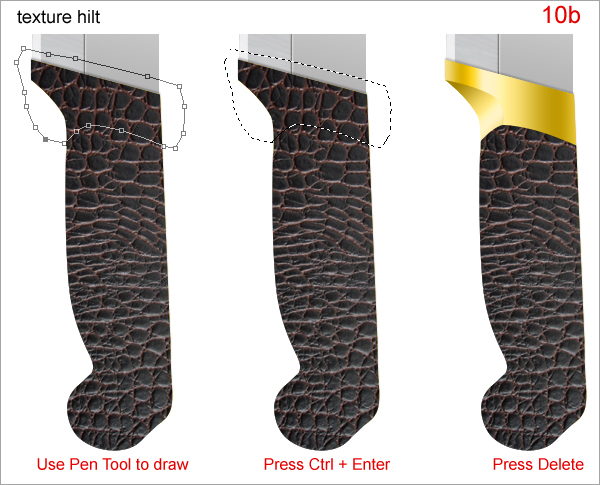

Step 11

Use Dodge Tool and Burn Tool with smooth brush to add shading to the hilt.
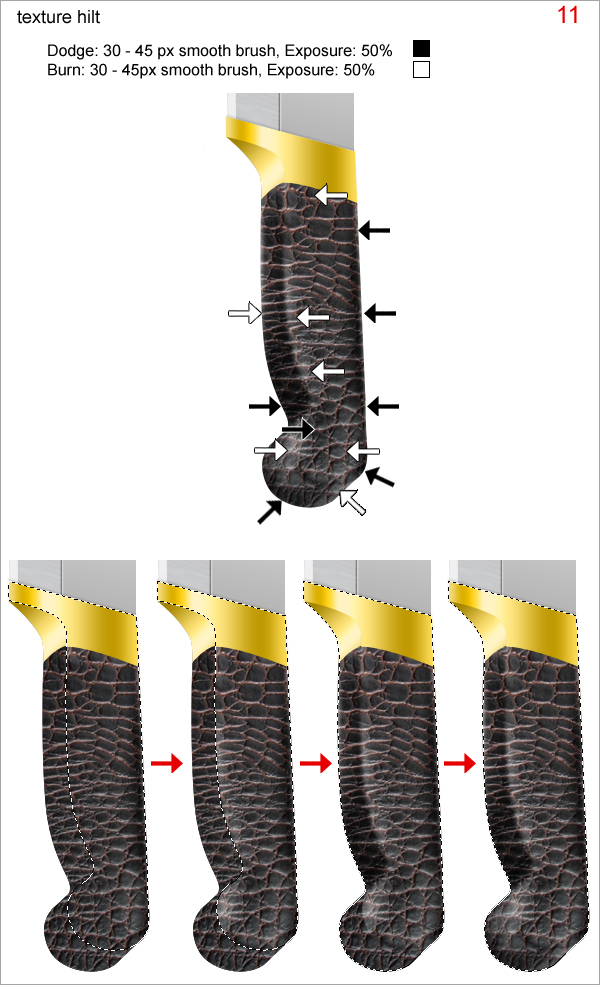

Step 12

Create a new layer on top of “texture hilt”, call it “line”. Use Pen Tool to draw as shown in (12a). Set a hard 2 px brush then select the Rectangle Tool, right click on path, choose Stoke Path with Brush to draw the black line (12b). Apply layer styles as shown in (12c).
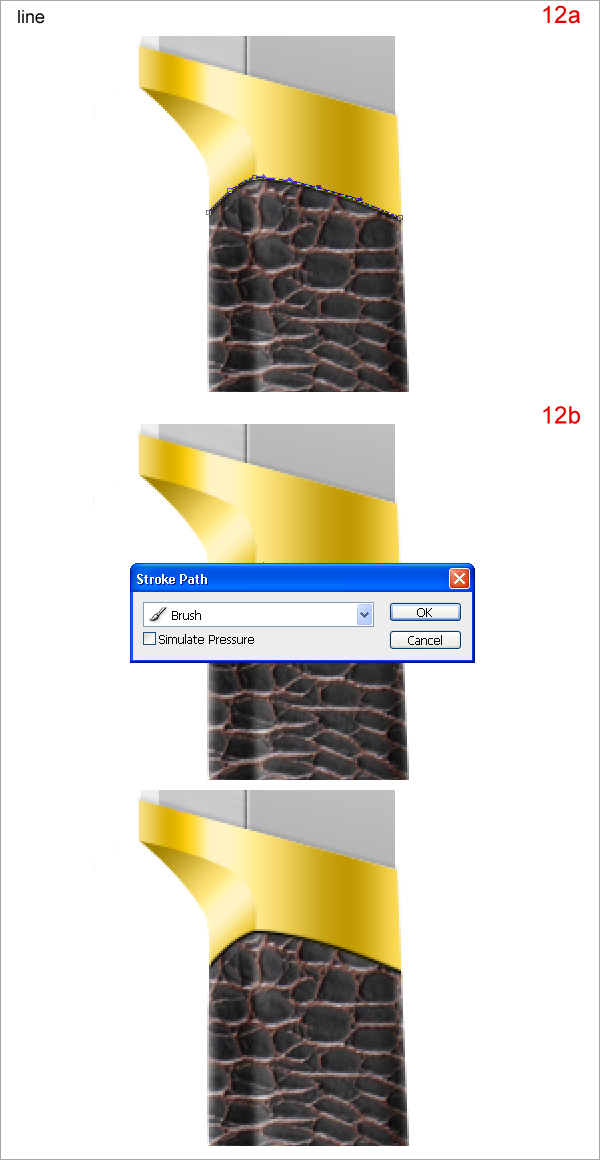
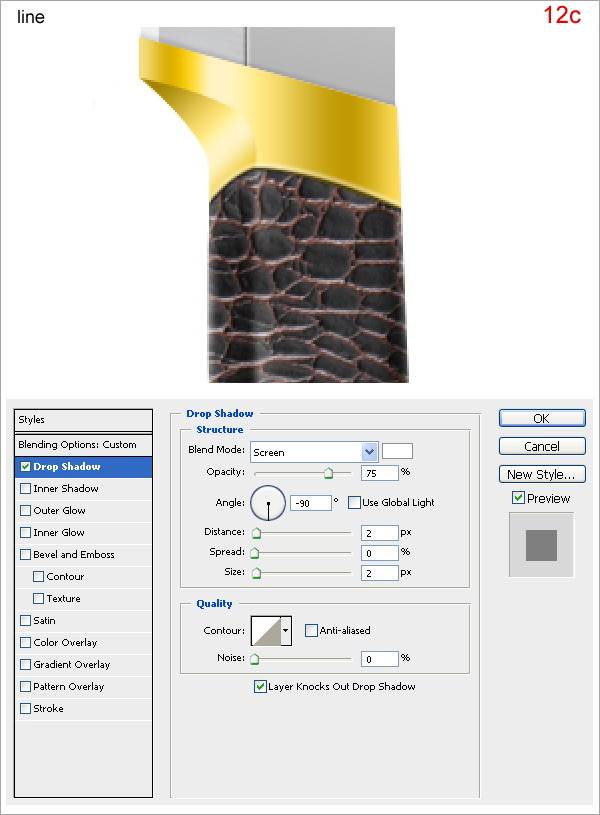

Step 13

Press Command + J to duplicate “golden hilt”, rename the new layer “noise hilt”. While holding down “Command” click on “golden hilt” to obtain its selection. Go to Filter > Noise > Add Noise, set as in (13a). Go to Filter > Blur > Blur. Then change its Blending Mode to Overlay and reduce Opacity to 15%.
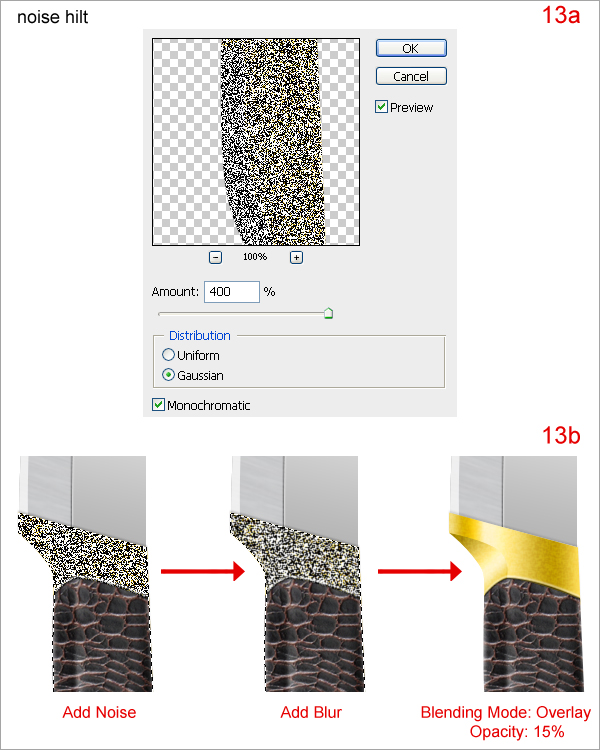

Step 14

Merge all layers (except background layer), rename new layer “final knife”. Then press Command + T to transform it as shown below.
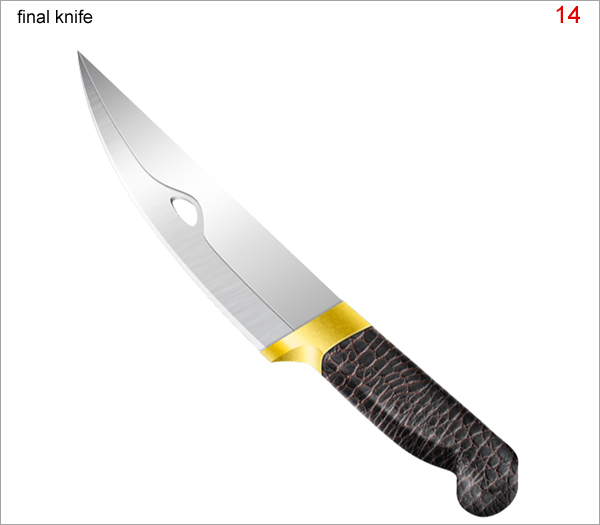

Step 15

Press Command + J to duplicate “final knife”, rename the new layer “shadow 1” and transform it as shown in (15a). Go to Filter > Blur > Gaussian Blur, set as in (15b). Use Rectangular Marquee Tool to make the selection as in (15c). Press Command + Alt + D, set Feather Radius as in (15d) and press Delete. Then reduce Opacity to 60% (15e).
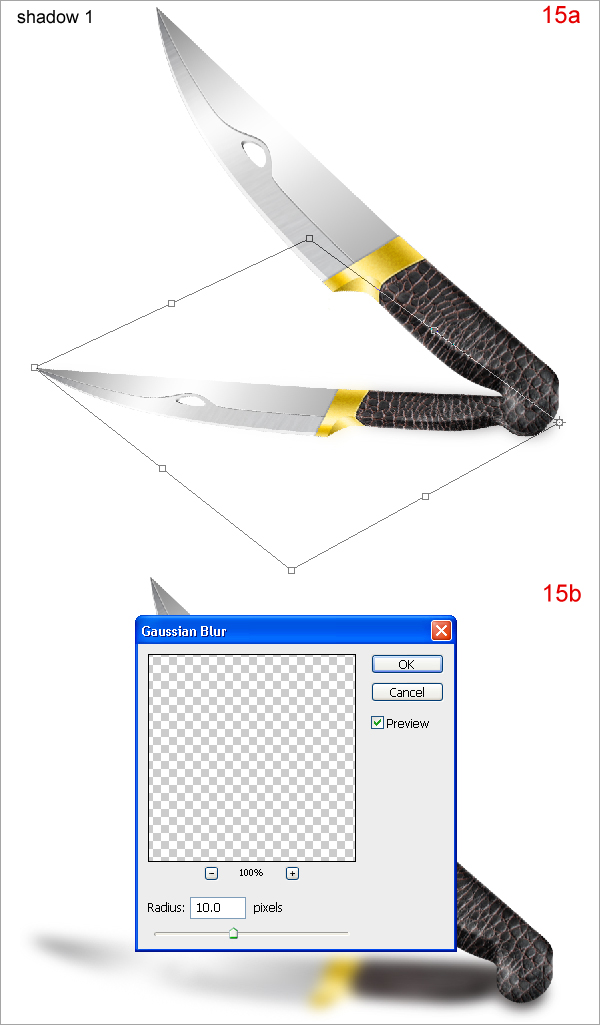
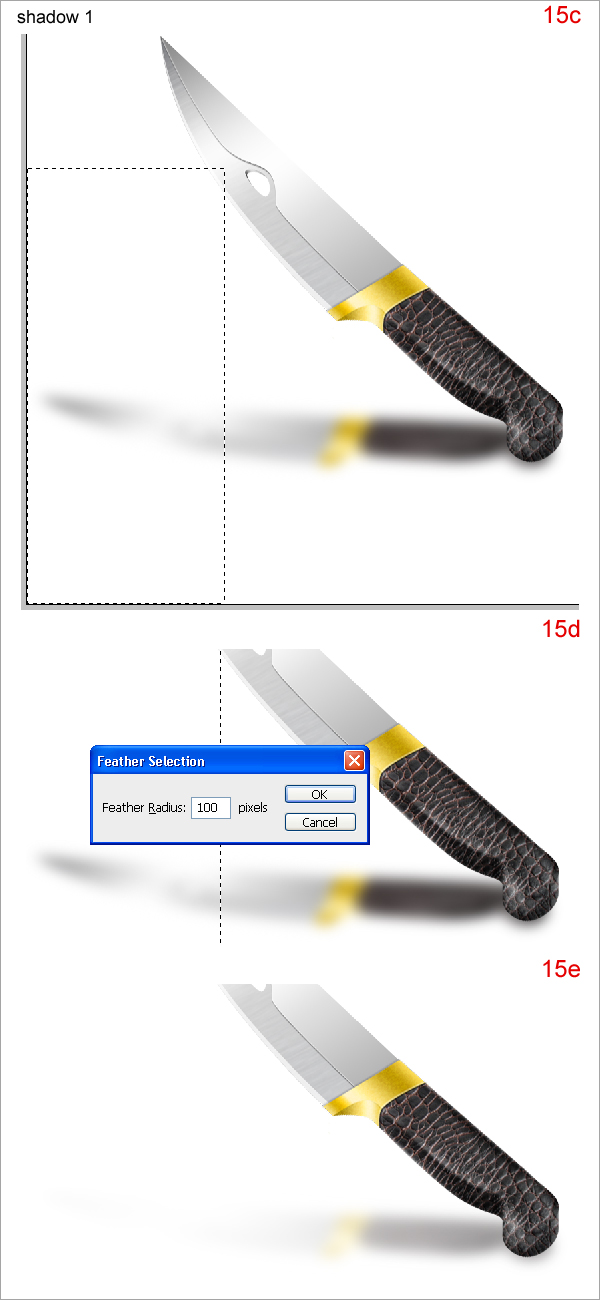

Step 16

Create a new layer on top of “shadow 1”, call it “shadow 2”. Perform the following steps.


Final Image

Your final design should look similar to the image below. Hope you learned something new and fun!
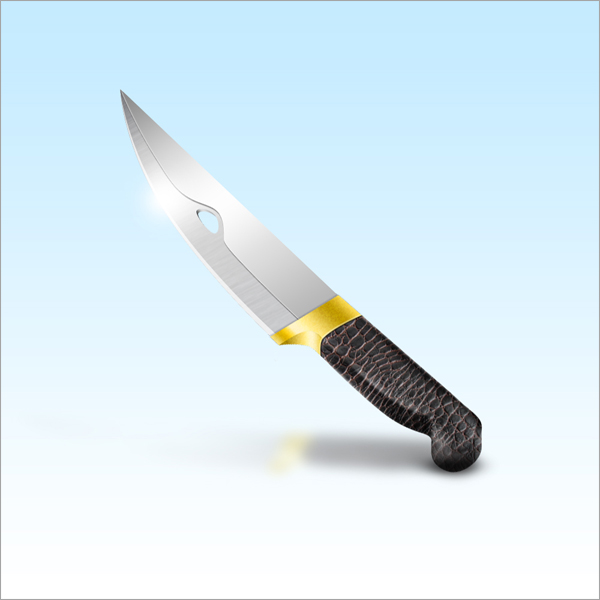

0 comments:

Post a Comment

Apture