PSDTUTS Updates |  |

| Isloo – 50 Free High Quality Icons Posted: 06 May 2010 02:21 PM PDT To celebrate IconFinder’s three-year anniversary we have a free present for all the readers of Psdtuts+. It consist of 50 icons designed by the talented Asher Abbasi.
These 50 icons are released under Creative Commons Attribution-No Derivative Works 3.0 and can be used commercially – just don’t redistribute them without written permission. As some of you might know, TurboMilk designed the logo and mascot of Iconfinder. Their talented designers have provided at great illustration of the IconFinder mascot for this anniversary. There’s no doubt that the work by them has helped IconFinder’s growth the last year. If you’re launching a new app or service you should hire TurboMilk.
|
| How to Create a Greek Mythology Inspired Photo Manipulation Posted: 06 May 2010 06:45 AM PDT In Greek Mythology, the Titan Atlas literally carried the weight of the world on his shoulders. This is because when the Titans were defeated Zeus condemned him to hold the Earth in place. In today’s tutorial we will demonstrate how to depict Atlas’ punishment using stock photography and Photoshop.
ResourcesToday, we will be using the following stock photos.
Step 1Open stock for atlas model, using Pen tool, extract model from its background and then duplicate it on a new layer. Change layer’s name to atlas. 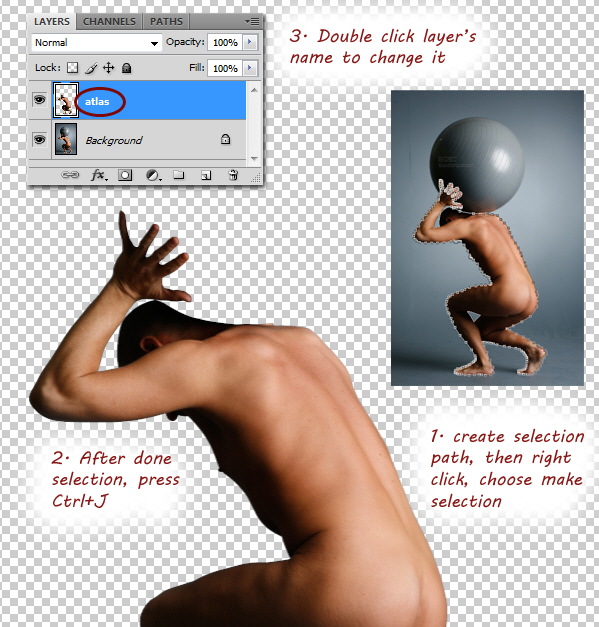 Step 2Fill background layer with black. We need a bigger canvas; go to Image > Canvas Size menu. For easier resize process, choose percent and then fill in Width: 120, Height: 140 percent and Pick middle down anchor point. This way, canvas will be resized upward. Click OK to confirm resize. 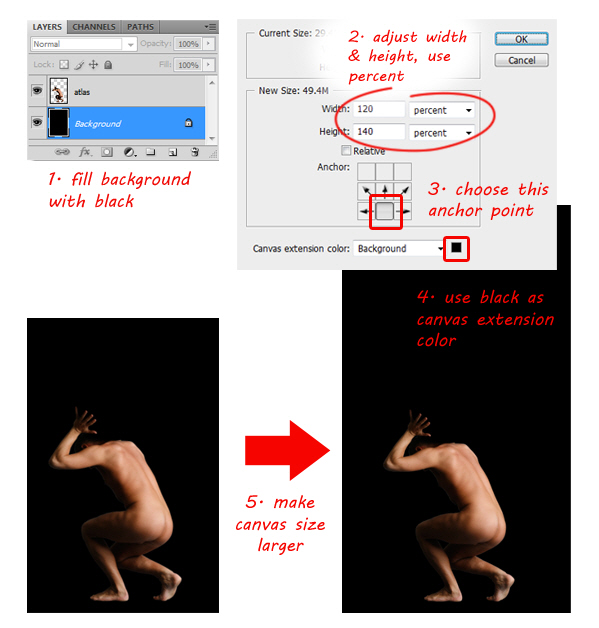 Step 3Open earth stock, notice that the earth consists of three layers, delete background layer so now you only have two layers left. Go to Layer > Merge Visible or just press Cmd+Shift+E to merge visible layers. 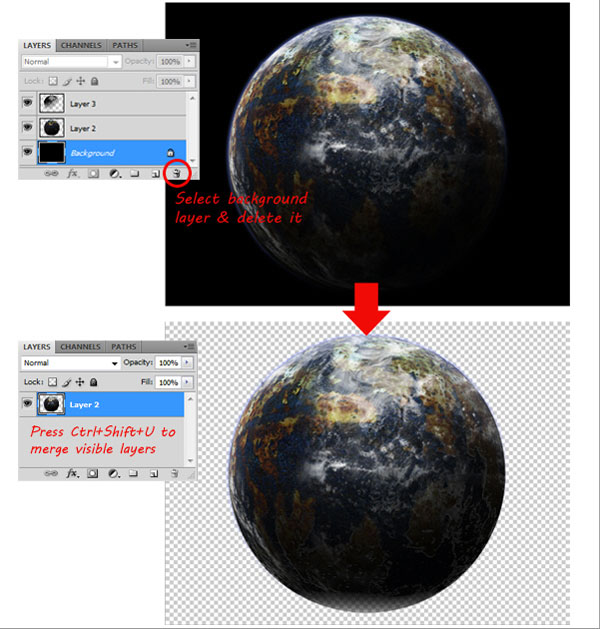 Step 4When done, insert the Earth in to atlas illustration. Make sure you place the Earth’s layer below the atlas layer, then rename its layer to ‘earth’. Resize earth to make it larger, then rotate it to the right so the dark side of earth is in the left side. Press Enter to confirm transformation. 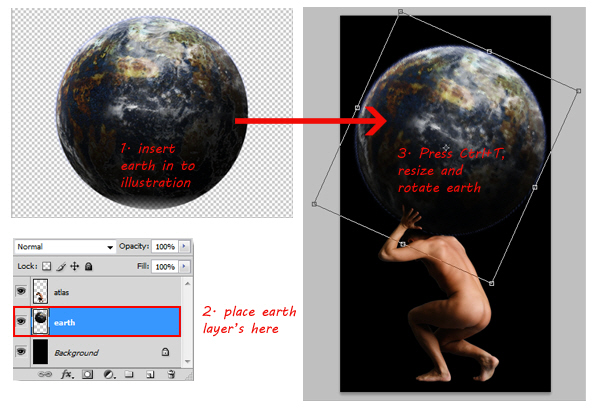 Step 5Click back to atlas layer then resize (Cmd+T) to make it smaller. Make sure atlas image is resized proportionally by holding Shift when you drag the corner control point. Hit Enter when done. 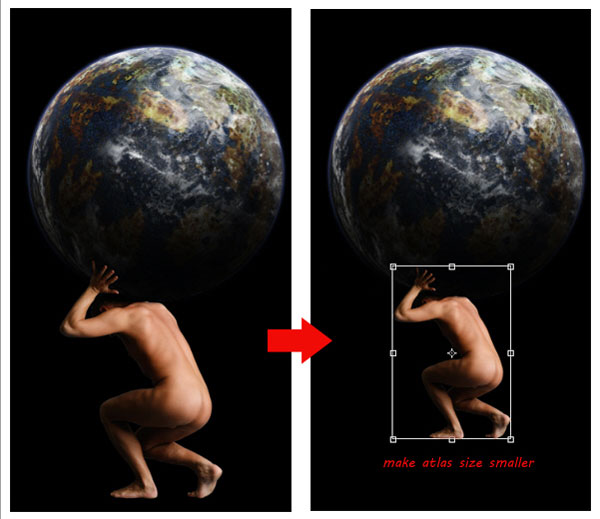 Step 6Use Crop Tool to crop canvas size. To give celestial atmosphere, add stars to the background. For that purpose, select background layer then click Filter > Noise > Add Noise. Adjust Amount value around 100%, select Gaussian and check Monochromatic ON. 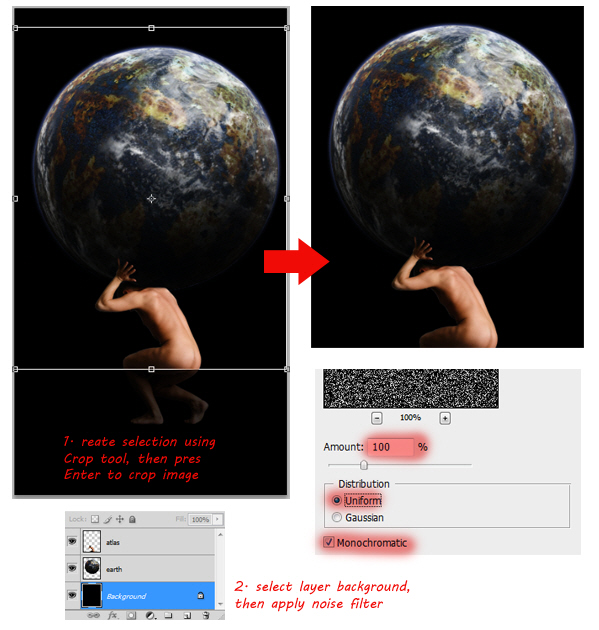 Step 7Click OK, then background layer will be filled with noise. Blur it using Filter > Blur > Blur More. You can repeat this step by pressing Cmd+F in case you want the noise look even more blurry. Press Cmd+L to bring up Levels dialog. Adjust input levels by dragging its slider’s until the number of "stars" is reduced, or until you have found the desired result. Click OK to confirm levels adjustment. 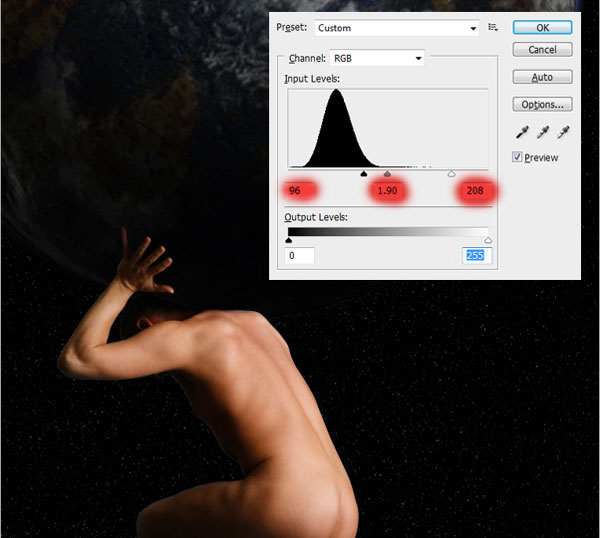 Step 8Activate Brush tool, then load the cloud brush (you can find and download the cloud brush here). See image below to learn how to load brushes. 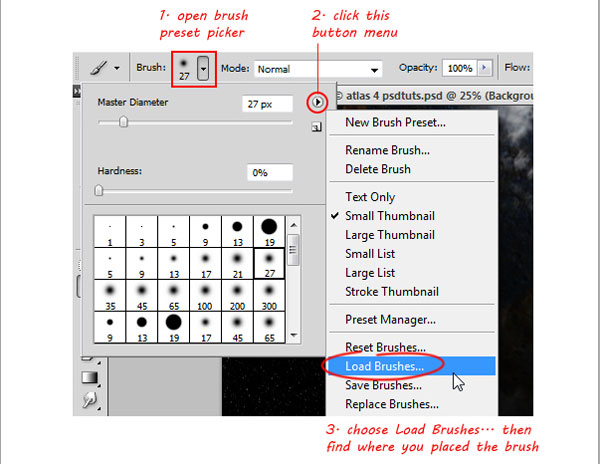 We also need more space to draw the clouds, so resize atlas and earth to make its smaller.
Step 9Select white as your brush color and make sure Brush Opacity is 100%. Create a new layer on top of your atlas layer, then start creating clouds using various cloud brushes. As you can see, the clouds are placed below the atlas body. To get better results, try to vary multiple cloud brushes as shown below. 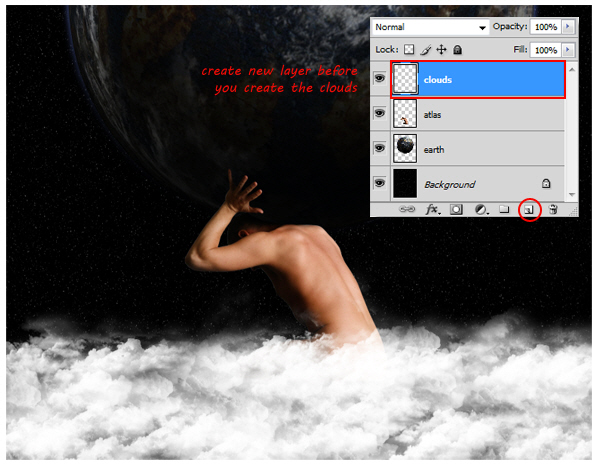 Step 10Now load some ink brushes in to Photoshop (you can find and download ink brush here). Same as before, combine multiple ink brush to get varied results. 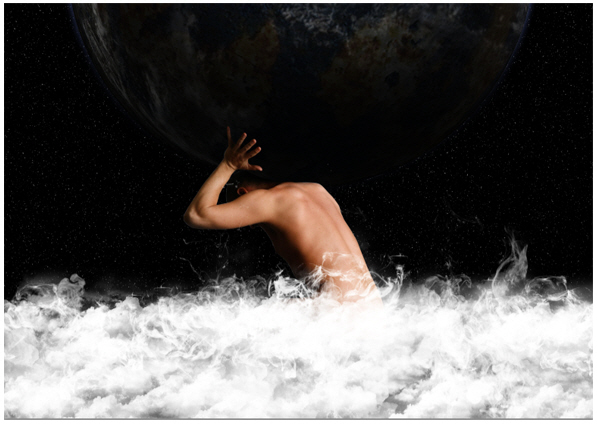 Step 11Add a layer mask to cloud layer. Now paint layer mask with black using cloud and fire Brush with low opacity (around 20-25% ). There is no guide to do this; just try to balance the look of the clouds, not too thick or thin. 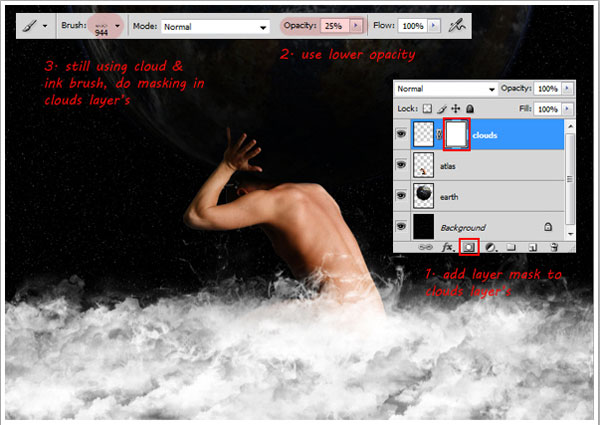 Step 12Select atlas layer, then press Cmd+U to bring up Hue/Saturation dialog. Drag Saturation slider to left to change pale skin color, and then drag Hue slider to right to change skin color look more yellowish. 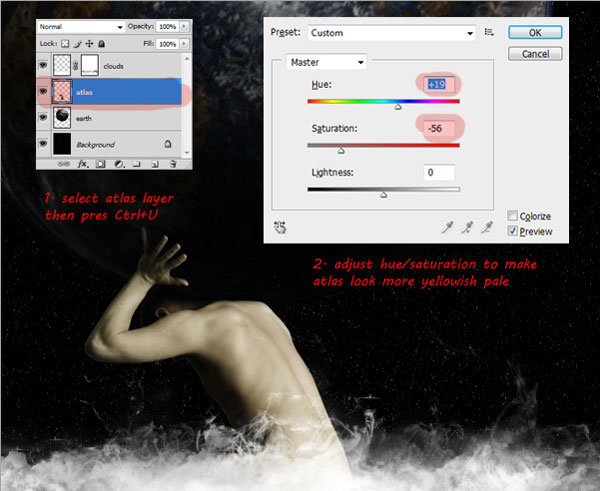 Step 13Open up texture stock, use Rectangular Marquee tool to create selection. Copy selected texture in to atlas illustration. 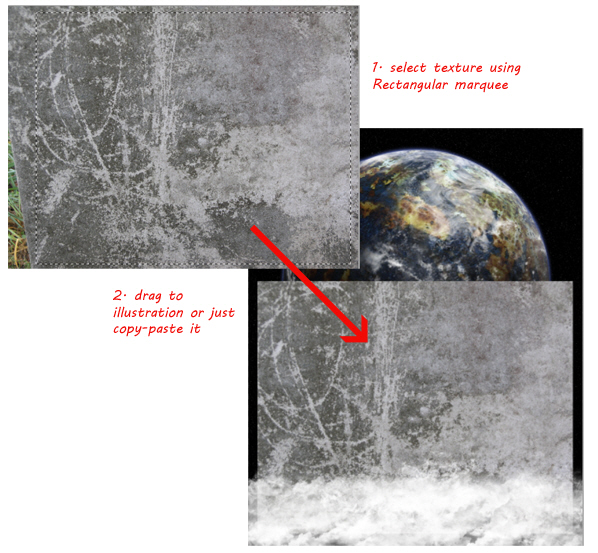 Step 14Place texture between clouds and atlas layer’s. Change its layer name to texture and then press Alt+Cmd+G to make it a Clipping mask. This way the texture will only appear inside of atlas’ body. Change texture layer Blending Mode to Overlay, then press Cmd+T and make it smaller. 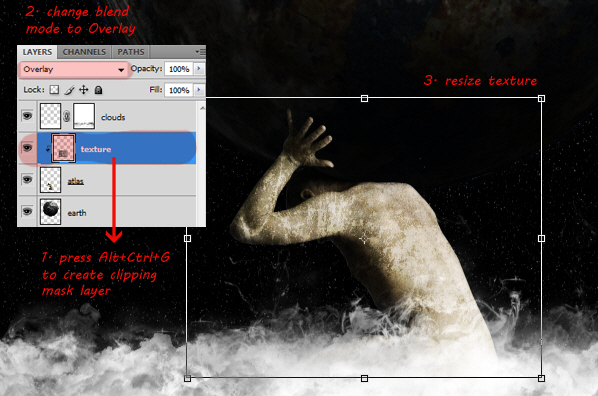 Step 15Open fire stock, create selection using Rectangular Marquee tool. Drag selected fire in to illustration. 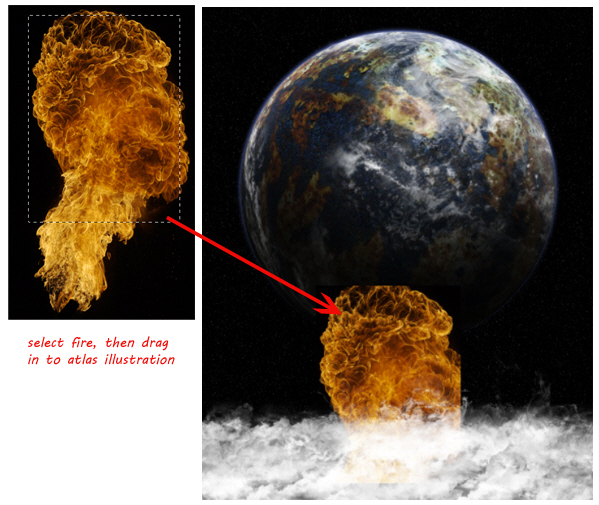 Step 16Place it between texture and clouds layer, then change its layer to a clipping mask by pressing Alt+Cmd+G. Also change the blending mode to Overlay. This should give the texture below it a nice hue. 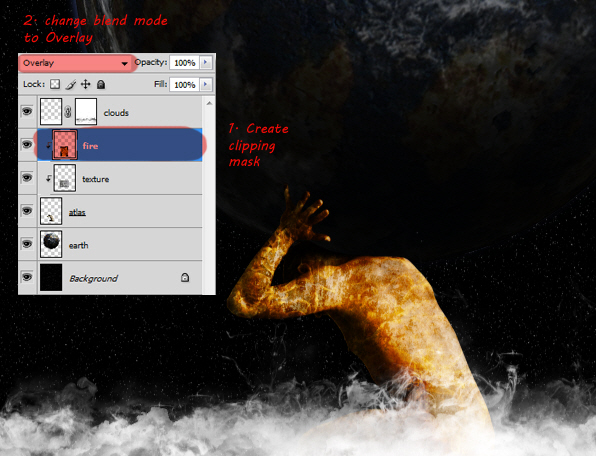 Step 17Add layer mask to the fire layer, then use a Linear Gradient to mask it. This way only half of the fire will be visible.  Step 18Open chain stock. You can use the Pen tool to create a selection path or you can also use quick mask selection using the Brush tool to extract the chain from its background.  Step 19After you are done extracting the chains, copy the selected chains in to the atlas illustration. Make sure that you place it on the very top of layer and name it ‘big chains’. Using free transform command, resize and rearrange the chains to the right of illustration, see image below for more details. 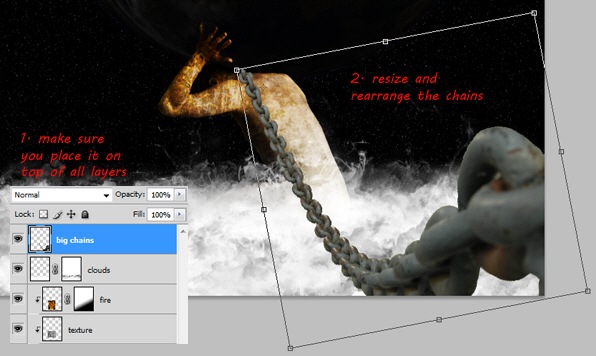 Step 20Duplicate chain layer, then flip it horizontally (Edit > Transform > Flip Horizontal). Drag the flipped chain to left, see image for more details. 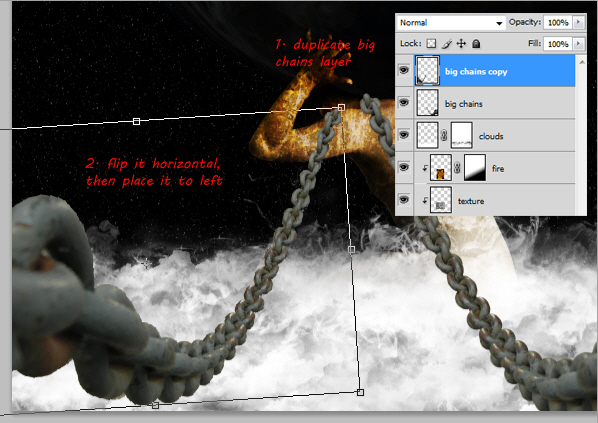 Step 21Open and select texture stock once again, then drag it in to atlas illustration. Place this texture over the first big chain layer. 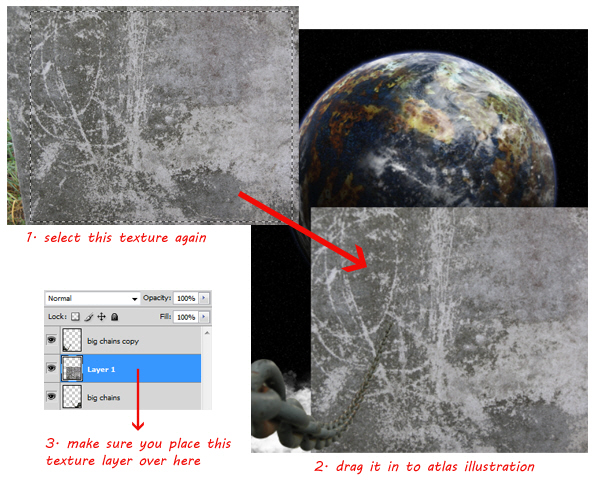 Step 22Make this texture only appear inside chain image by change its mode to clipping mask (Alt+Cmd+G). To blend texture with chains, change the Blending Mode to Overlay. 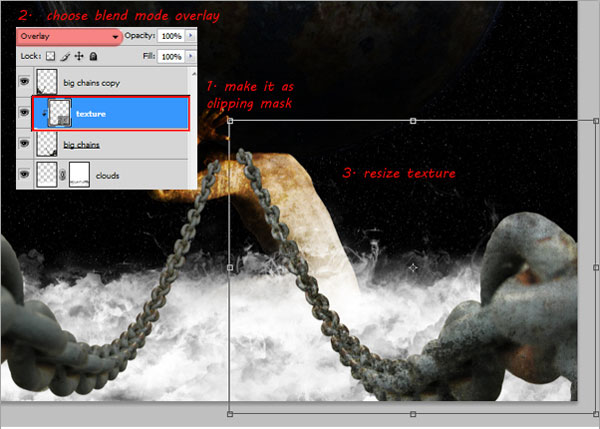 Repeat this process to the other big chains layer. 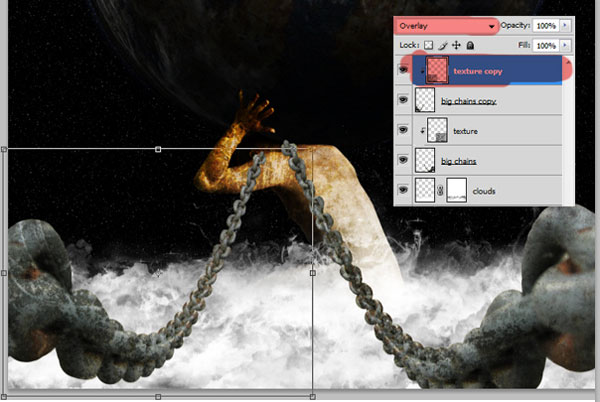 Step 23Open the second chain stock, select chain on the left by using Rectangular Marquee tool and then drag this selected chain in to the atlas illustration. Make sure you place this second chain stock on top of every layer, rename its layer to "small chain." 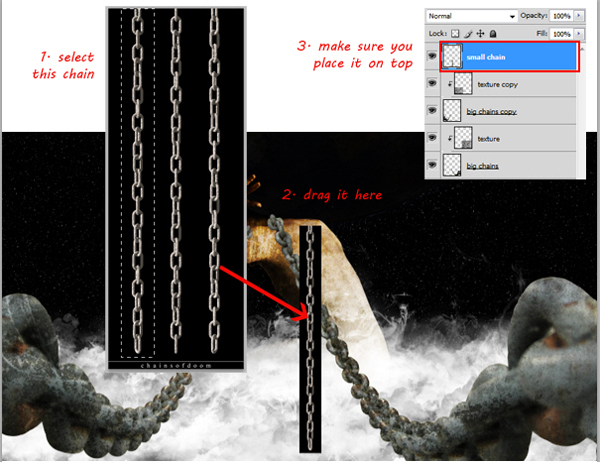 Step 24Use the magic wand to select and remove the black background from the chain. See image below for more details. 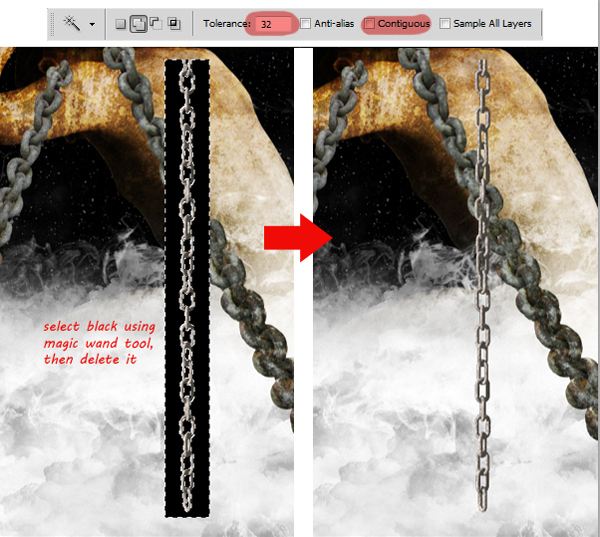 Step 25Rotate this small chain until it appears horizontally. Then use the Clone Stamp tool to extend the length of the chains. 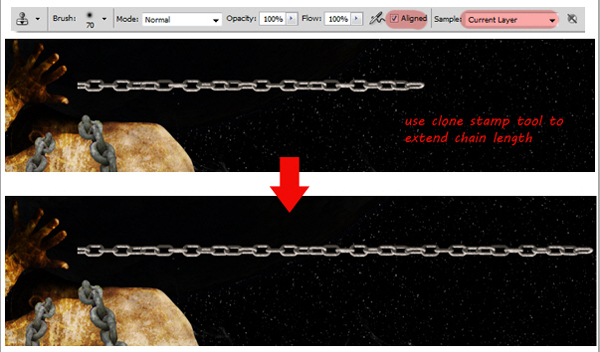 Step 26Press Cmd+J four times, so now you got four new small chain layers, plus one (the original chain layer). Arrange these five chain images like the image below, as you can see, it look like the chain is attached to atlas neck’s. 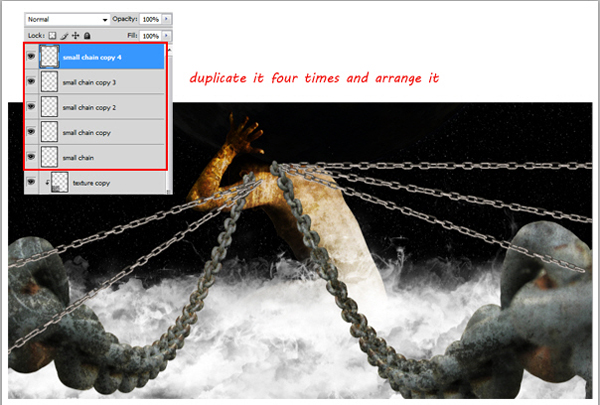 Step 27As you can see, the small chains are covering the big ones. We will fix this later. Select one of the small chain, then go to Edit> Transform> Warp. Drag warp control point to make the chain curve down like the image below. Do this step in each small chain layer until all the small chains are curved. 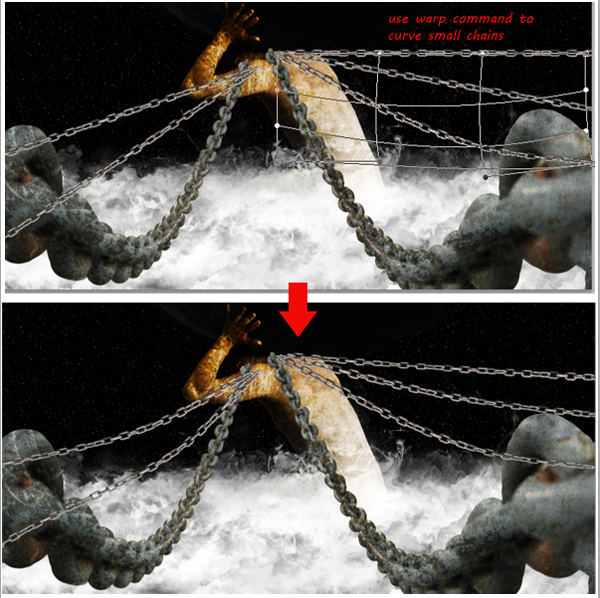 Step 28Use a hard round eraser tool to remove the small chains as shown below. 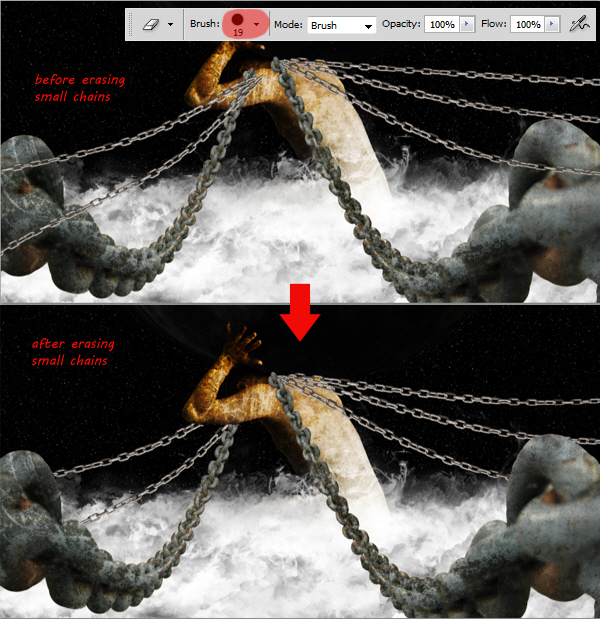 Step 29Now we need to create shadows for the chains to add depth to the illustration. First, we need to select all the chains. Hold Cmd+Shift, then click each related thumbnail layer, see image below for more details.  Step 30Create a new layer below the cloud layer, then fill the selection with black. Press Cmd+D to deselect. Now name this layer shadow. Now rotate this chain’s shadow to the left, so you can see it, it’s also because the light source is from top right corner, so normally the shadow will fall to the left. This also gives depth to the chains. 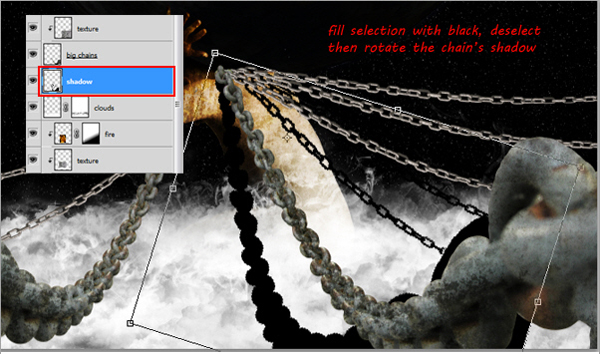 Step 31We need to make this shadow a little blurry, so go to Filter > Blur > Gaussian Blur. Adjust Radius value around 5 to 7 px, click OK to confirm Gaussian blur. Remember, to make it even more blurry you can easily repeat this step by pressing Cmd+F. 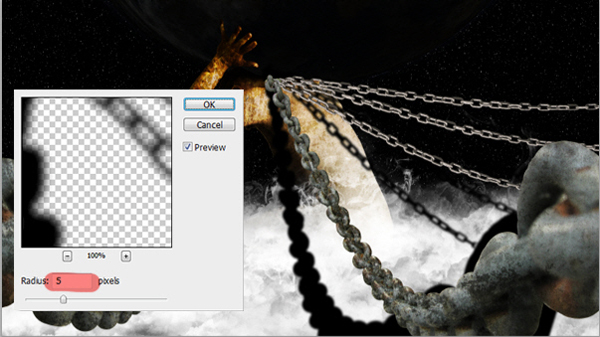 Step 32Still in the same layer, add a layer mask. Use a soft black round Brush with low opacity to mask the shadow, so it looks as if it is fading out. See image below for more details. 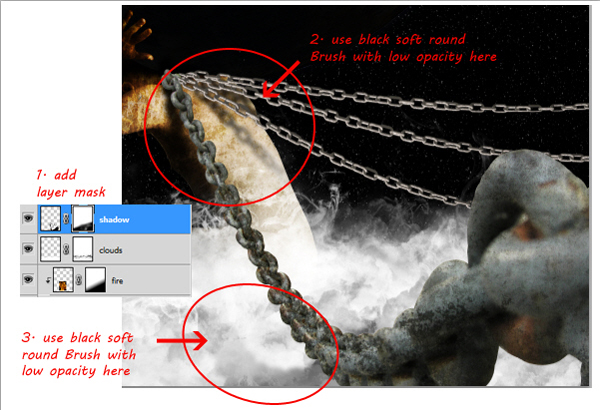 Step 33Repeat steps 29 to 32 to create shadows for the other chains. 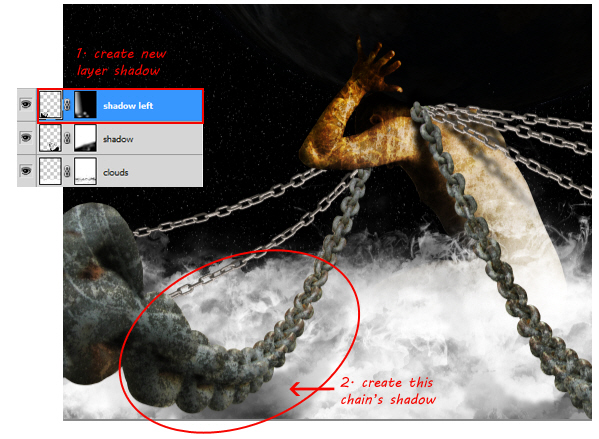 Step 34Now select the topmost layer. Hold Alt, then click menu button, choose Merge Visible. This will merge all visible layers in to a new layer.  Step 35Now go to Filter > Other > High Pass. Adjust Radius value around 1.5 to 2 px then click OK. Change this layer’s blending mode to Overlay. This step will make this illustration look sharper. 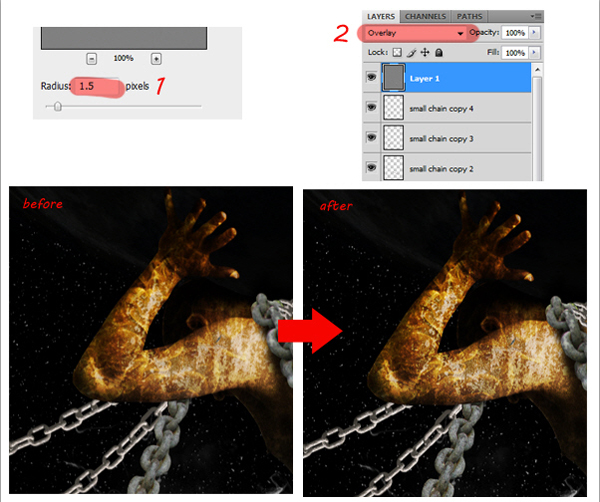 Step 36Add a new layer adjustment, Color Balance, then adjust its value so the entire illustration becomes yellowish. See image below for more details. 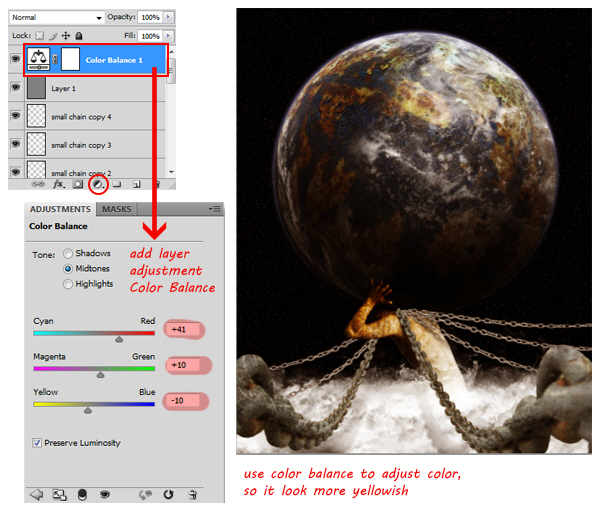 ConclusionTake a look at the final image below. 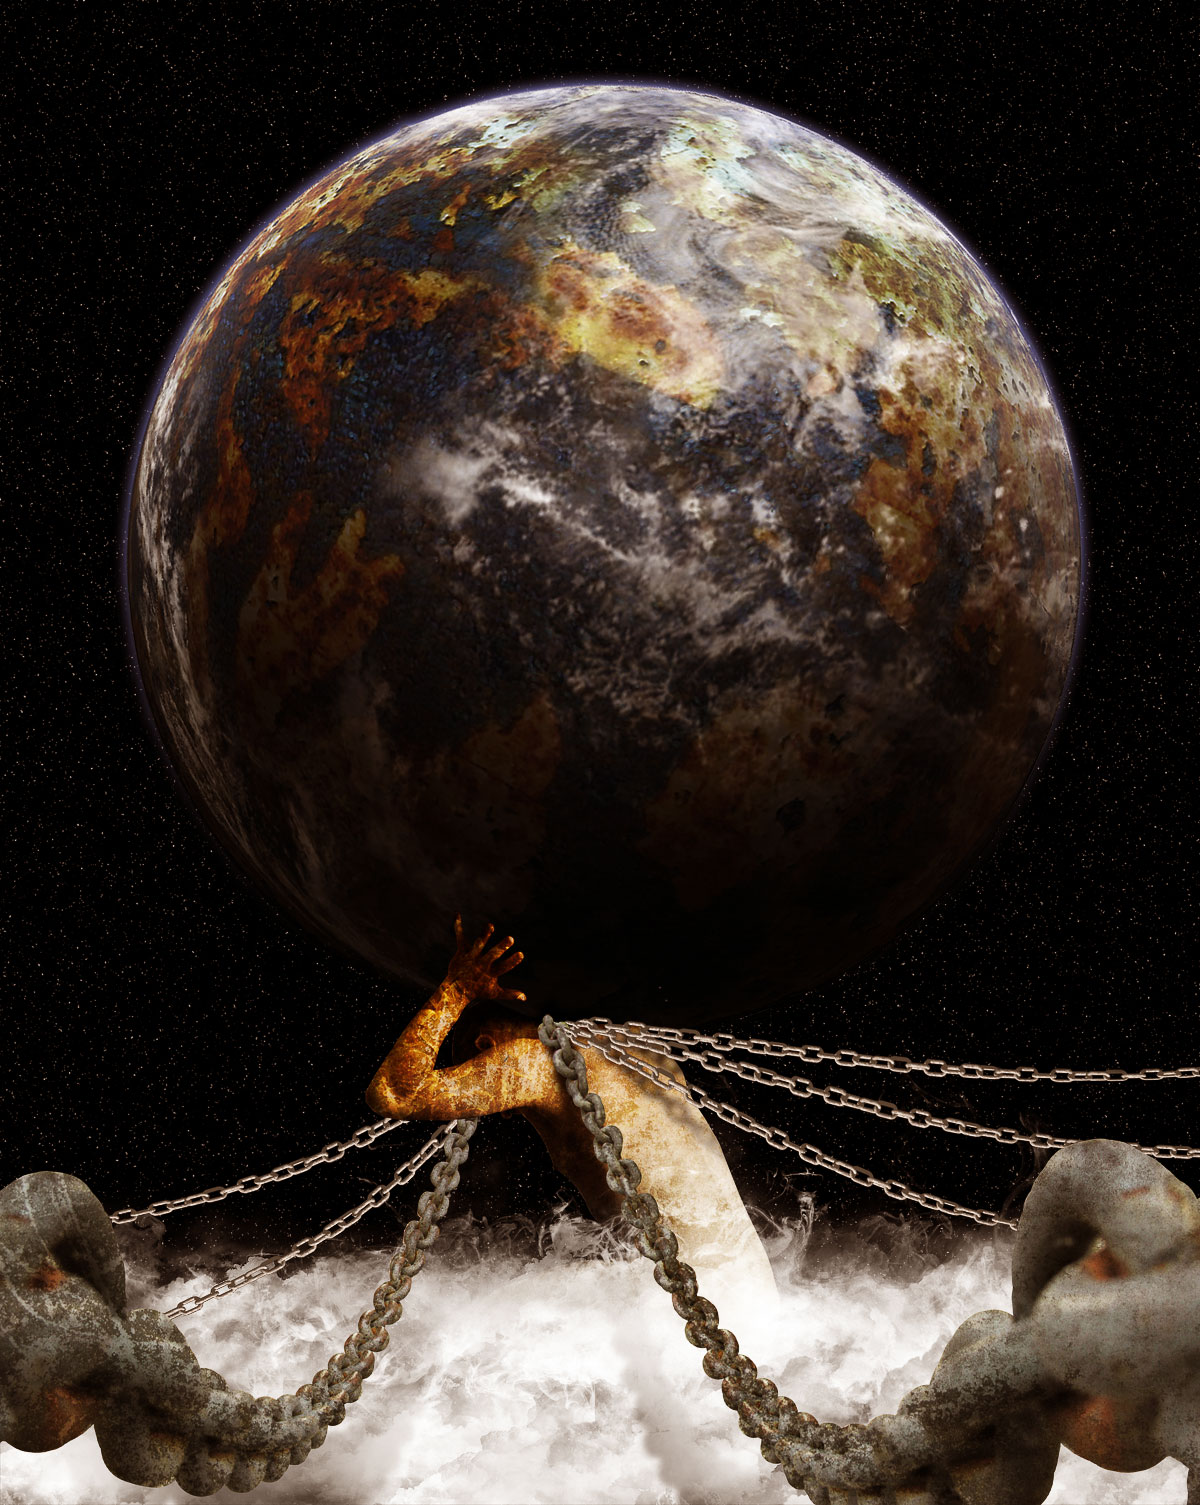
|

| You are subscribed to email updates from Psdtuts+ To stop receiving these emails, you may unsubscribe now. | Email delivery powered by Google |
| Google Inc., 20 West Kinzie, Chicago IL USA 60610 | |
0 comments:
Post a Comment