PSDTUTS Updates |  |

- New Tuts+ Site ‘Mobiletuts+’ Launched
- Quick Tip: Use Photoshop to Turn Day Into Dusk
- Create a Beautiful and Dramatic Scene With Photo Manipulations – Basix
| New Tuts+ Site ‘Mobiletuts+’ Launched Posted: 13 May 2010 12:39 AM PDT We’ve been burning the midnight oil at Tuts+ HQ to bring you Mobiletuts+, the youngest member of the Tuts+ family. It's all about quality tutorials for mobile developers – all mobile developers, regardless of preferred platform. Topics will include native development with the iPhone, Android, Windows and Blackberry platforms, cross-platform development with tools like Titanium and Phone Gap, and techniques for building mobile web apps and mobile accessible web sites with HTML 5. Visit Mobiletuts+ or read more after the jump. Whether you want to create the next killer app or become a pioneer of the mobile frontier, we've got you covered! In addition to publishing top quality tutorials, articles, and Quick Tips, Mobiletuts+ will be the first Tuts+ site to offer regular multi-media updates on the hottest mobile industry news. We will also be publishing interviews with successful mobile developers to provide you with the most effective real-world development techniques and strategies.
No problem! Mobiletuts+ will grow with its users. Initially we’ll be publishing lots of content on the fundamentals, like our first tutorial: An Introduction to iPhone SDK Development. We’ll be hitting all the major mobile development platforms with our introductory content, then moving on to the more advanced stuff. If you’re a veteran mobile developer, stick with us! The advanced goodness is almost ready to rumble. Meet the Editor, Mark Hammonds
 Contribute!If you think you have the skills to create screencasts, written tutorials, articles or Quick Tips for Mobiletuts+ it's easy to familiarize yourself with the guidelines and become a tutorial author. We're hungry for user contributions and pay a negotiated USD rate for each tutorial, article or Quick Tip we publish. Submit your concept today!
|
| Quick Tip: Use Photoshop to Turn Day Into Dusk Posted: 12 May 2010 09:30 AM PDT Taking photos at night is not an easy task. Photos taken without adequate lighting often look dim or grainy; they typically don’t look the same as what we see with our own eyes. That is why it is sometimes easier to convert a daytime photo to night using Photoshop than it is to try to take the same photo in the evening hours. In today’s tutorial we will demonstrate a quick technique to make your photos look as if they were taken at night. Let’s get started!
Original ImageBefore we begin, let’s take a look at the original image that we will be working from. 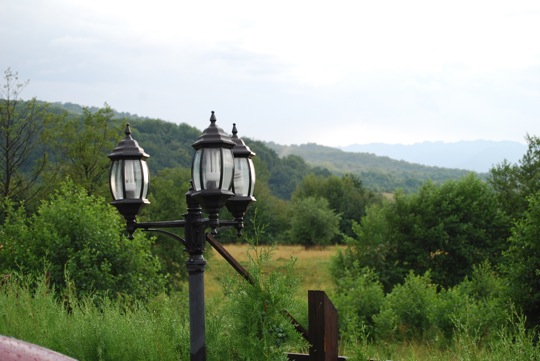 Step 1Open your image in Photoshop. Now create a duplicate of the Background layer. Next we’ll be creating the filter stack which will help us preserve the picture’s details while darkening it. Now convert the duplicate layer to Smart Filters (Filter > Convert for Smart Filters) so that we can edit the filters whenever we need to. Step 2This image shows the Filter Gallery with a stack of filters in the lower right panel of the window. This is just an example of how a filter stack looks like – some of you probably didn’t even know that you can do this. We’ll be creating our own stack in a minute. 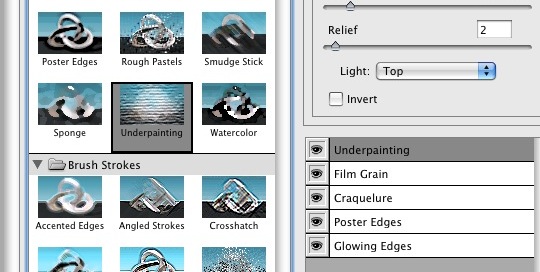 Step 3Now, open the Filter Gallery (Filter > Filter Gallery) and we’ll begin making the filters stack. As a note, you could also do this by applying individual filters on the layer, stacking them in the Layers Palette, but I prefer to use this approach because I think it’s quicker this way, and probably because it has a lower impact on memory usage as well. Next, make sure you clear the stack if you have used it before by clicking the Trash icon at the bottom of the stack panel until you only have a filter left in the stack. 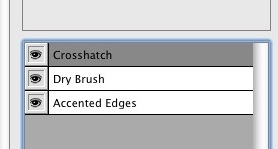 Step 4It’s time to get messy. For the first item in the stack, choose the Accented Edges filter from the Brush Strokes category. This will accentuate the picture’s edges, preserving its details while darkening. The values used are as follows: Edge Width: 2, Edge Brightness: 38, Smoothness: 5. Step 5Next, add a new item in the stack by clicking on the button next to the Trash icon you clicked earlier to empty the stack. This will duplicate the first filter and will be added above it. Now choose the Dry Brush filter from the Artistic category, and give this filter the following values: Brush Size: 6, Brush Detail: 9, Texture: 1. This will help us darken the photo. Step 6Finally, add a last item in the stack – Crosshatch from the Brush Strokes category, with the following values: Stroke Length: 9, Sharpness: 6, Strength: 1. This last item will sharpen the other two filters. Right now, it doesn’t look very promising (check the image below), so we need to fix this. Make sure the smart filter layer is selected and from the Blending modes choose Linear Burn, and then give it a 40% opacity. 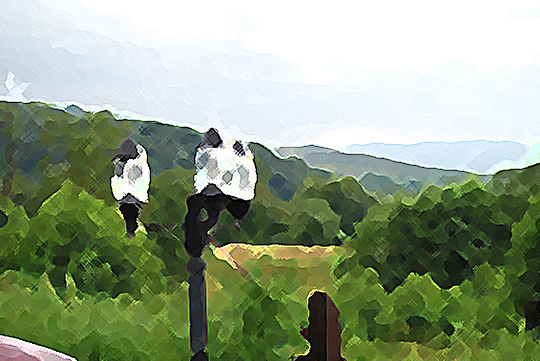 Step 7Now it looks better, but it doesn’t look much different from the original. But after applying some adjustment layers, you’ll see that these filters have a big impact on making it look like it was really shot during the evening. The first adjustment layer that we’re going to create is Brightness/Contrast. Give it a brightness of -50 and a contrast of 0.  Step 8Next, add a Hue/Saturation adjustment layer with a saturation of -20 (the other two controls must be 0). Now add an Exposure adjustment layer with an exposure value of -0.45, an offset of 0 and make sure Gamma is set to 1. Step 9Wait, there’s something more to add. Add a Vibrance adjustment layer with a vibrance of +20 and 0 saturation. Finally, add a Levels adjustment layer, then select the Red level from the Levels dialog and give it the following values: 0, 0.91, 255. Do the same thing for the Blue level with these values: 0, 0.79, 255. The final result is below!  Additional ExampleIn this example I’ve used a value of 40% for the layer’s opacity. This value of 40% will be used for large images and landscape pictures (and I’m not referring to the page orientation). In case of a portrait or a small picture, you should use a value of 15%.  Before applying the effect.  After applying the effect. Download the ActionWe have provided the action for this tutorial in the Extras folder for this tutorial’s download which is available exclusively to Psd Premium Members.
|
| Create a Beautiful and Dramatic Scene With Photo Manipulations – Basix Posted: 12 May 2010 06:15 AM PDT Today we will learn a number of techniques to help you add drama to a photo manipulation. We will to do this by learning how to combine two pictures to create a picturesque background, how to draw long hair manually using Photoshop brushes, as well as how to add some adjustment layers to add dramatic effects to the final image. Let’s get started!
Resources
Step 1Create a new file, size 1600 px wide and 2122 px high at a resolution of 300 pixels/inch. Paste field to new file. 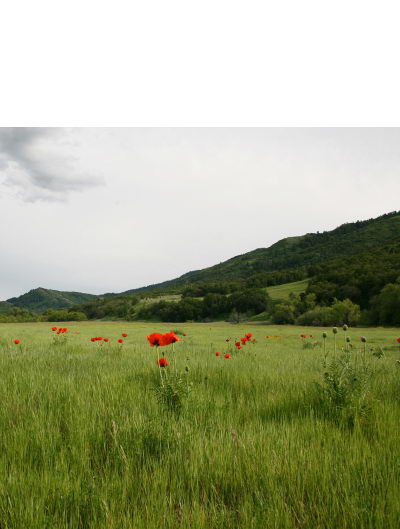 Step 2Add layer mask. Activate gradient tool. Draw linear gradient from black to white. 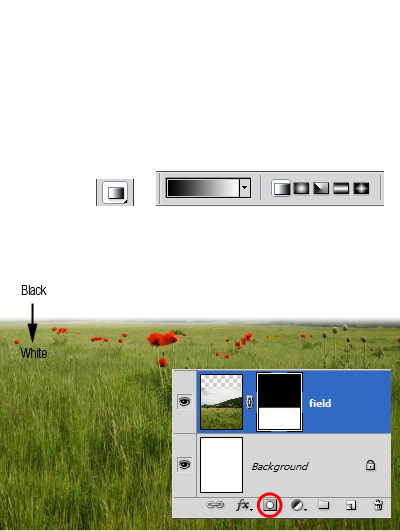 Step 3Zoom in until you can see all the details. Paint unneeded background with black to remove it. 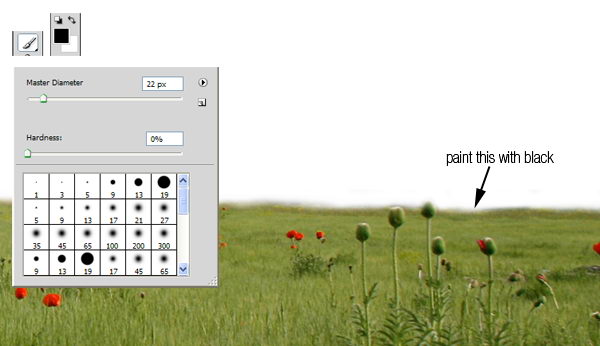 Step 4Paste sky underneath field layer. The colors will not match the field so we will have to fix it. From the adjustments panel click Color Balance with setting shown below. 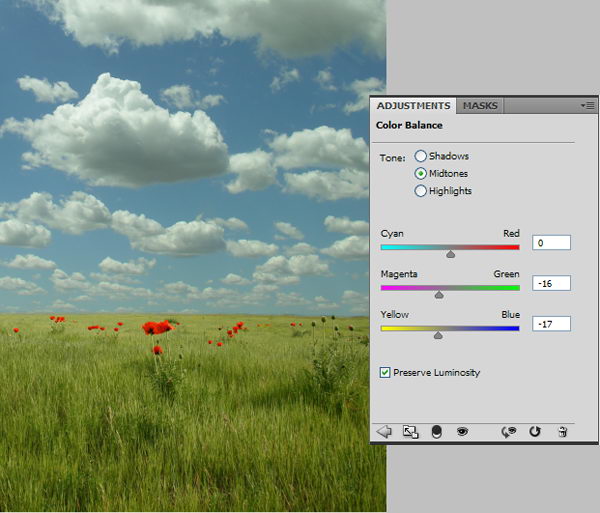 Step 5Download the girl picture. Create new path and with pen tool draw path around her. Avoid selecting her hair. We’ll just recreate it in a few steps. 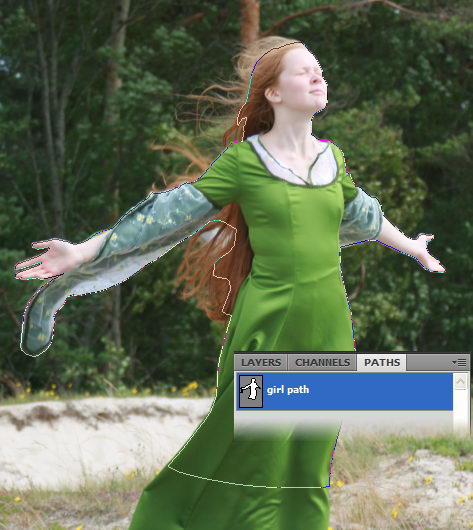 Step 6Hit Cmd+Enter to convert path into a selection. Copy the girl and paste it into the new background. Press Cmd+T for transformation and while holding shift drag its corner until she is the appropriate size. 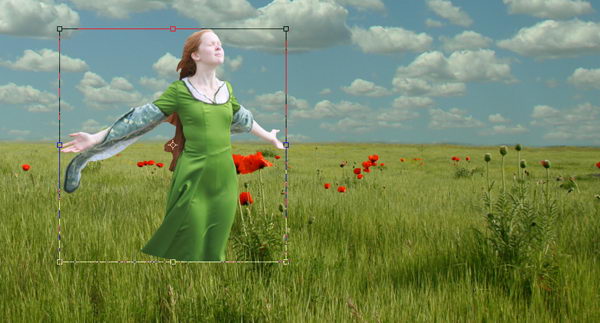 Step 7Before we proceed with this tutorial, we will need to fix some small details. She has transparent sleeve and it has to reveal some background behind her. To do this, add layer mask, select soft brush with low opacity (10-20%), then paint it with black. 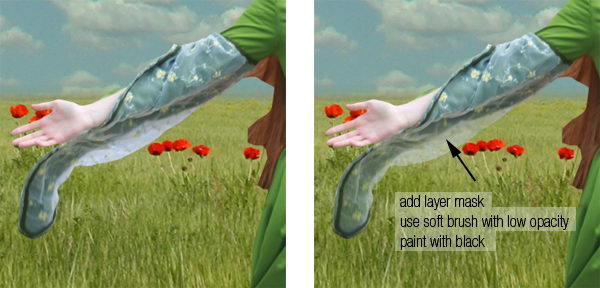 Step 8Activate field layer. Select some field behind her. Hit Cmd+J to duplicate it to a new layer. Then hit Cmd+shift+] to move it to the top layer. 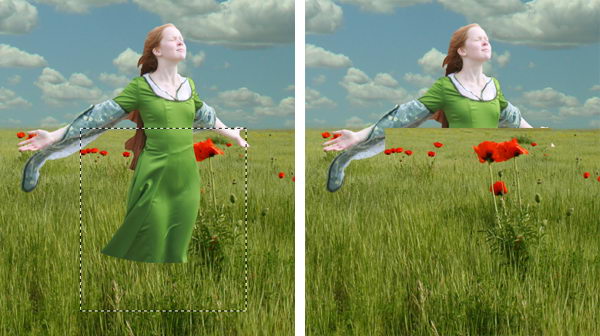 Step 9Add a layer mask to the new field. For masking grass, Photoshop has a very useful brush in its default set, named Dune Grass. So, right click and select it. Remove the check mark in front of Color Dynamics. Next, make sure your foreground color is set to black and layer mask is selected. Start painting until the girl looks like standing in the middle of the field. 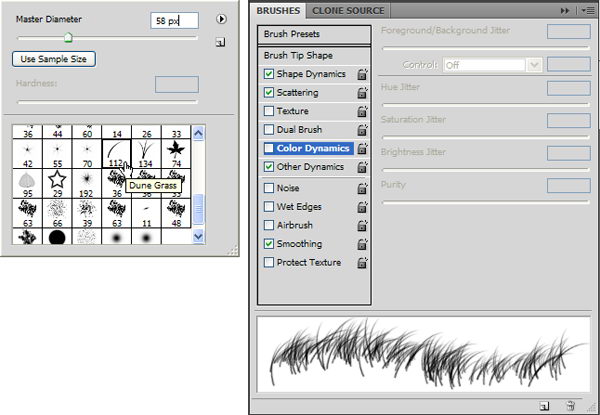 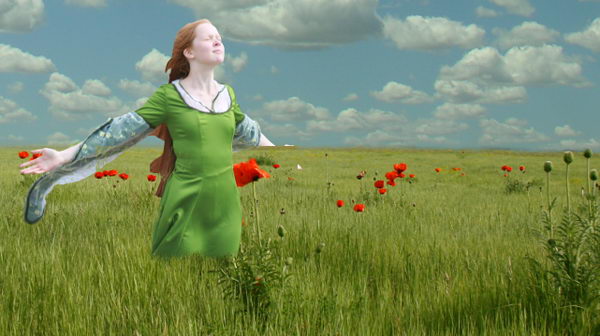 Step 10To strengthen the illusion that the girl is standing inside the field, it’s a good idea to have something in front of her. Change our brush to standard round brush, paint some flowers with white to reveal it. 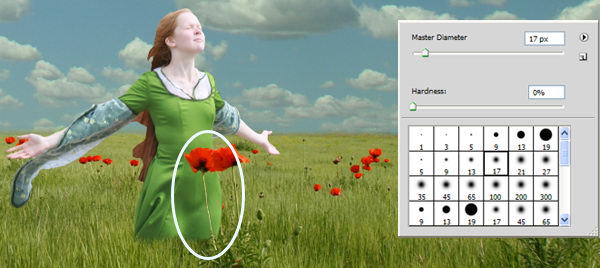 Step 11Now let’s draw her hair. But before doing that, make sure the layer mask is active. Paint her hair with black using a soft, low opacity brush until it is transparent. 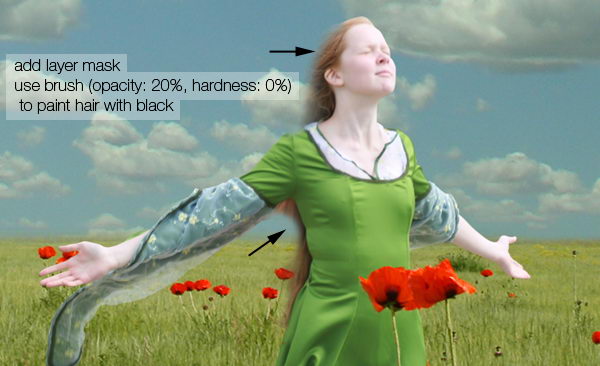 Step 12Load the hair brush set. This set consisted of some long premade hairs. Using the brush tool, Cmd+click her hair to sample its color. Open brush panel (F5), click and drag the inside preview box to rotate brush tip. Once you’ve found perfect size and position click to draw an instant long hair. To get a natural color, be sure to sample various color from the hair. Repeat this step until you have enough hair. 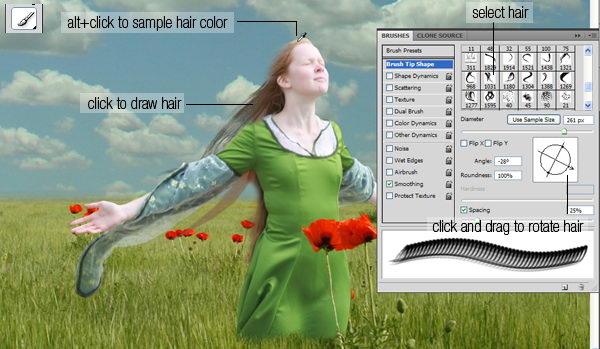 Step 13After step 12 you may find that the result isn’t entirely realistic. If you look closely you may find that there are repeating objects in her hair. This is a common problem when using premade brushes. The best way to avoid this is by drawing some hairs manually. Grab the hair brushes set from here. Lower your brush opacity to 15-25%. If you use a tablet, then that’s a good thing. You can activate its Pen Pressure from the Brush Panels. Manual painting is not easy. It may help to work with a lot of layers. That way you can always delete layers that you don’t like. Below are the steps I took while creating the hair.  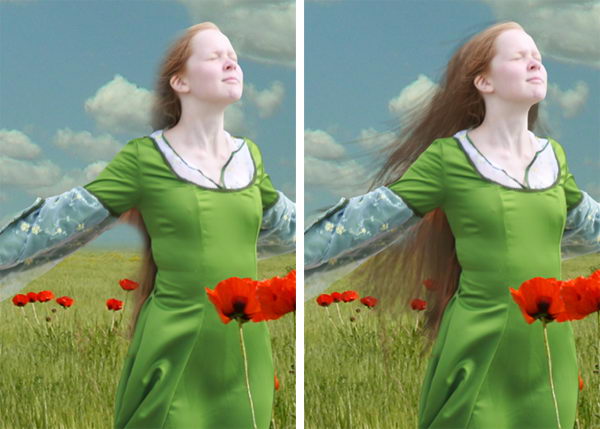 Step 14Now, we need to add some lighting to the girl. To do this we’ll use non-destructive dodging and burning. Hold cmd and click New Layer icon. Choose Use Previous, Mode: Overlay, and Fill with. Activate burn tool, set opacity to 20% and start painting to make her darker. Do the same with the dodge tool for opposite effects. Remember, if you hold alt while dodge tool selected, then you’ll have burn tool. Same thing happen to burn tool. 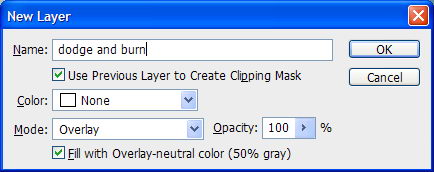 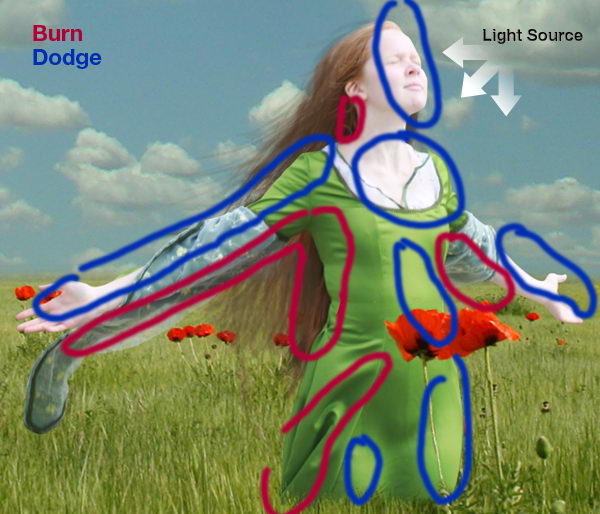 Step 15Now, I’ll add dark border around the image. Hit ctrl+A to select all. Click Edit > Stroke. Use very large width and click OK. Soften the border using Gaussian Blur with a very big radius. 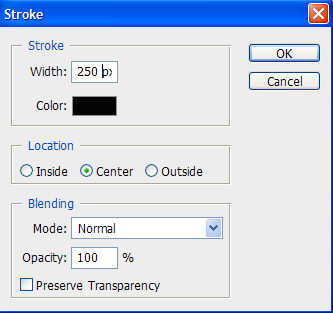 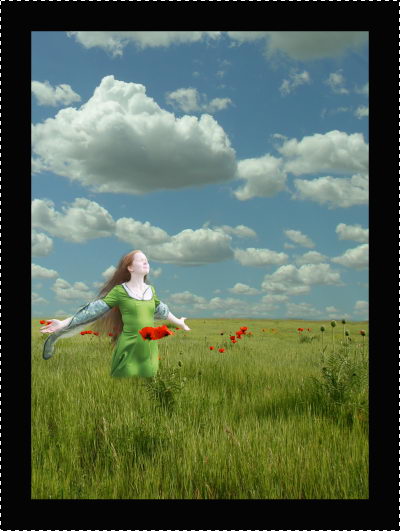  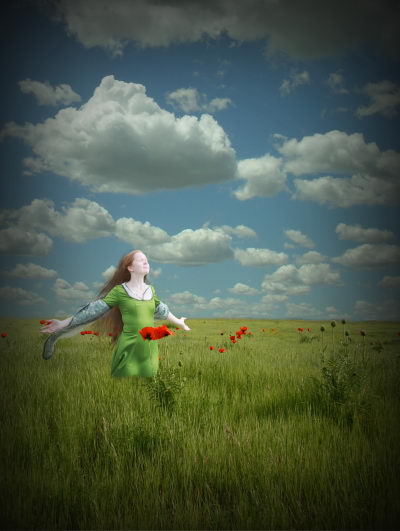 Step 16Hit ctrl+T. Hold ctrl and drag its corner until you find nice lighting. 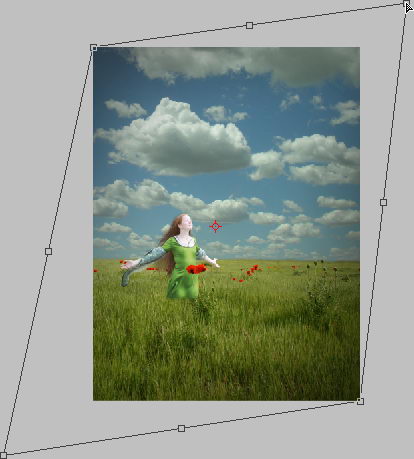 Step 17To add fake light draw a poligonal selection and fill it with white. Add very big Gaussian Blur and lower down layer’s opacity to 30%. 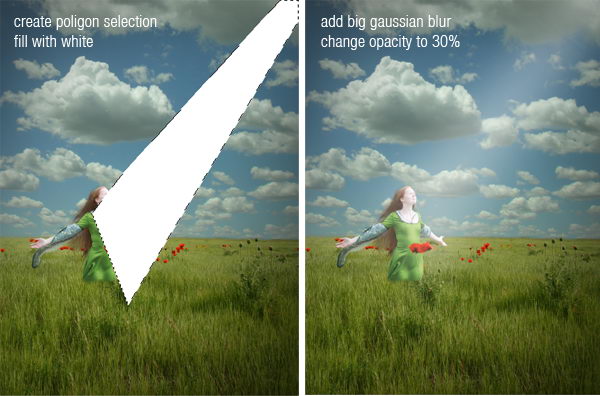 Step 18Draw the girl’s shadow on the field. 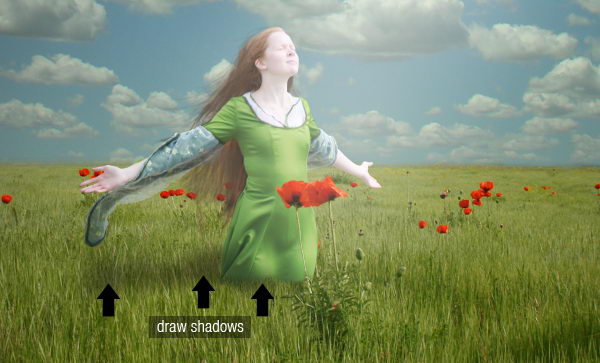 Step 19Grab the butterfly set. The butterflies are already in a transparent png file, so you just need to select it and drag it to the image. Resize it to match its proportion. Don’t forget to add shadows for a realistic look. 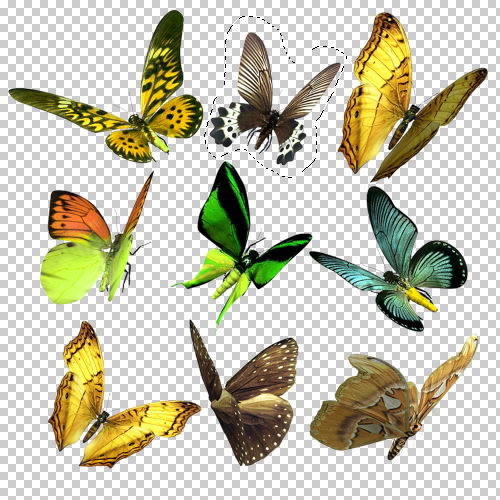 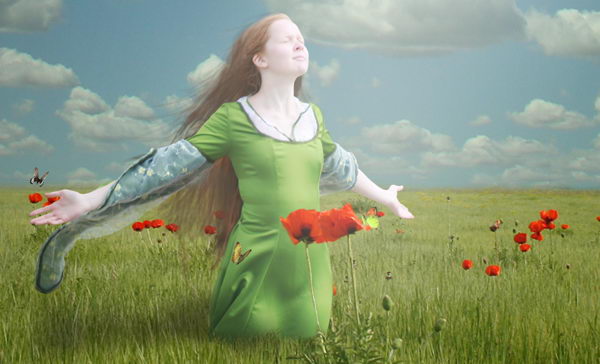 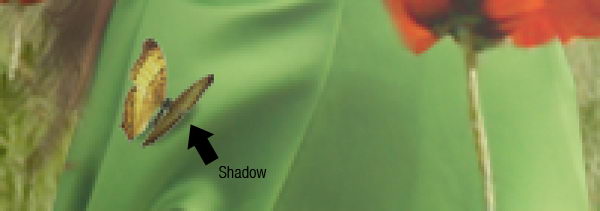 Step 20Load the floral brushes. Try to experiment with the brush shape. Combine them to get a unique shape like I did here, then add some text in the English font found from dafont. 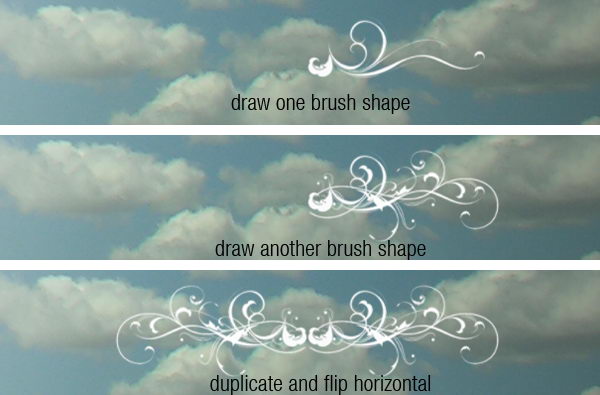 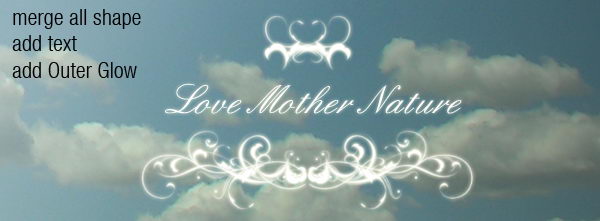 Step 21For final adjustment, select the sky layer and use Brightness/Contrast to raise its Lightness. I also added an adjustment layer Photo Filter with a warming filter on top of the image. 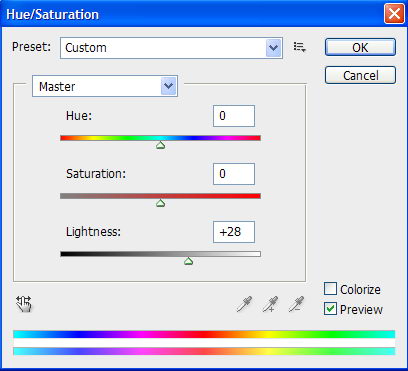  ConclusionI hope you have enjoyed this tutorial and learned something new. You can view the final image below or view a larger version here. 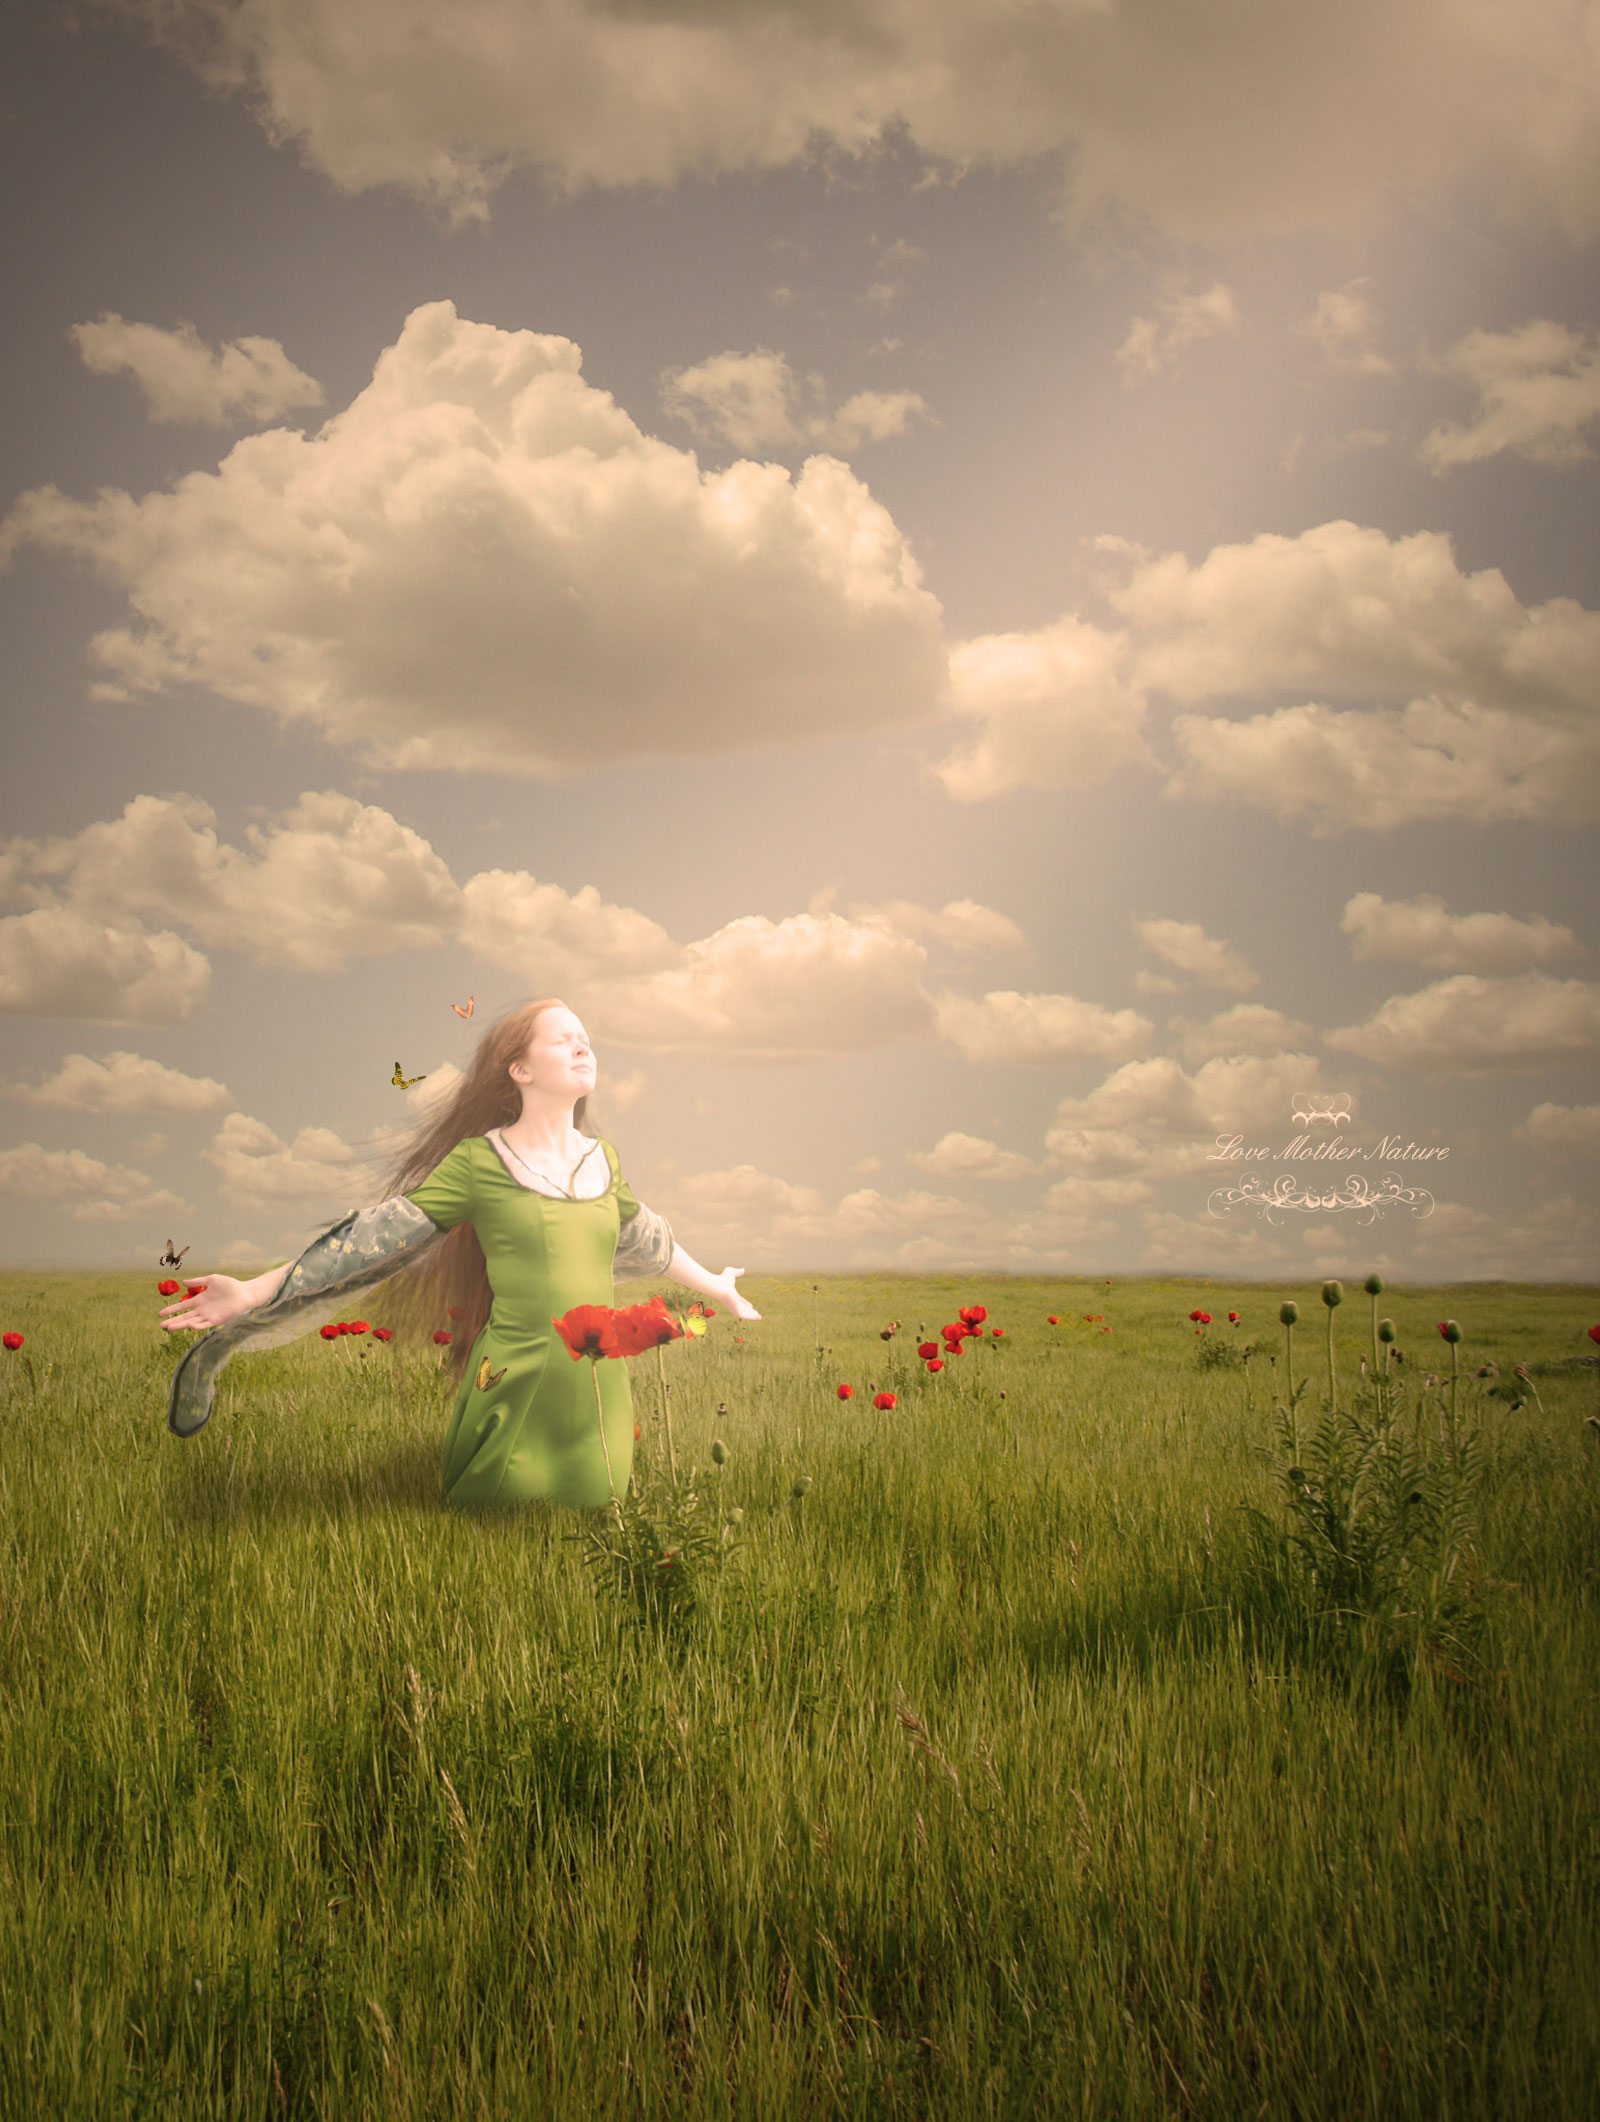
|
| You are subscribed to email updates from Psdtuts+ To stop receiving these emails, you may unsubscribe now. | Email delivery powered by Google |
| Google Inc., 20 West Kinzie, Chicago IL USA 60610 | |
0 comments:
Post a Comment