PSDTUTS Updates |  |

| A Comprehensive Guide to Photoshop’s Liquify Tool Posted: 20 May 2010 09:30 AM PDT
The Liquify filter may be one of the most commonly used filters in Photoshop’s arsenal. The Liquify filter allows us to distort the pixels in a given image without losing quality. Some designers are a bit intimidated by the Liquify filter, others may use in improperly. Today, we will explain the features of this very powerful filter in detail so you can use it in your work.
What is it?From photo retouching, to artistic effects, the Liquify filter is a powerful tool for every Photoshop user. This filter allows us to push, pull, rotate, reflect, pucker, and bloat the pixels of any image. Today, I will show you the basics of this filter. Grab a bunch of images to practice with and let’s get it started! The Liquify filter may be applied to any bitmap Layer but unfortunately cannot be applied to a Smart Object. You can access the Liquify Filter window by clicking Filter > Liquify, or by pressing Shift + Command (Ctrl) + X on your keyboard. Once the filter is open, you’ll see a window with the following areas:
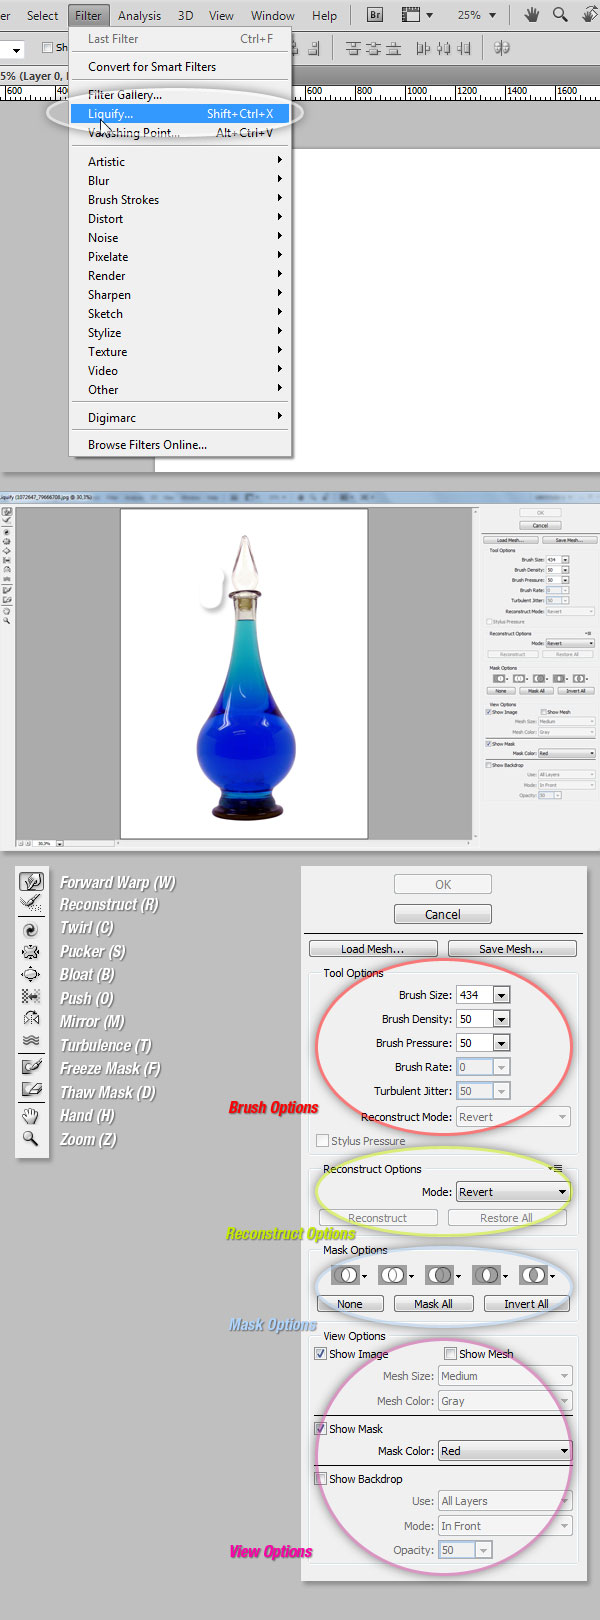 ToolsForward Warp Tool (W)The most basic tool that you may use is the Forward Warp, basically pushes the pixels of the image forward as you drag. You can control the amount of pixels pushed by changing the brush size in the Brush Options on the right panel. The larger the brush the more pixels will be pushed forward. Once you apply this effect, you must click on the OK button on the right panel to commit the changes. 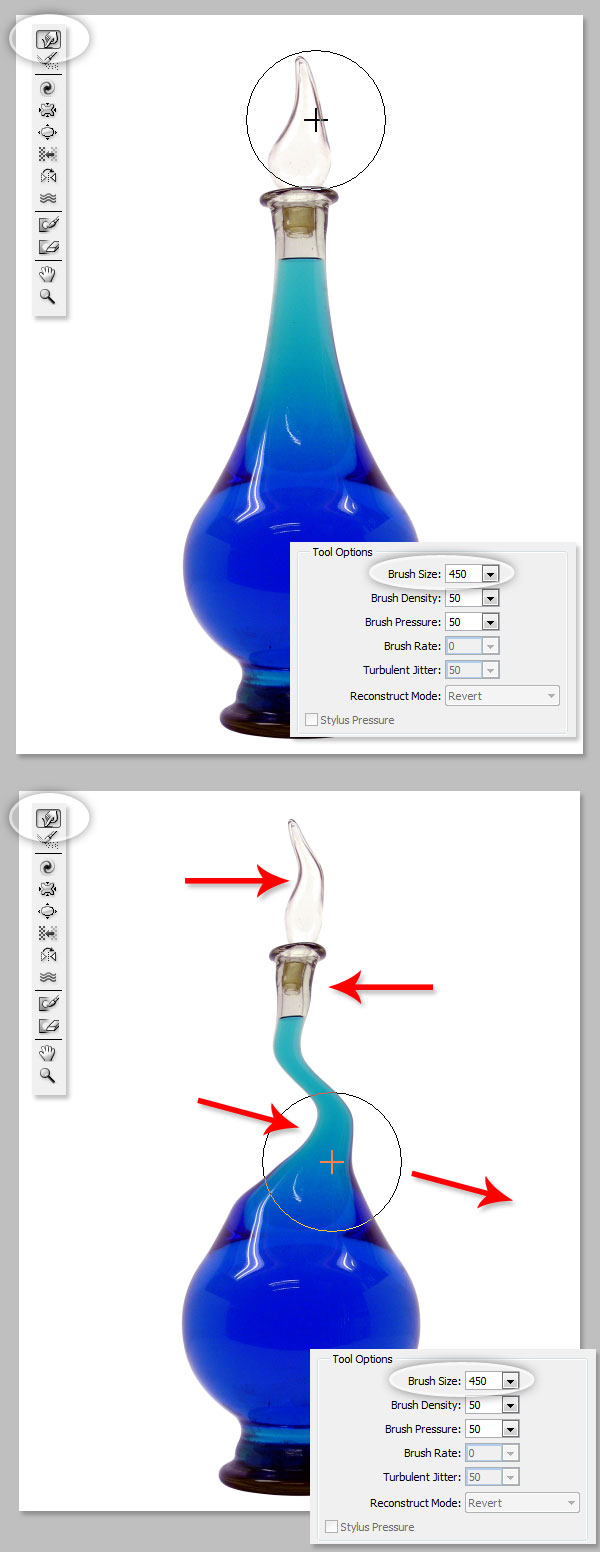 Brush DensityThis value controls how a brush feathers on the edge, by default a Liquify effect is stronger in the center of the brush and softer on the edges, you can increase the Brush Density value from 0 to 100. The larger the value, the stronger the effect on the brush tip’s edges. 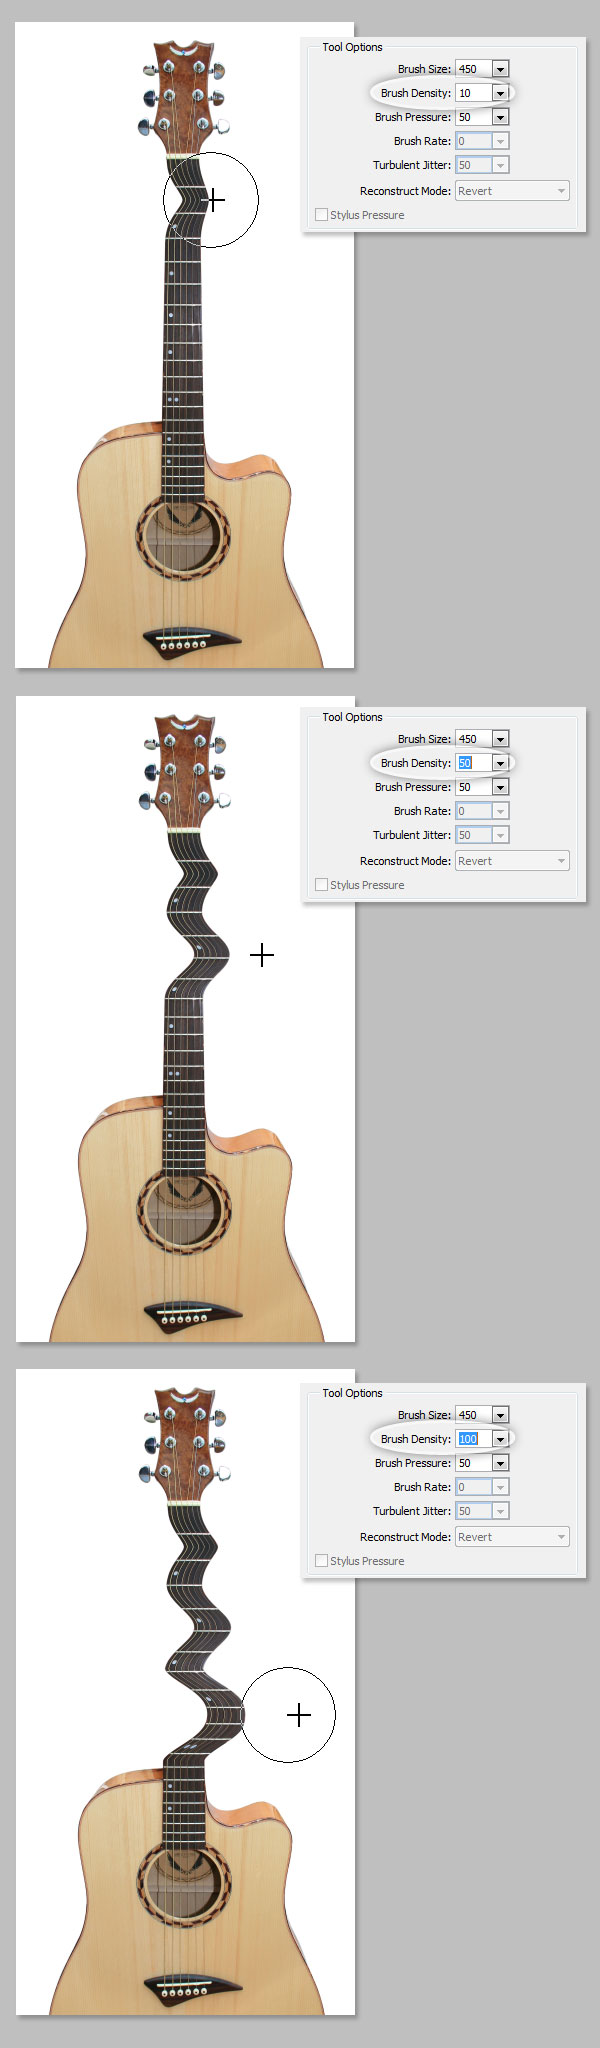 Brush PressureThis value controls the speed at which distortions are made when you drag the brush. This value can be set from 0 to 100, being 0 the lowest pressure and 100 the highest. Using a low brush pressure makes changes occur more slowly, so it’s easier to stop them at exactly the right moment. 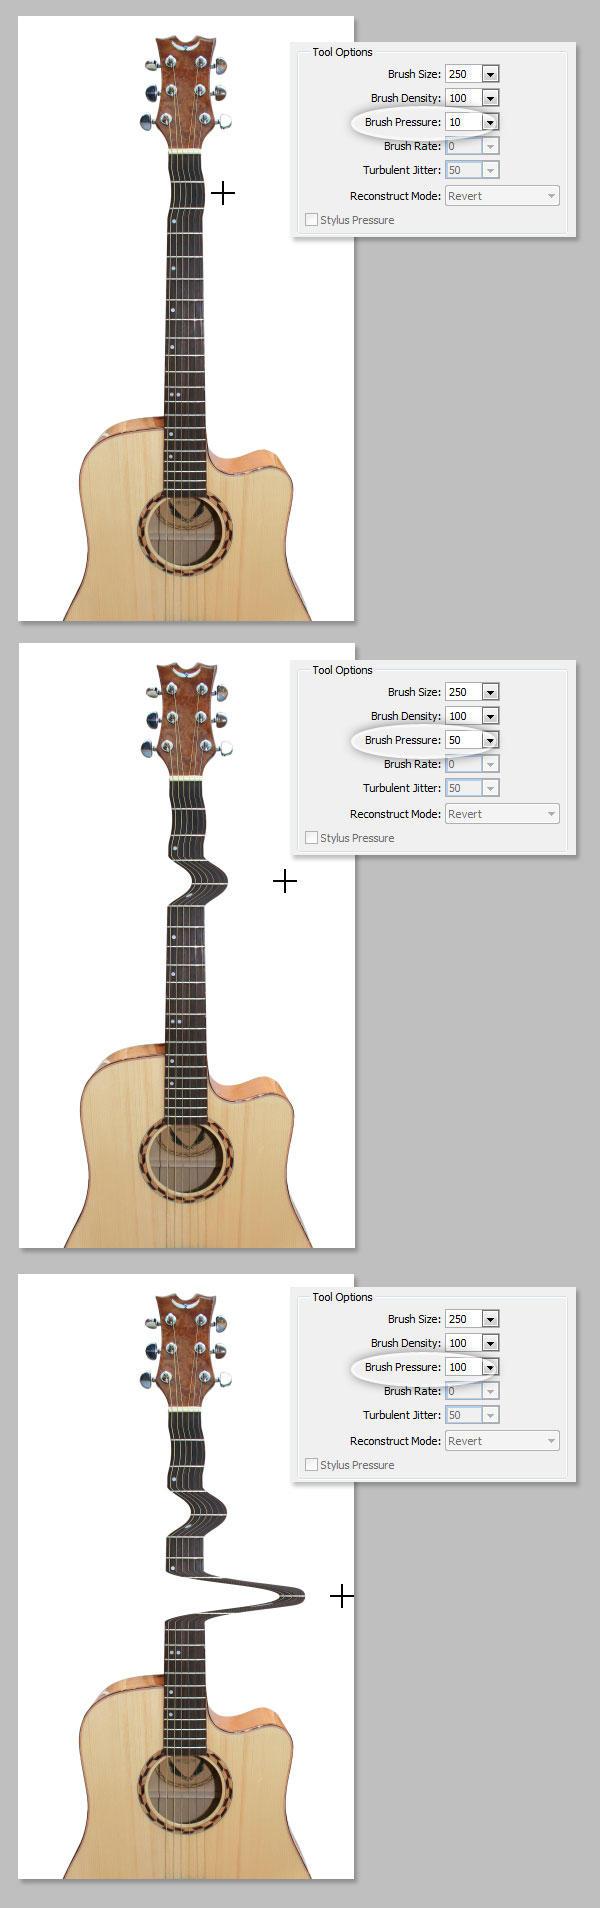 Twirl Tool (C)This filter rotates pixels clockwise as you click or drag, in order to Twirl pixels counterclockwise, just hold the Option (Alt) key while you’re clicking. The Brush Rate value comes in handy here, it controls the speed which distortion is applied while the mouse is still stationary, the higher the number the faster the effect. 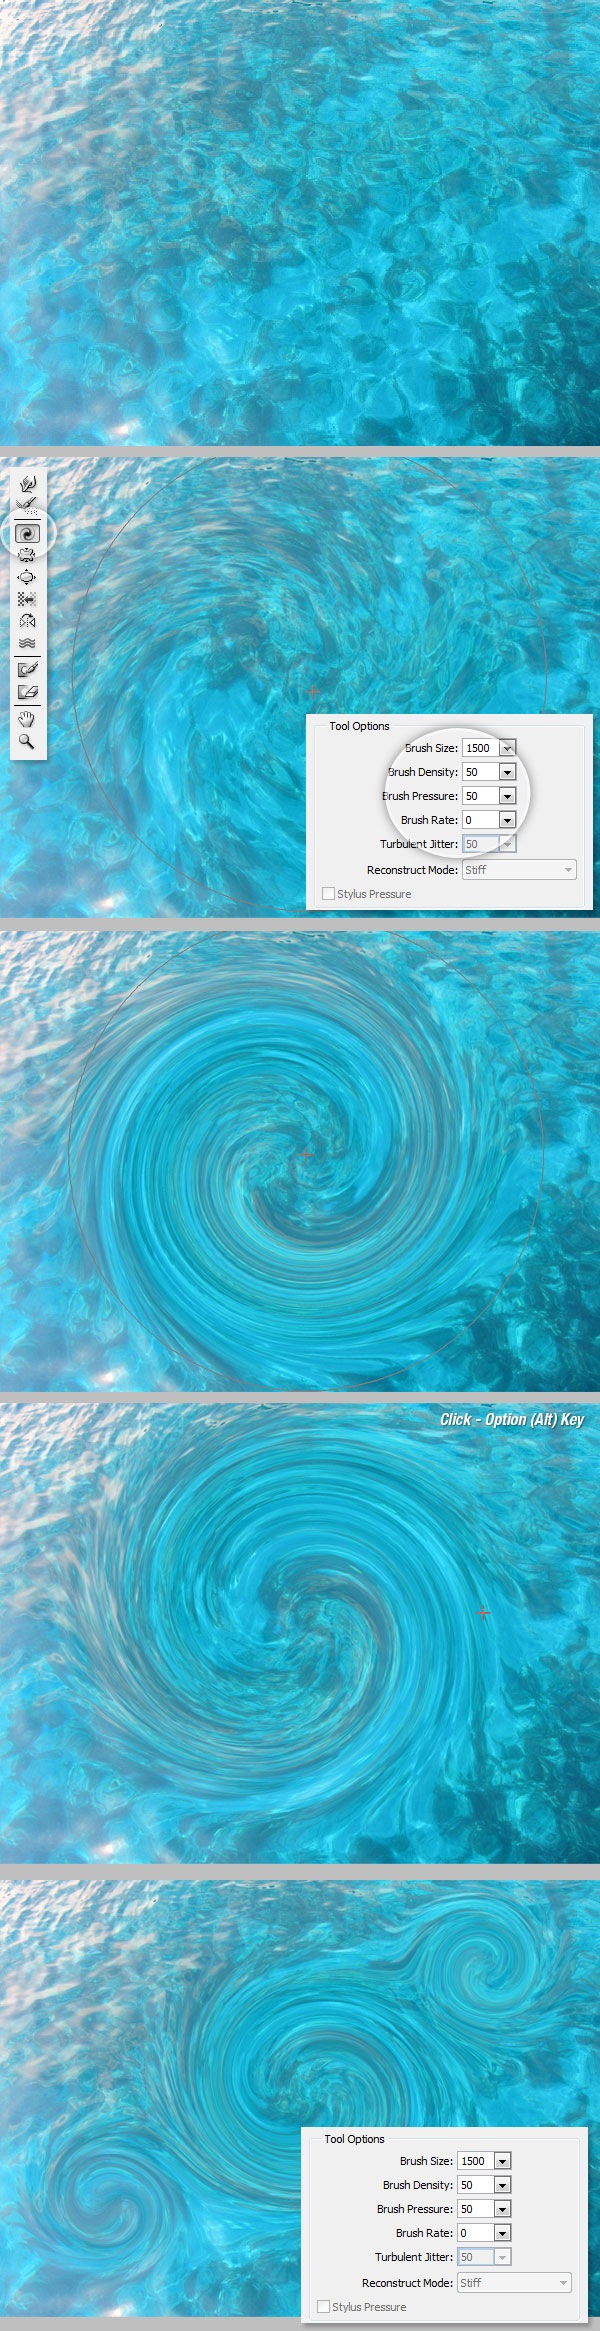 Pucker (S) and Bloat (B) ToolsThe Pucker Tool moves pixels towards the center of the brush area and the Bloat Tool moves pixels away from the center as you click or drag on the image. This is pretty useful when you want to inflate or deflate something. 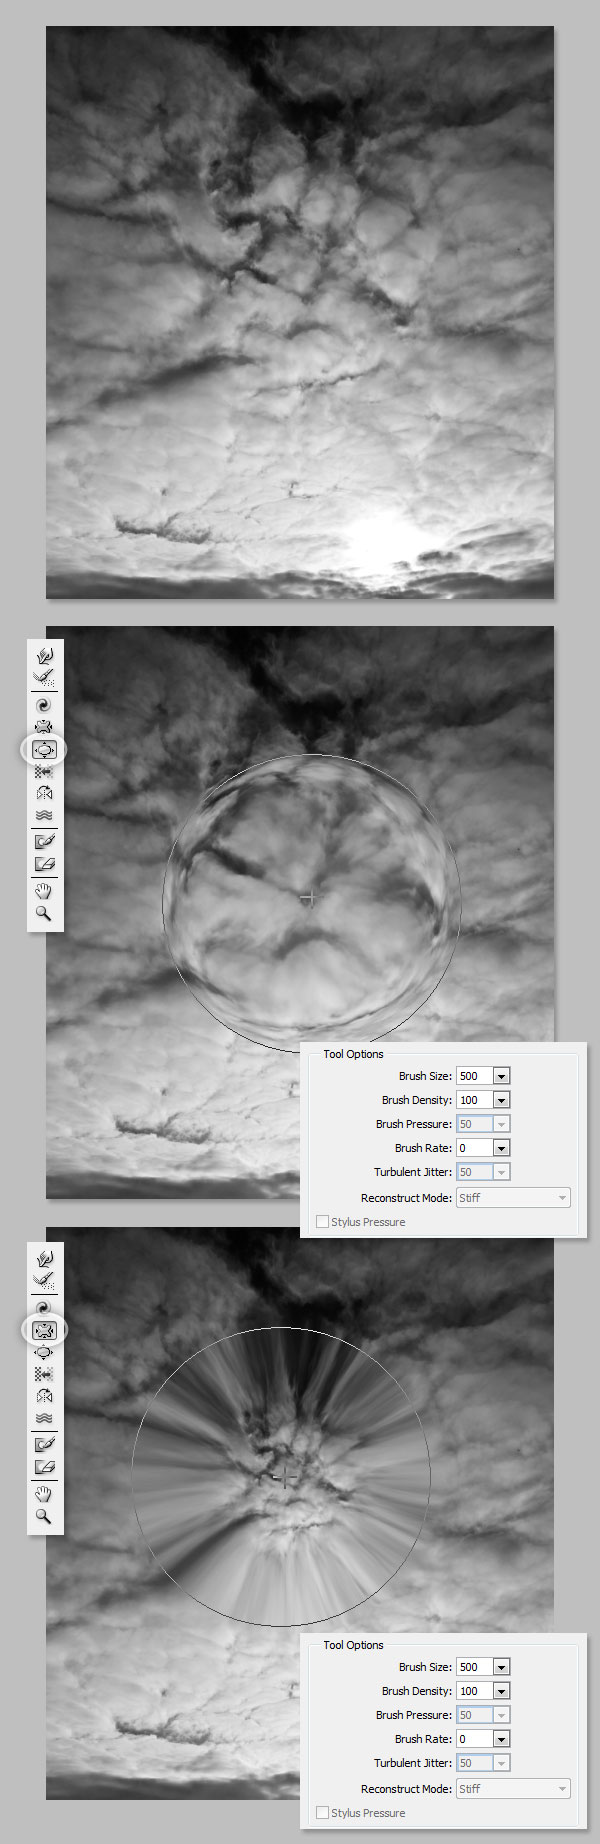 Push Tool (O) VerticalThis tool moves pixels to the left when you drag the tool up and to the right when you drag it down. You can also drag clockwise around an object to increase its size, or drag counterclockwise to decrease its size. To invert the direction (left or right) hold down the Option (Alt) key as you drag.  Push Tool (O) HorizontalMoves pixels up when you drag the tool left to right, and down if you drag right to left.  Mirror Tool (M)This tool works exactly like a mirror. The pixels perpendicular to the direction of the stroke will be duplicated depending on the stroke direction the mirror pixels could be below (left – right stroke) or above (right – left). This works much better if you make horizontal or vertical parallel strokes. Hold the Option (Alt) key while drag will invert the reflected pixels’ source to the opposite angle. 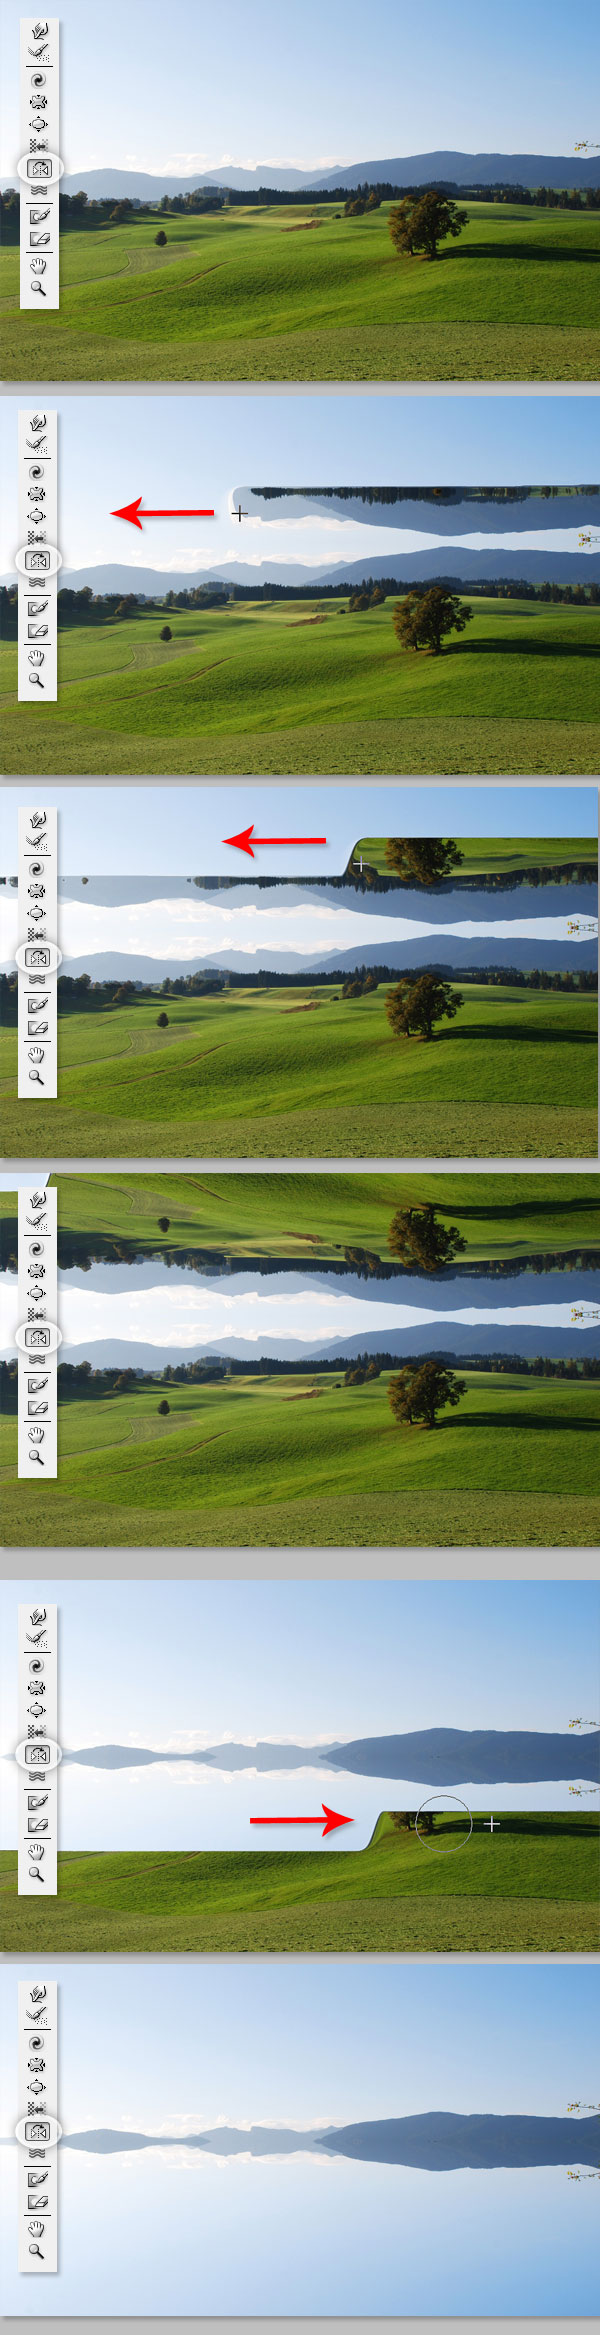 Turbulence (T)Smoothly scrambles the pixels while dragging. With this tool you might find the Turbulent Jitter value very handy; a high number here means a lot of turbulence.  Masks – Freeze and Thaw MasksYou can protect some areas of the image from changes by using a Freeze Mask. In the Tool bar, click on the Freeze Mask button and paint the areas you want to keep unchanged. The Thaw mask works just like a mask eraser. Use this tool like the other Liquify tools; you can control the brush’s Size, Density and Pressure. After Masking an area and applying it, the masked area will remain unchanged.
Mask OptionsThe mask Options panel, at the right side of the Liquify window allow you to choose Selection, Layer Mask, Transparency, or Quick Mask to create masks on the image. You can also edit previously created masks as well by choosing Replace, Add, Subtract, Intersect or Invert.  Reconstruct AllAfter distorting, you may need to reconstruct some areas here and there. There are many creative ways to reconstruct the distortions with the Liquify filter. The simplest way to do this is by clicking the Restore All Button on the Reconstruct Options Panel. 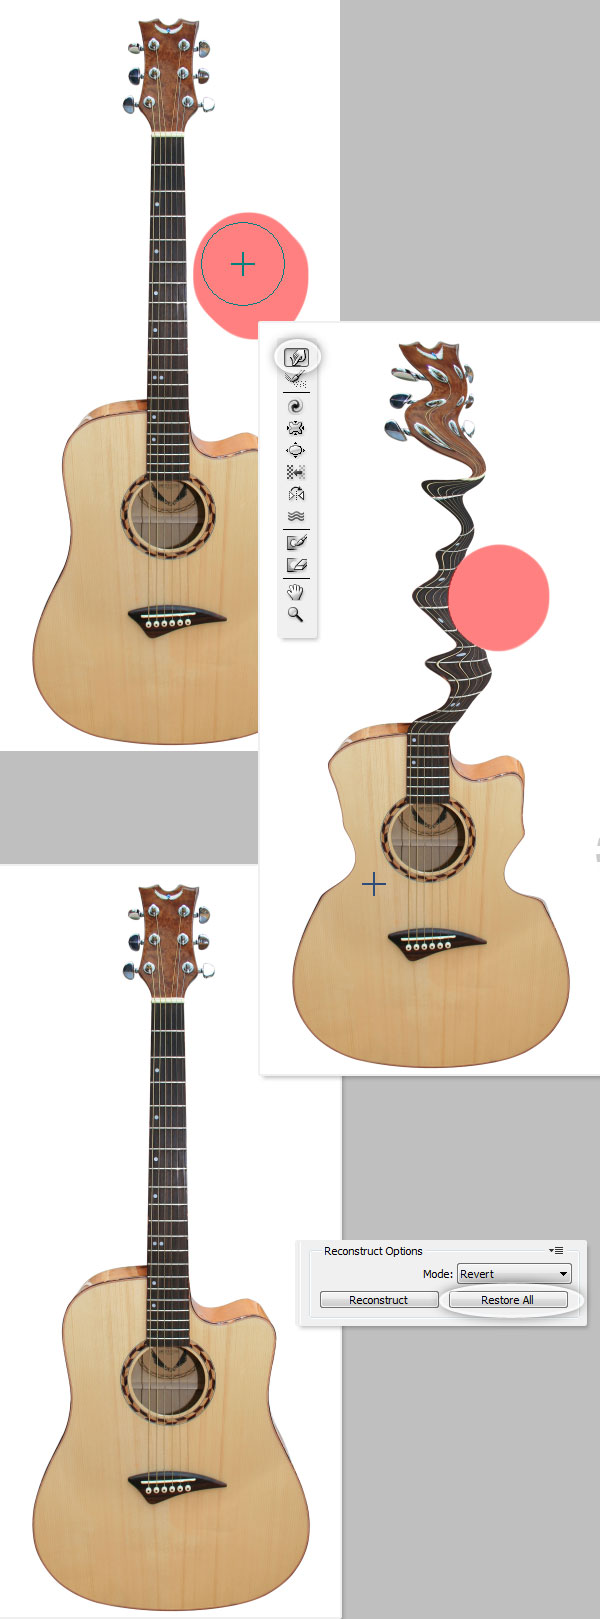 Reconstruct Tool and Reconstruct OptionsThe Reconstruct Tool allows you to use a Brush to reconstruct certain areas of the previously distorted image. By default the Reconstruct Mode (at the Reconstruct Options panel on the right side) is Revert, which means the image will return to its original state. There are many other options with different behaviors depending the distortion position relative to a frozen area. These options are very interesting but a little complicated, so we will leave them for another (more practical) tutorial. 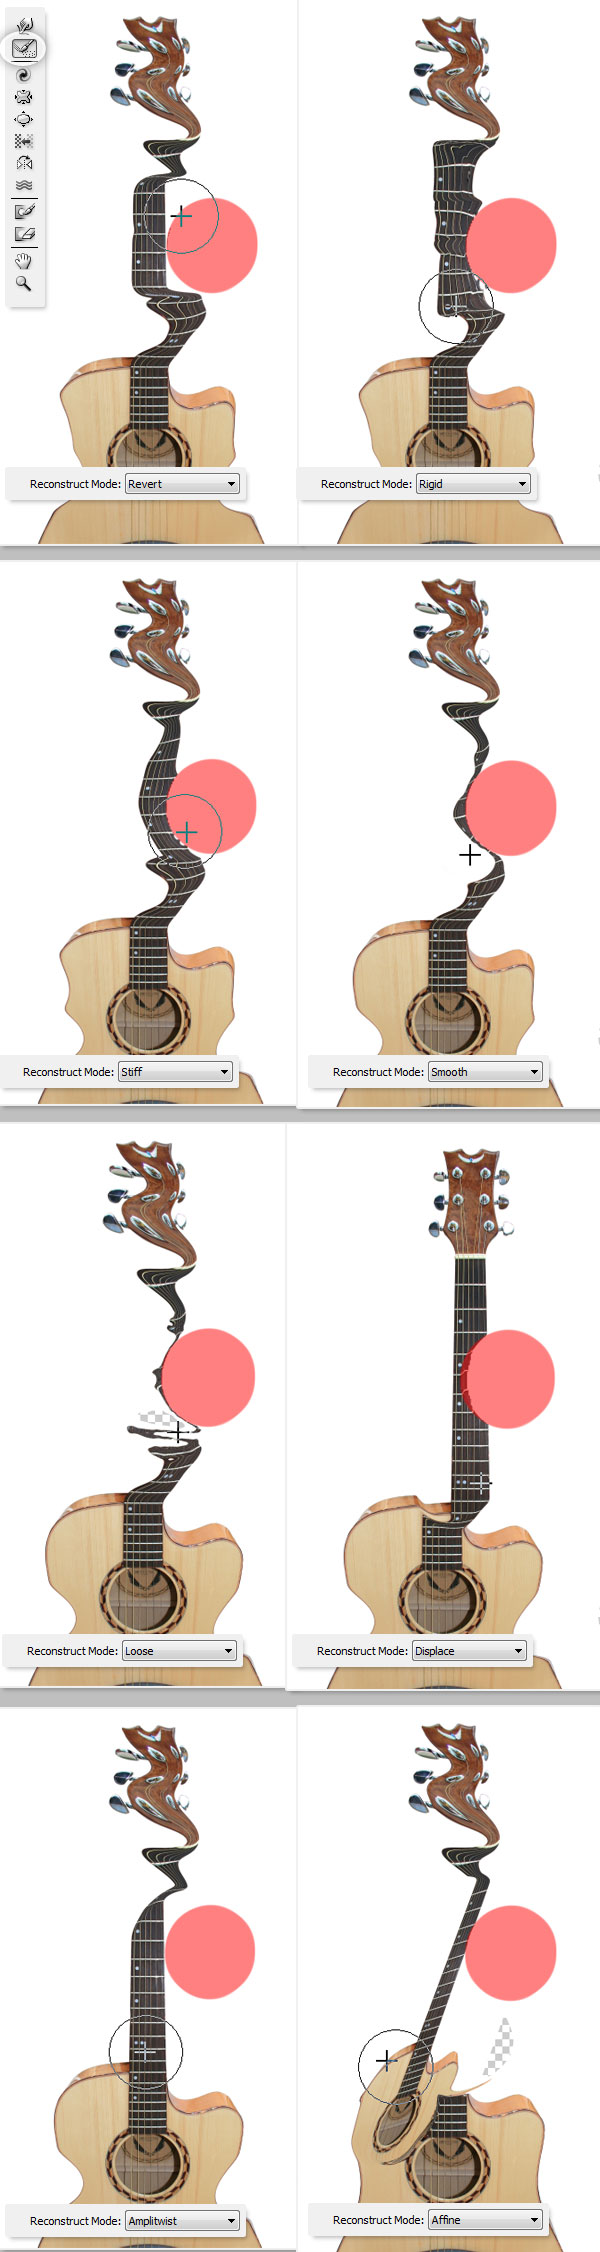 Auto ReconstructOn the Reconstruct Options Panel, there’s a button labeled Reconstruct. By pressing it you can auto reconstruct the image using one of the options on the list. 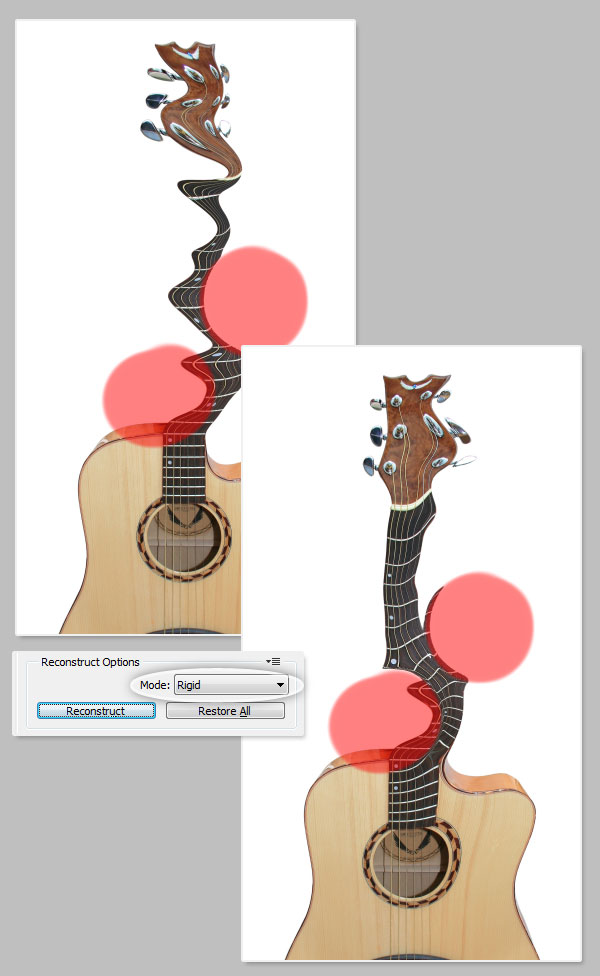 View Mesh and MasksThe Mesh is a bi-dimensional grid than can be shown or hidden in the View Options Panel. You can increase or decrease the Mesh Size, and change its color. The Mesh and Masks can be shown or hidden from this panel and its color can be changed. Every distortion made with any of the previously mentioned tools can be saved as a Mesh, to do this, click on the Save Mesh button in the Options Panel. A saved Mesh can be opened and be re-applied to any other image by clicking on the Load Mesh button. 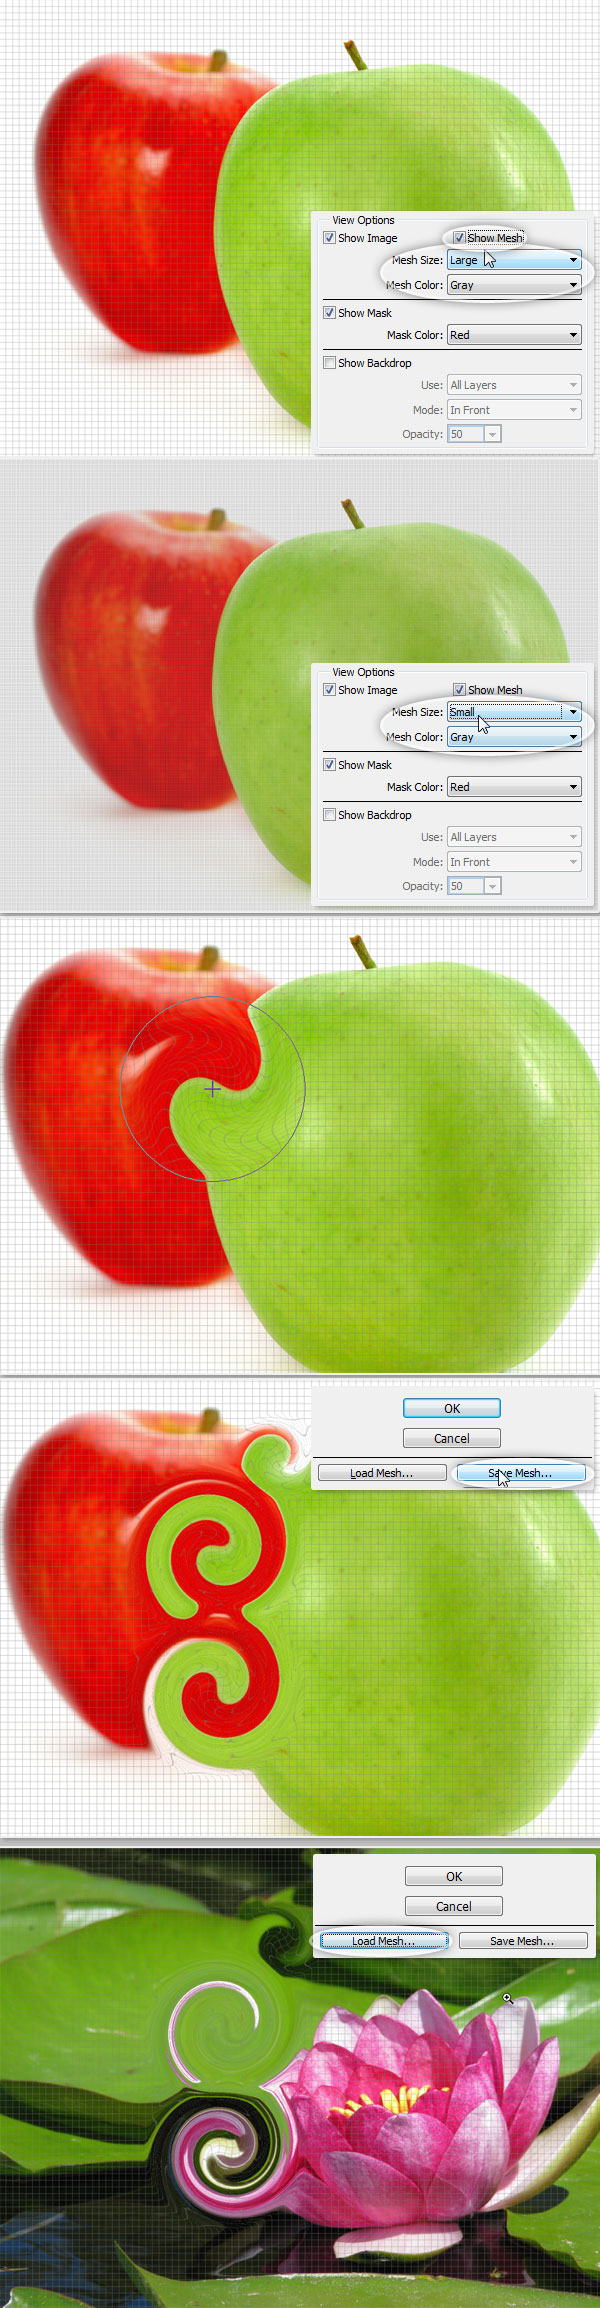 BackdropsBackdrops show additional layers aside from the Layer actually being edited. In a multiple layer document, chose the layer you want to distort and open the Liquify Filter Window. On the View Options Panel check the Show Backdrop checkbox to show the additional layers in the document. You can easily show or hide them, or change its opacity. 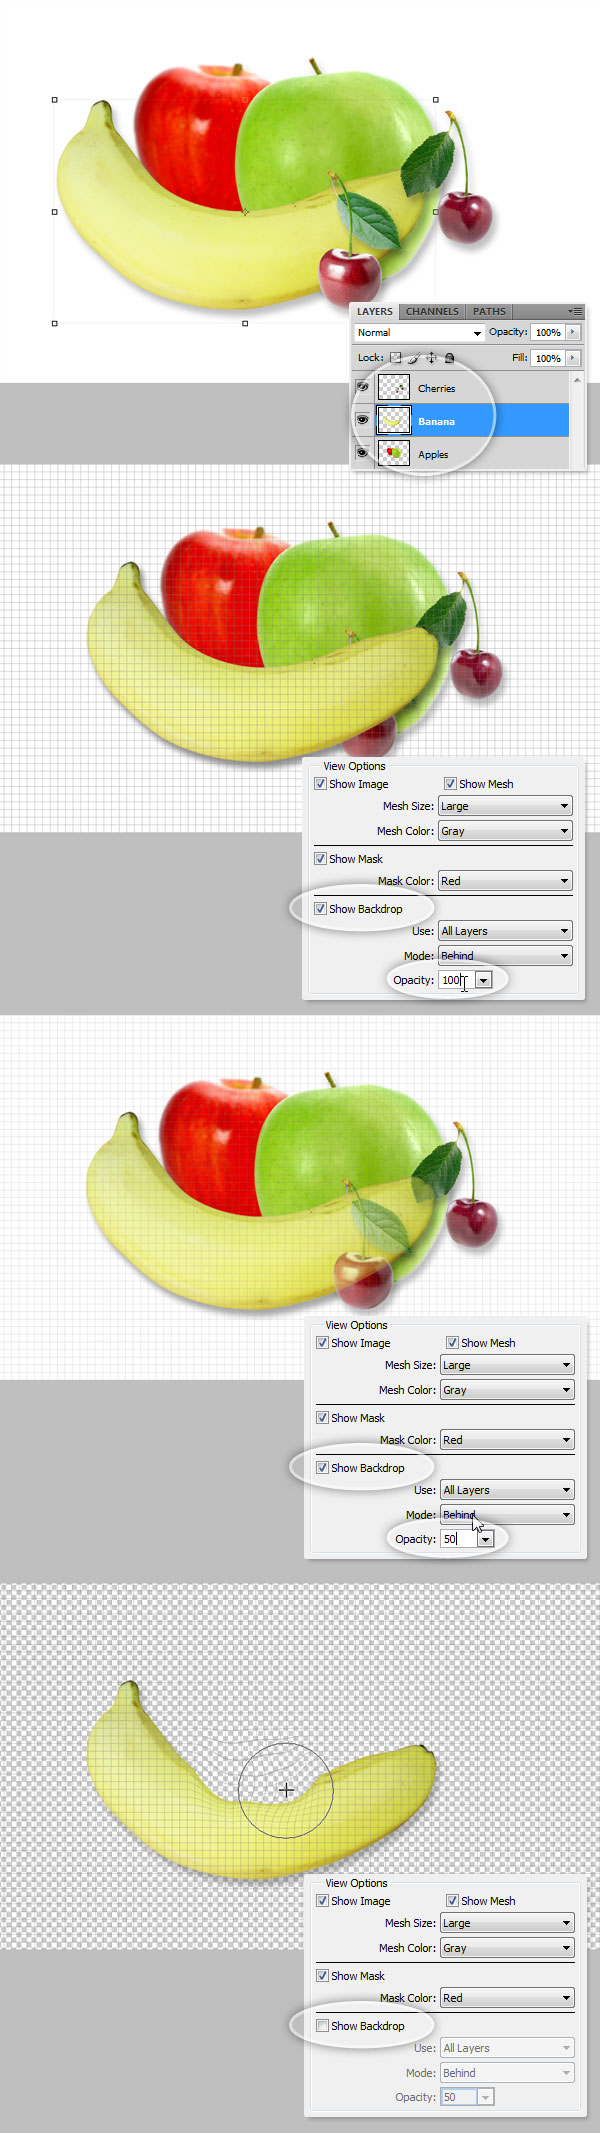 More on BackdropsYou can chose the layer being shown as a backdrop or even select all the layers as well. In addition, you can control the position of the backdrops, bring them to the front, or leave them behind the active object in the Mode option. Only the active layer is distorted, the backdrop layers are only for visual aid.  Alternative to Plastic SurgeryThe Forward Warp Tool can be easily used to fix imperfections on any photograph. In the following example, we use two brush sizes to transform this girl’s nose and chin, and even make her smile just a little bit. But remember, with great power comes great responsibility. You can fix almost anything in a picture with this tool but try to be ethical in your approach.  ConclusionThe Liquify tool is one of Photoshop’s most beloved features and it is an important tool to learn and master. Hopefully, you found this guide useful and will use it to help you in future projects. |
| Alphabetic Inspiration: A-Z Experiments with Letters, Hand-Crafted Type, and More Posted: 20 May 2010 06:17 AM PDT
This inspirational post is all about creating non-traditional type, letters, and alphabets. Some of these are made to into functional fonts and others serve as realized concepts. Consider doing some experiments with photographing objects made into full alphabets, hand crafting letters, working with 3D, trying unusual mediums, and more. Construct an image based font you can use in Photoshop, build your first pictorial font, or just have fun hand crafting some letters.
This Post is Day 4 of our Illustrative Lettering Session. Creative Sessions Illustrate the Alphabet ProjectFor those of you interested in showing off your own illustrated alphabets and letters, jump over to this session’s group project Illustrate the Alphabet where you can post an image of your letter creations and get some feedback on your work. Object Based Letters and FontsThere are so many real world objects one can collect and use as the basis for a font. Many of these are collections assembled here into letters, whether it’s vegetables, metal constructions, ties, iPhones, or any other object. Set up a photo shoot in your spare room and make a unique image based font. 5-A-Day Type, by Jimmy Smith PillsType, by Vladimir Koncar HAARSPAN_GE, by Maude P. Lescarbeau Tie-pography, by Ed Nacional Mech type, by Sebastian Gagin Paper font, by Jozef Ondrík Fuzzy – Font, by Font Soup Splinter: 3D Typeface, by Arslan Shahid iPhone Font, by urikane parker Rock Around the Clock, by DASE Roman Sherbakov emotional book, by ShanSan Art&Design Made By – Awareness campaign, by Dolly Rogers Multisensory Typography, by Alan Murphy Hand-Crafted Letters and AlphabetsWheather it’s drawn, painted, carved, or in one case cut up potatoes used to make letters. The hand crafted feel is prevalent in the alphabets below. From watercolor to calligraphy their are a plethora of mediums and disciplines to choose from when creating unique letters. Potato Font, Sofie Platou Watercolor Typography, Sasha Prood Deconstructive Typography, Alper YILDIRIM I used to Bitch about my shoes until…, Bruno Santinho Diploma project1 2005-2006, Balázs Szabó Blue Plastic Cup Font | my experimental fonts, Sveta Sebyakina Tring Type, Rheannon Cummins INK & SIMMETRY :: Tipography, María LaMuy Alphabet Studies, Michael Zeyda Photographic, Image Based, and Pictorial LettersThe dominant element that makes up these letters below are either photographs or drawn letters made with recognizable images in them. Some are shot from satellites, others are cut up images that are then reconstructed into alphabets. Photography is a medium well suited for those looking to capture unique lettering to use in Photoshop illustrations. Pictorial based fonts are often drawn then vectorized in the construction process, and there are a few of those shown here as well. We Are Animals Type, POGO Google Earth Alphabet, Vladimir Zivkovic Photographic light capture typography, by Chris Page Typography experiments, Reack Typography – Creeps Deco Bold, Moa Nordahl Bound Type, Gatis Cirulis Keeparty, by Irena Zablotska, Eugene Rudyy, and Keepa Sequences, Jónas Valtýsson Experimental Letters and FontsThere are a million and one ways one can create letters. The inspirational projects below are just a handful of additional alphabet experiments in effects, 3D, and even motion in the first example. Type Experiments by Roy Eventov 3D typeface, by Jarrik Muller Alphabet, by Jan Vitásek Misunderstood, by Adeliya Akhmerova MEA BODONI, by Jorge Mendez Type Experiment, by Oleg Portnoy Title, by Artist The Roommates, by Giampiero Quaini Hand Made FontsThere are some that have taken image based and experimental fonts to a professional level. If your looking for a high end experimental type foundry, then check out Hand Made Fonts. They have a ridiculous amount of amazing image based fonts, over two hundred of them in high resolution. Some are created from 3D, others from images of light in motion, earthly elements, and various objects. Here are just a handful of jaw-dropping letters they’ve constructed.      All images are the copyright of their respective artist. Further Inspiration
|

| You are subscribed to email updates from Psdtuts+ To stop receiving these emails, you may unsubscribe now. | Email delivery powered by Google |
| Google Inc., 20 West Kinzie, Chicago IL USA 60610 | |
0 comments:
Post a Comment