PSDTUTS Updates |  |

| Quick Tip: Use Puppet Warp in Photoshop CS5 to Tweak Your Images Posted: 22 Jun 2010 09:45 AM PDT
Photoshop CS5′s new Puppet Warp feature can be extremely useful if you need to make minor adjustments to your photos. In today’s quick tip tutorial we will demonstrate how to correct a Photo with this new tool in minutes. Let’s get started!
Step 1First, let’s load our image. I have selected this stock image.  Step 2Create a selection around the object. The selection needs to be fairly accurate but we will use the refine edge tool to fix the selection just in case, later on. So using the Pen Tool (P) trace the path around the object as best as you can, making sure you finish where you started creating a single loop.     Step 3With the pen tool still selected, right click the path and click "Make Selection". This will now load the path as a selection. Enter the value 0 for feather radius and select ok.   Step 4With the selection still active, click on the Marquee Tool (M) and under the options for the tool, click the button for "Refine Edge". This tool allows us to refine and fix the selection as best as possible. Feel free to experiment with the settings to find the best selection for the object if needed. Once you have made your selection, change the output from "Selection" to "New Layer with Mask".   Step 5We now have two separate layers, one with just the flower and the original. We now need to delete the flower from the original background image. To do this, load the original selection again (Cmd/Ctrl + Click Masked Layer icon) and use CS5′s new content aware fill to delete the area. For best results, expand the selection by going to Selection > Modify > Expand, Expand by 10px and click ok. Now press Delete on the original layer and select content Aware Fill.    Step 6Sometimes Photoshop won’t get it right the first time and may leave some contrasting lines. To fix this, we can use the Spot Healing Brush Tool (J) using some content aware settings and simply paint over the lines to blend them in.  Step 7We can now very easily apply the puppet warp tool without destroying or distorting the background. With our masked layer selected, go to Edit > Puppet Warp. This will open the tool and allow us to manipulate and warp the object. Placing points systematically around the displayed mesh will create bending/warping points. Place them on your object in the best arrangement to create joints to bend as shown below.  Step 8Dragging or rotating these points (Alt + Click and move over point) will warp the object in the desired direction. Using this we can drag the stem of the flower to come from the side, while still allowing the flower to stay upright. 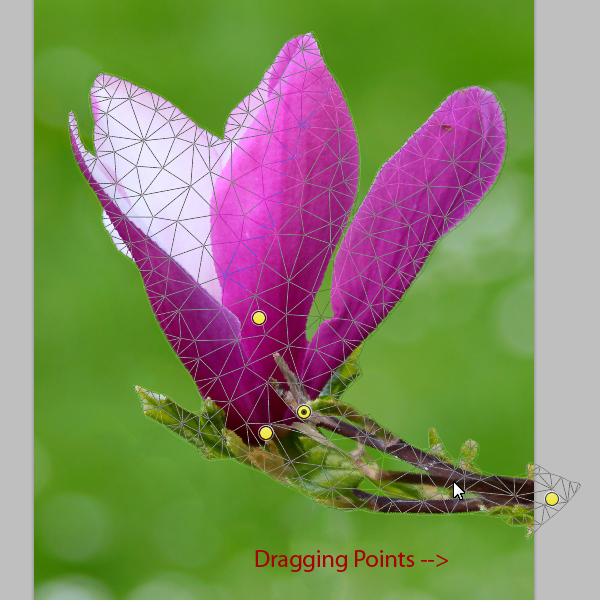  Final ImageAnd that’s how you use the Puppet Warp Tool. I hope you enjoyed this tutorial!  Additional UsesMoving arms, or changing body stance.  Straighten lines, or correcting lens distortion.  |
| You are subscribed to email updates from Psdtuts+ To stop receiving these emails, you may unsubscribe now. | Email delivery powered by Google |
| Google Inc., 20 West Kinzie, Chicago IL USA 60610 | |
0 comments:
Post a Comment