1stwebdesigner |

| How To Create An Options Page For Your Wordpress Theme Posted: 21 May 2010 02:00 PM PDT
Today we will be incorporating an options panel for the WordPress Classic theme. The methods you will learn will allow you to very easily integrate it into an existing theme you're working on. Setting The Files :The theme that we will be working on is the classic theme provided by wordpress. You can find it on wp-content/themes folder. You should see the following files:
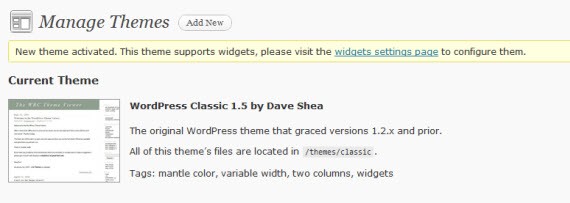
Most of our work will be done within the functions.php file. Now go to your wordpress admin panel then go to Appearance>Themes and activate the classic theme.
Working on functions.php :Begin by opening up functions.php in your code editor of the classic theme ( wp-content/themes/classic/functions.php ) then insert the following code : <?php $themename = "Classic Theme"; $shortname = "ct"; I added two variables the first one reffers to the name of the theme and the second is the shortname : You can choose any name for these two variables but don’t forget to select significant names because you will be using them later. Now let’s start adding some options for our theme : $options = array ( array( "name" => $themename." Options", "type" => "title"), array( "type" => "open"), array( "name" => "Color Scheme", "desc" => "Select the color scheme for the theme", "id" => $shortname."_color_scheme", "type" => "select", "options" => array("blue", "red", "green"), "std" => "blue"), array( "name" => "Logo URL", "desc" => "Enter the link to your logo image", "id" => $shortname."_logo", "type" => "text", "std" => ""), array( "name" => "Homepage header image", "desc" => "Enter the link to an image used for the homepage header.", "id" => $shortname."_header_img", "type" => "text", "std" => ""), array( "name" => "Footer copyright text", "desc" => "Enter text used in the right side of the footer. It can be HTML", "id" => $shortname."_footer_text", "type" => "text", "std" => ""), array( "name" => "Google Analytics Code", "desc" => "Paste your Google Analytics or other tracking code in this box.", "id" => $shortname."_ga_code", "type" => "textarea", "std" => ""), array( "name" => "Feedburner URL", "desc" => "Paste your Feedburner URL here to let readers see it in your website", "id" => $shortname."_feedburner", "type" => "text", "std" => get_bloginfo('rss2_url')), array( "type" => "close")); Here the variable “option” contains a big array which also contains other child arrays. Each child array holds an option. The first array reffers to the title of the page ( In our case it’s ‘Classic Theme Options’ ). Every time when we want to add a new option we have to declare an array with a type and give it the name we want. You can take a look at the options specified below :
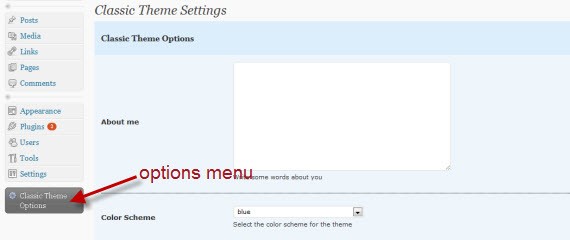
Now we have our options ready but how can we view them ? Add the following pieces of code to the functions.php file: function mytheme_add_admin() { global $themename, $shortname, $options; if ( $_GET['page'] == basename(__FILE__) ) { if ( 'save' == $_REQUEST['action'] ) { foreach ($options as $value) { update_option( $value['id'], $_REQUEST[ $value['id'] ] ); } foreach ($options as $value) { if( isset( $_REQUEST[ $value['id'] ] ) ) { update_option( $value['id'], $_REQUEST[ $value['id'] ] ); } else { delete_option( $value['id'] ); } } header("Location: themes.php?page=functions.php&saved=true"); die; } else if( 'reset' == $_REQUEST['action'] ) { foreach ($options as $value) { delete_option( $value['id'] ); } header("Location: themes.php?page=functions.php&reset=true"); die; } } add_menu_page($themename." Options", "".$themename." Options", 'edit_themes', basename(__FILE__), 'mytheme_admin'); } Here I declared a function with a name of “mytheme_add_admin”. This function is used for updating options : If the options are saved, then all the options are updated with their new values. If the options are being reset (indicated by another hidden variable with a value reset), then all of the options are deleted. The last line adds a theme page( add_theme_page ) in Appearance box and it calls mytheme_admin function. If you want you can replace add_theme_page with add_menu_page to create an external box :
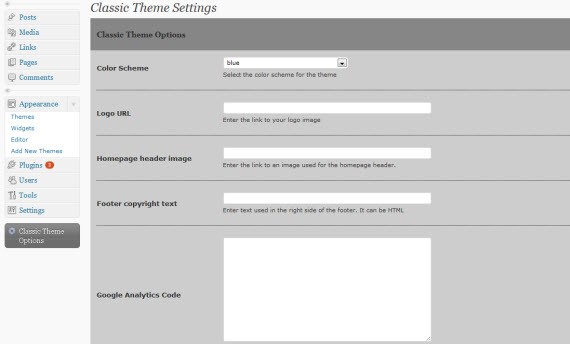
At this step we still don’t have the theme options page, so we have to write mytheme_admin function which was called by add_theme_page, add this code to functions.php : function mytheme_admin() { global $themename, $shortname, $options; if ( $_REQUEST['saved'] ) echo '<div id="message"><p><strong>'.$themename.' settings saved.</strong></p></div>'; if ( $_REQUEST['reset'] ) echo '<div id="message"><p><strong>'.$themename.' settings reset.</strong></p></div>'; ?> Here we have some conditions : if the settings are saved Wordpress will show ” Classic theme settings saved “. Likewise for reset. Now paste the code above I will explain it after : <div class="wrap"> <h2><?php echo $themename; ?> Settings</h2> <form method="post"> <?php foreach ($options as $value) { switch ( $value['type'] ) { case "open": ?> <table width="100%" border="0" style="background-color:#cdcdcd; padding:10px;"> <?php break; case "close": ?> </table><br /> <?php break; case "title": ?> <table width="100%" border="0" style="background-color:#868686; padding:5px 10px;"><tr> <td colspan="2"><h3 style="font-family:Georgia,'Times New Roman',Times,serif;"><?php echo $value['name']; ?></h3></td> </tr> <?php break; case 'text': ?> <tr> <td width="20%" rowspan="2" valign="middle"><strong><?php echo $value['name']; ?></strong></td> <td width="80%"><input style="width:400px;" name="<?php echo $value['id']; ?>" id="<?php echo $value['id']; ?>" type="<?php echo $value['type']; ?>" value="<?php if ( get_settings( $value['id'] ) != "") { echo get_settings( $value['id'] ); } else { echo $value['std']; } ?>" /></td> </tr> <tr> <td><small><?php echo $value['desc']; ?></small></td> </tr><tr><td colspan="2" style="margin-bottom:5px;border-bottom:1px dotted #000000;"> </td></tr><tr><td colspan="2"> </td></tr> <?php break; case 'textarea': ?> <tr> <td width="20%" rowspan="2" valign="middle"><strong><?php echo $value['name']; ?></strong></td> <td width="80%"><textarea name="<?php echo $value['id']; ?>" style="width:400px; height:200px;" type="<?php echo $value['type']; ?>" cols="" rows=""><?php if ( get_settings( $value['id'] ) != "") { echo get_settings( $value['id'] ); } else { echo $value['std']; } ?></textarea></td> </tr> <tr> <td><small><?php echo $value['desc']; ?></small></td> </tr><tr><td colspan="2" style="margin-bottom:5px;border-bottom:1px dotted #000000;"> </td></tr><tr><td colspan="2"> </td></tr> <?php break; case 'select': ?> <tr> <td width="20%" rowspan="2" valign="middle"><strong><?php echo $value['name']; ?></strong></td> <td width="80%"><select style="width:240px;" name="<?php echo $value['id']; ?>" id="<?php echo $value['id']; ?>"><?php foreach ($value['options'] as $option) { ?><option<?php if ( get_settings( $value['id'] ) == $option) { echo ' selected="selected"'; } elseif ($option == $value['std']) { echo ' selected="selected"'; } ?>><?php echo $option; ?></option><?php } ?></select></td> </tr> <tr> <td><small><?php echo $value['desc']; ?></small></td> </tr><tr><td colspan="2" style="margin-bottom:5px;border-bottom:1px dotted #000000;"> </td></tr><tr><td colspan="2"> </td></tr> <?php break; case "checkbox": ?> <tr> <td width="20%" rowspan="2" valign="middle"><strong><?php echo $value['name']; ?></strong></td> <td width="80%"><?php if(get_option($value['id'])){ $checked = "checked=\"checked\""; }else{ $checked = "";} ?> <input type="checkbox" name="<?php echo $value['id']; ?>" id="<?php echo $value['id']; ?>" value="true" <?php echo $checked; ?> /> </td> </tr> <tr> <td><small><?php echo $value['desc']; ?></small></td> </tr><tr><td colspan="2" style="margin-bottom:5px;border-bottom:1px dotted #000000;"> </td></tr><tr><td colspan="2"> </td></tr> <?php break; } } ?> <p class="submit"> <input name="save" type="submit" value="Save changes" /> <input type="hidden" name="action" value="save" /> </p> </form> <form method="post"> <p class="submit"> <input name="reset" type="submit" value="Reset" /> <input type="hidden" name="action" value="reset" /> </p> </form> </div> Explanation :With this code we created our options page content : I used a php foreach loop, each option type is evaluated on a case-by-case basis. So if the type of the option is title do this, if it is a checkbox do that… If there is an "open" type option we do nothing. If there is a "close" type options, we close our table. For each of the types "text" , "select" , "checkbox" and "textarea" , we display the corresponding input. At the end we added two buttons one to save the settings and the other to reset them. Now our options page is ready, but we have to add this short code to make it work : <?php } add_action('admin_menu', 'mytheme_add_admin'); ?> This short code tells Wordpress to add the admin menu. After all this, here the result you should end up with :
In this example I used simple styles included in functions.php to make our options page looks better but I will show you how to add a stylesheet to functions.php so you can add your styles rapidly. How to add a stylesheet to functions.php :First, you have to create a new folder on your theme folder, name it functions then create a new css file with a name of functions.css. After flling your css file add this code to functions.php after mytheme_add_admin function : function mytheme_add_style() { $file_dir=get_bloginfo('template_directory'); wp_enqueue_style("functions", $file_dir."/functions/functions.css", false, "1.0", "all"); } That adds the functions.css file to the head. The location of the file is determined by the template directory. Also, if you want you can use scripts to make your options page better by including a js file.To do this you have to change wp_enqueue_style("functions", $file_dir."/functions/functions.css", false, "1.0", "all"); To : wp_enqueue_script("script", $file_dir."/functions/script.js", false, "1.0"); After adding your stylesheet or your script, you have to add this code under add_action(‘admin_menu’, ‘mytheme_add_admin’); so they will be active : add_action('admin_init', 'mytheme_add_init'); Making Use of the Options :Now after creating our options, I will show you how to make use of them. First up, open up your header.php file, and add the following code: <?php global $options; foreach ($options as $value) { if (get_settings( $value['id'] ) === FALSE) { $$value['id'] = $value['std']; } else { $$value['id'] = get_settings( $value['id'] ); } } ?> You must put the code above at the start of all the files which you add options to. Once you've done that you can begin using your options. For example : If you want to display the footer text you have to echo $ct_footer_text ( ct reffers to the shortname of the theme ) : <?php echo $ct_footer_text; ?> For a checkbox you can check if the box is checked ( it will return true ) do this… You can download the functions.php file here. That’s it ! Thanks for reading this tutorial and I hope it was useful. |
| How to Create Your first WordPress Theme: Part 2 Posted: 21 May 2010 03:15 AM PDT
You can Download source files of this tutorial or Live preview this theme. As I promised in the first part of this tutorial, we will do some stuff that will make your blog theme more interesting and useful. I’m re-writing the list with what we will cover in this part:
1. Widgetizing the SidebarHaving a widget-ready theme is the most important thing of a blog theme. It doesn’t matter for the reader but it helps you a lot. How a widget-ready theme is helping you? Well, imagine that you want a lot of things to be displayed in the sidebar. Think that you will have some lists like friends, archive, categories, tag cloud, advertising area, etc. It would be easy to write markup in the sidebar.php file, but it would be more easy letting WordPress for handling this. Having a widget-ready theme is a big advantage because you can add text, lists and advertising area within WordPress admin panel. But enough with talking, let’s get started! Open your sidebar.php file that you have coded in the first part of this tutorial. Now, we’ll have to decide what pieces of code will stay even if the widgets are turned on. Widgetizing the sidebar makes a condition like: if widgets are available, show widgets and chosen sidebar markup, else, show original sidebar markup. Below are the widget tags, without any code in them: <!--Code that will stay even if the widgets are used--> <?php /* Widgetized sidebar, if you have the plugin installed. */ if ( !function_exists('dynamic_sidebar') || !dynamic_sidebar() ) : ?> <!--Code to be replaced by Wordpress--> <?php endif; ?> Maybe this clears everything for you. The comments are very explanatory, so now we just need to use it with our sidebar markup. So, you should decide what code will remain even if the widgets are used. Normally, the search box have to always be there. Of course you can let WordPress add it but this will stop you from any additional customization to the search form elements: <div id="navigation"> <p><strong>Navigation Here</strong></p> <ul> <li><a href="<?php bloginfo('url'); ?>">Home</a></li> <?php wp_list_pages('title_li='); ?> </ul> </div> <div id="extra"> <form id="searchform" method="get" action="<?php bloginfo('home'); ?>"> <input type="text" name="s" id="s" size="15" /><br /> <input type="submit" value="<?php esc_attr_e('Search'); ?>" /> </form> <?php /* Widgetized sidebar, if you have the plugin installed. */ if ( !function_exists('dynamic_sidebar') || !dynamic_sidebar() ) : ?> <p><strong>Categories</strong></p> <ul> <?php wp_list_categories('title_li='); ?> </ul> <?php endif; ?> </div> I’ll stop here for a moment. I added a search form, which has WordPress specific values. If you remove them, the search form won’t work: <form id="searchform" method="get" action="<?php bloginfo('home'); ?>"> <input type="text" name="s" id="s" size="15" /><br /> <input type="submit" value="<?php esc_attr_e('Search'); ?>" /> </form> The code I have been showing you previously, is the markup of the sidebar.php file, along with the widget tags. The condition for what I’ve written there, is the following: if there aren’t any widgets in use, show the categories, else, show the widgets you are activating. We aren’t ready yet. This code won’t work if we do not add some functions. Normally, for not modifying the WordPress core files, we add new functions to the functions.php file that you will have to create. For creating the function for the widgets, add the following code to your new functions.php file: <?php if ( function_exists('register_sidebar') ) register_sidebar(array( 'before_widget' => '', 'after_widget' => '', 'before_title' => '<p><strong>', 'after_title' => '</strong></p>', )); ?> You need some explanation, right? Well, between the apostrophes you need to write your needed markup. Before and after widget could be used div tags, of course if your template needs them. For our current layout, we won’t add anything. The same thing happens for the title of each widget (e.g. Categories) which are wrapped by the paragraph and strong tags. You got it? Hope you did. This is everything you need to know about widgetizing the sidebar. 2. Adding a “Read more” linkCreating a Read more link is used for the blogs who do not want to show all the content of their articles on the front page. There are many ways we can achieve something like this: 2.1 The WordPress “more” tagThe more tag is activated by a little button when adding a new post from the WordPress admin panel. You can press ALT+Shift+T or click the following button:
If you do not know how to use it, I’ll explain you how to. Let’s say you have 2 paragraphs of text, but you want to show on the frontpage only the first paragraph. Click after the first paragraph and then click the shown button. You will see a dotted line with a little tag where it says “more”. All the content before this line will be shown. But there is something else. You need to modify the content tag from the index.php file. As the source files from the first part do not have any parameter set to the tag, you will need to add it. Copy and paste the following code instead of the standard content tag: <?php the_content(__('Read more...')); ?> Do not remove the paragrpah tags. Just the content tag needs to be modified. Now in each article where you place the more tag from the WordPress will show a “Read more” link. Go and try it! 2.2 Using the excerptAnother way to achieve this is by using the excerpt. This works a bit diffrent. When publishing a new article in WordPress, you will see a box where it says “Excerpt” If you still have the content more tag used, the excerpt will automatically use the content before the dotted line. If you won’t use it from the WordPress Editing screen, it will remain empty. If so, you will be able to write something different, like a short introduction or description. Let’s say you have some content in the article, and just write in the excerpt a random description. If you publish the text, you will notice that you will get the whole content on the respective article. For getting the text you have written in the Excerpt box, you will need to modify the index.php loop. So instead of: <?php the_content(__('Read more...')); ?> You will need to add the excerpt tag which is the following: <?php the_excerpt(); ?> Now, take a look and see the difference. 2.3 Using a limitation plugin Using such a plugin sometimes is easier for you. What this plugin does? Well, depending on each plugin, it can limit your content to word number, letter number or just show the first paragraph of the article. You can see a list of 3 such of plugins: Now, you just need to decide which one is best for you. 3. Comments-template: using comments in WordPressWhen It comes to develop a new WordPress theme, the part I hate the most is working on the comments. It’s not because it’s hard, it’s because I need to make a lot of stylings to achieve a nice comment area. I won’t get into styling because it relies on your creativity and CSS skill. I will only show you how to use the comments in a theme and what the used tags are doing. I suggest learning some basics of PHP before editing the comments.php file, because you’ll need some basic knowledge about PHP to code your own comments. For now, I’ll just show you how to use them. So let’s get started by opening the comments.php file from the WordPress Classic theme which is located in the wp-content/themes/classic directory. Now, save the comments.php file in your layout07 directory. Ok, you won’t understand much things in this file if you don’t have some basic PHP knowledge. For now leave the file intact and open the single.php file and add after the content tag the following tag: <?php comments_template(); ?> This will enable the comments in your theme. You will see a heading saying “No Comments” and below, a form with a heading saying “Leave a comment”. You can either leave a comment as a guest, or just sign in to WordPress and leave a comment as an admin (or user). Now, the most important tags you need to know when editing the comments.php file are the following: <?php comment_author_link() ?> <!-- The author of the comment --> <?php echo get_avatar( $comment, 32 ); ?> <!-- The commenter's avatar (or Gravatar) --> <?php comment_text() ?> <!-- The commenter's comment text --> <?php comment_date() ?> <!-- The date when the comment have been posted --> <?php comment_time() ?> <!-- The time when the comment have been posted --> <?php edit_comment_link(__("Edit This"), ' |'); ?> <!-- The edit link for the comment (if you want to edit something in your comment) --> Now, constructing a new comment structure is very easy, but you need to pay attention for not breaking the PHP code. The default structure of the comment is the following: <?php if ( have_comments() ) : ?> <ol id="commentlist"> <?php foreach ($comments as $comment) : ?> <li <?php comment_class(); ?> id="comment-<?php comment_ID() ?>"> <?php echo get_avatar( $comment, 32 ); ?> <?php comment_text() ?> <p><cite><?php comment_type(_x('Comment', 'noun'), __('Trackback'), __('Pingback')); ?> <?php _e('by'); ?> <?php comment_author_link() ?> — <?php comment_date() ?> @ <a href="#comment-<?php comment_ID() ?>"><?php comment_time() ?></a></cite> <?php edit_comment_link(__("Edit This"), ' |'); ?></p> </li> <?php endforeach; ?> </ol> <?php else : // If there are no comments yet ?> <p><?php _e('No comments yet.'); ?></p> <?php endif; ?> So now, let me explain. Starting from the first line: If there are comments left to your article, your comments will be shown with the giveen structure within foreach PHP function, else (if no comments are posted) show a text with “No comments yet.”. For changing the look of your comments, you need to work just inside the foreach function. I’ll show you how to change the look of your comments, very easily. Delete the <ol> tags and everything inside the foreach function. You’ll just be left with something like this: <?php if ( have_comments() ) : ?> <?php foreach ($comments as $comment) : ?> <?php endforeach; ?> <?php else : // If there are no comments yet ?> <p><?php _e('No comments yet.'); ?></p> <?php endif; ?> Next, wrap the foreach function with a div id “comments”, like the default structure were wrapped by <ol> tags. Now, add the following code withing the foreach function: <div id="comments"> <p><strong><?php comment_author_link() ?> said this on <?php comment_date() ?> at <?php comment_time() ?> <?php edit_comment_link(__("Edit This"), ' |'); ?></strong></p> <p><?php comment_text() ?></p> </div> Just take a look on how the comments are displayed now. I have removed some tags because you won’t need them as a beginner WordPress theme developer. I added div’s instead lists because it’s more clean. The class and the id were assigned for further customization via CSS. Now, if you have made the changes as I told you, you should edn up with something like this: <?php if ( have_comments() ) : ?> <div id="comments"> <?php foreach ($comments as $comment) : ?> <div class="comment"> <p><strong><?php comment_author_link() ?> said this on <?php comment_date() ?> at <?php comment_time() ?> <?php edit_comment_link(__("Edit This"), ' |'); ?></strong></p> <p><?php comment_text() ?></p> </div> <?php endforeach; ?> </div> <?php else : // If there are no comments yet ?> <p><?php _e('No comments yet.'); ?></p> <?php endif; ?> For finding more information about manipulating the comments.php files go to the WordPress Codex and start looking for what you need. All that I’ve covered here is just basic stuff. Hope you’ve understood everything of what I’ve told you! 4. Using custom fields for showing an image for each articleCustom fields are one of the most important feature of WordPress. If you master the custom fields, you can create stunning WordPress functionalities like displaying an image for each article (like what I’ll be teaching you), displaying a certain message or link to your visitors (like a live preview and a demo button or even a source link for your article). Where can you find the custom field box? The cutom fields box is located under the Send Trackbacks box, in the Post > Add post in the admin panel:
Using the custom fields isn’t so hard. You just have to learn the tag that calls a specified custom filed name. The tag is the following: <?php echo get_post_meta($post->ID, 'custom field name', true); ?> If you would write “image” instead of “custom field name”, WordPress will create a custom field with the name “image”, so any value you will give to the custom field, WordPress will output the value in the place where you have written your custom field tag. Not too clear for you? Let’s apply the custom field tag to create a nice thumbnail for each post! We will use an image tag which uses as source a link introduced by the custom field: <img src="<?php echo get_post_meta($post->ID, 'image', true); ?>" alt="<?php the_title(); ?>" /> This tag will be posted above the content tag inside the index.php and the single.php files. Now go and create a new custom field with the name “image” and add to the value a link to an image. You can see how I’ve done this in the following pic:
Just in case that you won’t attach a thumbnail to your post, the article will show you an image missing. So you may add a thumbnail to each article you are writing. This is everything you need to do! 5. Author details: single page template and profileWordPress have some predefined functions to output the current author details. This can be useful if you want to show some details about you or other authors in the single page templates. WordPress is also creating a profile page for any author where you can show the author details: description and posts. This may sound difficult, but it’s very easy, just like all other things in WordPress. You only need a tag or two (if you want the author name displayed too) to show up your auhor details on single page template (and also others). Place the following tags at the start or at the ending of the article loop (in the single.php file): <p><strong><?php the_author_posts_link(); ?></strong></p> <p><?php the_author_description(); ?></p> The first line is for outputing the author’ posts page link and the second is for outputing the description of the author (entered from Biographical Info from the profile within WordPress admin panel). You can wrap these codes by a div id “author” so you can style it if you want. So the loop would look like the following: <?php if (have_posts()) : while (have_posts()) : the_post(); ?> <p><strong><a href="<?php the_permalink(); ?>"><?php the_title(); ?></a></strong></p> <p>Published on <?php the_time('m d Y'); ?> by <?php the_author(); ?></p> <img src="<?php echo get_post_meta($post->ID, 'image', true); ?>" alt="<?php the_title(); ?>" /> <p><?php the_content(); ?></p> <div id="author"> <p><strong><?php the_author_posts_link(); ?></strong></p> <p><?php the_author_description(); ?></p> </div> <?php comments_template(); // Get wp-comments.php template ?> <?php endwhile; else: ?> <p><?php _e('Sorry, no posts matched your criteria.'); ?></p> <?php endif; ?> Now, for creating the author profile page, you need to open the page.php file then save it as author.php. Now, delete the actual loop and everything within the content div and paste the following code: <p><strong><?php the_author_posts_link(); ?></strong></p> <p><?php the_author_description(); ?></p> <ul> <?php if (have_posts()) : while (have_posts()) : the_post(); ?> <li><p><strong><?php the_title(); ?></strong></p><p>Published on <?php the_time('m d Y'); ?></li> <?php endwhile; else: ?> <p><?php _e('Sorry, no posts matched your criteria.'); ?></p> <?php endif; ?> <ul> As you see, the author details are outside the loop. Then, we would like to display the posts that the current author have written so far. We are creating the loop, but this time we will show just the article title and the date when it was published. That’s it now. Save your file and go to test it! That’s it!Well, people, these are all the things I’ve wanted to cover as basics. Just leave comments requesting other things, and probably I will cover them in upcoming tutorials. Have fun with creating WordPress, and if i’ve helped someone to develop a nice theme, let me know! More to come on 1STWD… |


| You are subscribed to email updates from Graphic and Web Design Blog To stop receiving these emails, you may unsubscribe now. | Email delivery powered by Google |
| Google Inc., 20 West Kinzie, Chicago IL USA 60610 | |
0 comments:
Post a Comment