1stwebdesigner |

| How to Create a Classic Table Phone in Illustrator Posted: 14 Jun 2010 02:00 PM PDT
Step 1Open your Adobe Illustrator. Create a new document with 450px x 450px size. Step 2Open your sketch file in Adobe Illustrator. Create a new layer above the sketch picture layer, and name it as phoneBody.
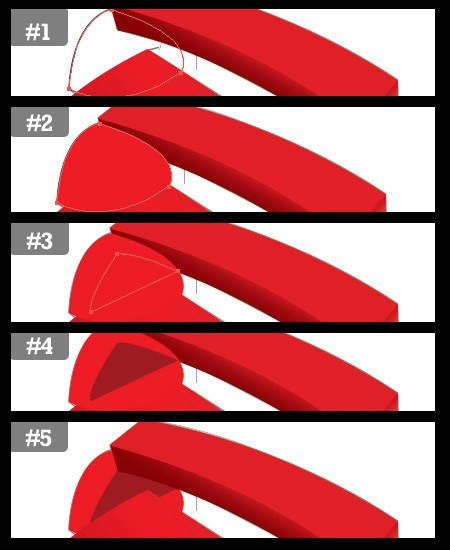
Step 3Now We are going to paint each parts, We will try to draw each part of the body and color them with corresponding colors. To paint them we do use solid color plus Gradient colors. Ok, now take pen tool(P) with no fill color. Draw borders of every separate parts. Shall we start from receiver? Draw borders of top side of receiver and then apply gradient color. I am using #de2126 as my red color. Once you colored this object you delete borders ( Delete means just choose no color for stroke)
Step 4Next step is draw other parts, Left side of the receiver. Draw this object, color with Gradient tool(G) and then select no color for stroke. I used #880303 for dark red and #bb141a for light red.
Step 5Next is right side of the receiver. Draw this object and fill with Gradient tool(G). #ce171f for dark red and #d48168 for light red.
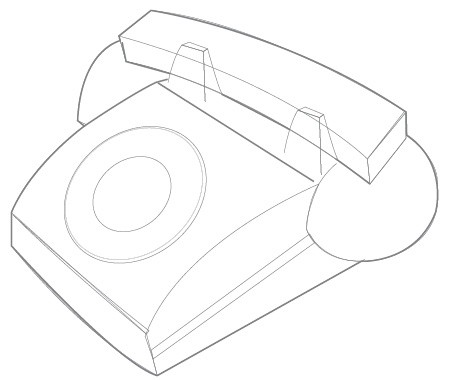
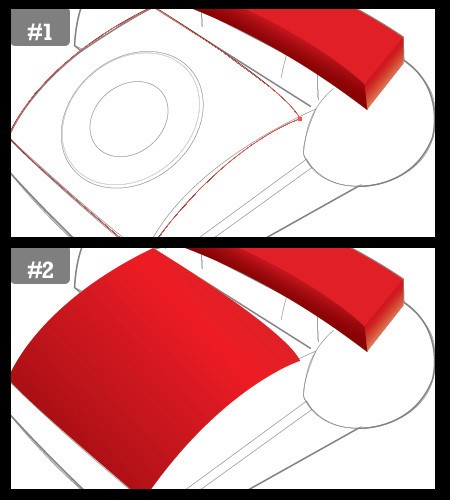
Step 6Next draw this object which is top of the telephone. 1st draw this rectangle, color with gradient tool (T). Colors that i used – #ac0f15 for dark red and #e61f25 for light red.
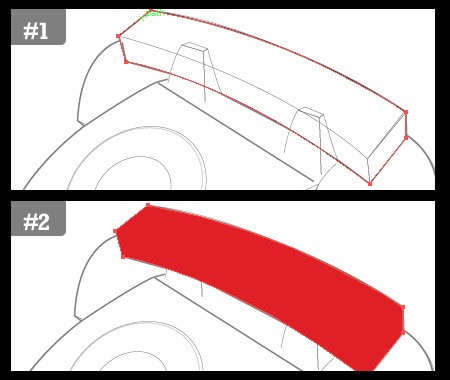
Step 7Ok, Lets move to front side of the phone. Draw a rectangle with the help of pen tool and fill with gradient tool. Colors are #ab0f14 dark red & #ed1c24 light red
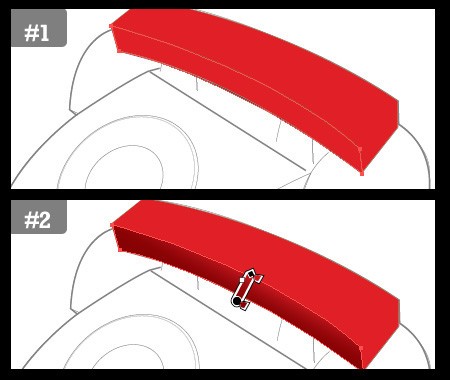
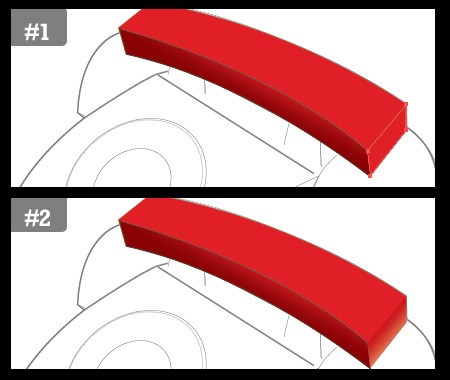
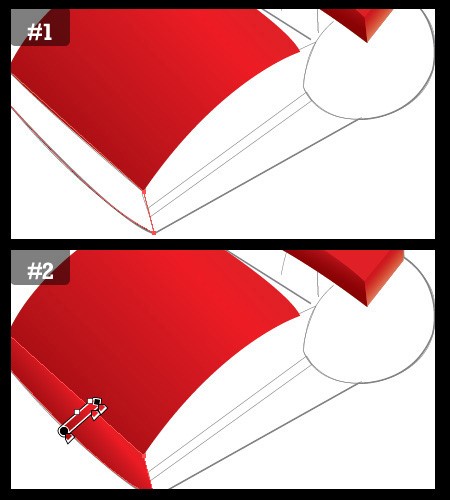
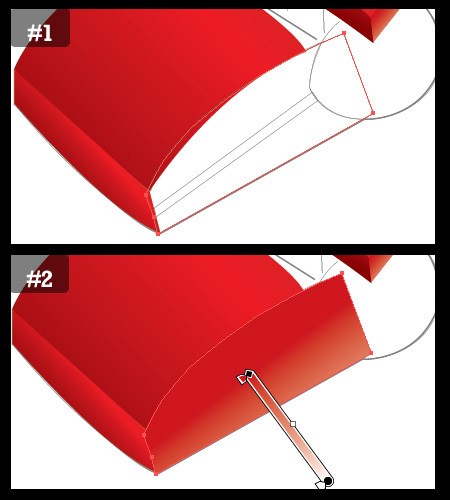
Step 8Next is right side of the telephone. We do the same method to draw up. Draw this object and color with gradient tool. Once you colored, select and go for no color to lines. Colors i used are dark red #ce171f & white
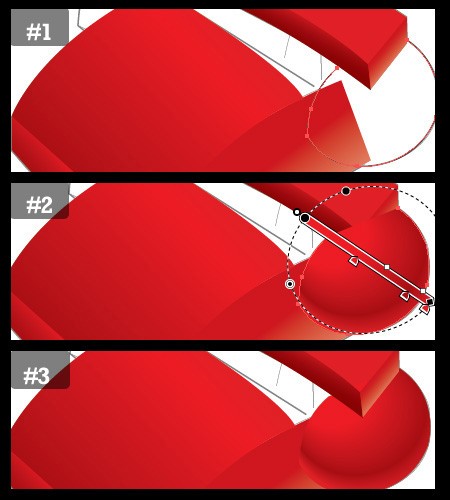
Step 9Now friends, We want to draw speaker which is in a telephone. Draw an object like this and color with gradient tool, type is redial. 3rd picture shows you, how to place this gradient. To color this i have used these colors. #a70e13 for dar red and #ed1c24 & #de2126 for light red. After colorings select this object, choose no color for stroke. Then you send this object back to handle. So you will see just like a picture in 3rd illustration.
Step 10Now draw mic part as well. Follow those illustrations you will understand. We finished the object in #4, send this object back to all other objects.
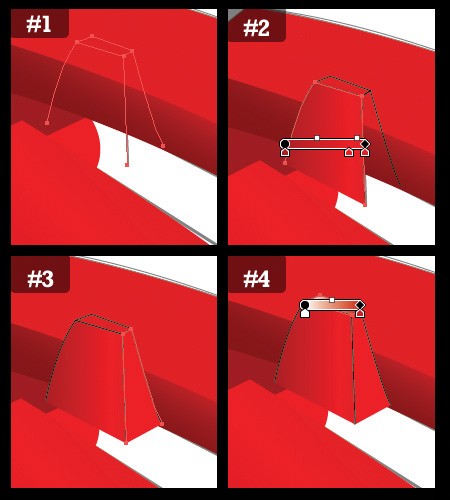
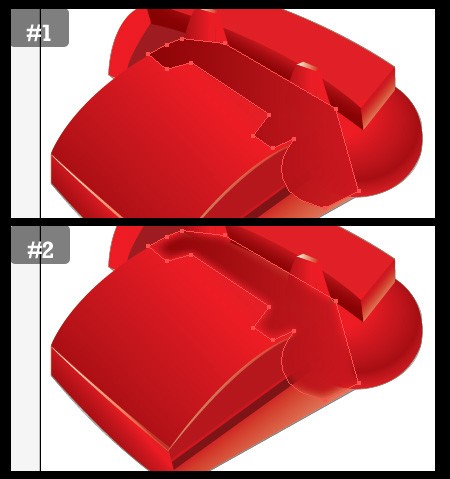
Step 11No We need to draw receiver holders (Sorry, I don’t know the exact name of this)
#1 :- Draw three side parts #2 :- Color with gradient tool to front side. Colors i used, Dark red #aa1f23, light red #ec2227 #3 :- Color right side of the holder with solid color #ec2027 #4 :- Finally color top side with gradient tool. Dark red #cd2127 & white Step 12Have a copy of the object which we created in previous step and paste it as another holder
Step 13Now we draw an object and put it under the receiver. Just draw a rectangle with pen tool (P) and color with #bf2e27 and then send this object back.
Step 14Now Draw this objects as well.
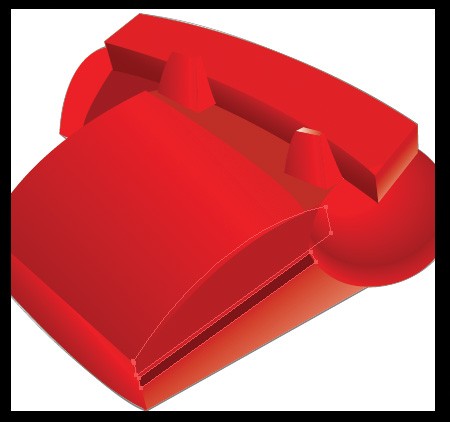
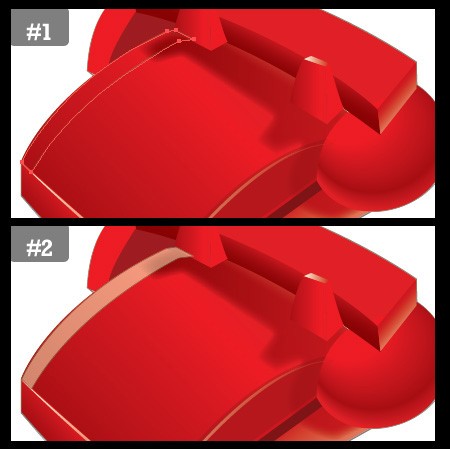
Step 15Now We need to give shining effects. Lets draw a two borders to give a shining effect. You can do this by Pen tool and gradient tool.
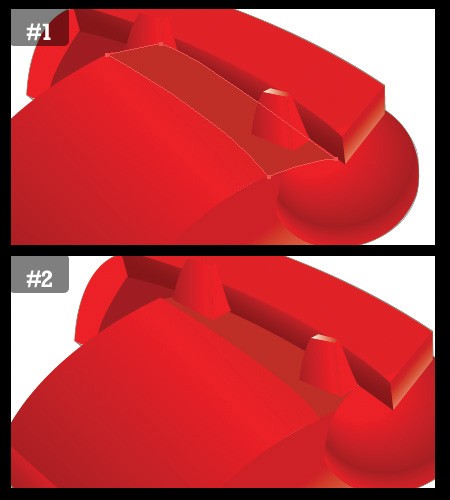
Step 16Ok, lets add some shadow effects to our phone. Draw an object and fill with #b31317 (see #1), apply feather up to 7.06 mm and reduce opacity to 95%. After that send this object back.
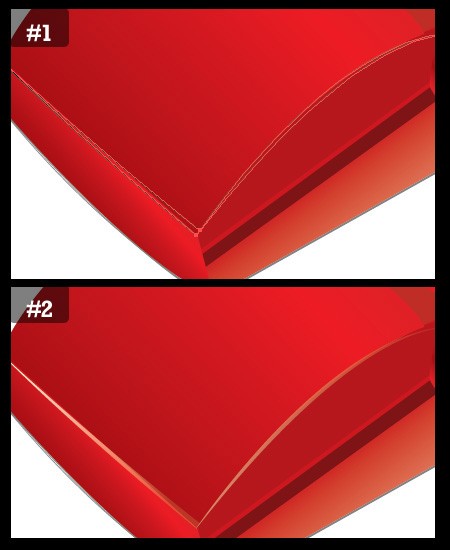
Step 17Ok friends, We will add some more shining to our phone. At 1st make shining to receiver. Please see the illustration below.
Step 18Now we will give another shining to main body.
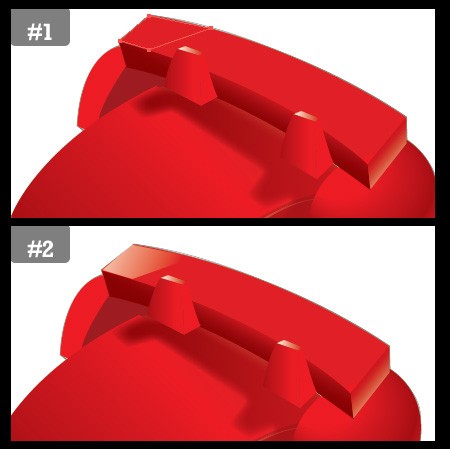
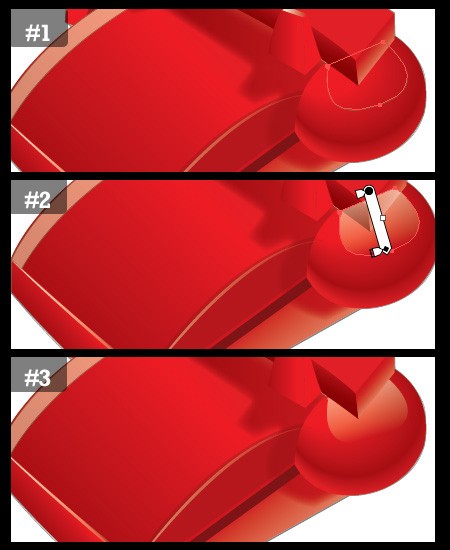
Step 19Next is draw shining to the speaker. You draw an object just like in #1, color with white gradient colors. Then send this object to back.
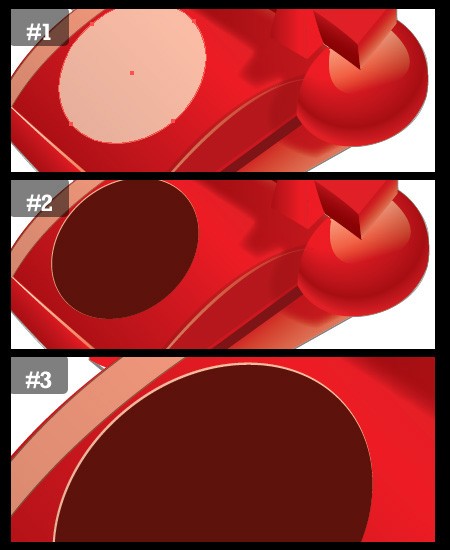
Step 20Ok friends, now We came to number roll. Create an oval shape and fill with white color, & reduce its opacity to 70%. Then make a copy of that, move a bit to downside and change the color to #5d140b. So you will end up with a picture like in #3
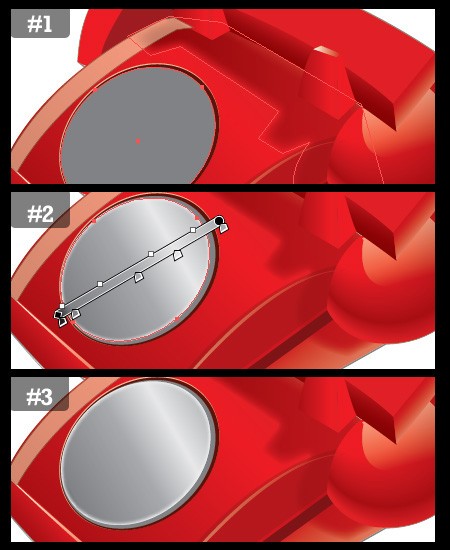
Step 21Draw another oval and apply gradient colors with different tones of ash color. See #2. Then apply inner glow. Inner glow option can be seen in Effects > Stylize > Inner Glow… Select #e8e7e7 and set blur to 2.8mm. See #3
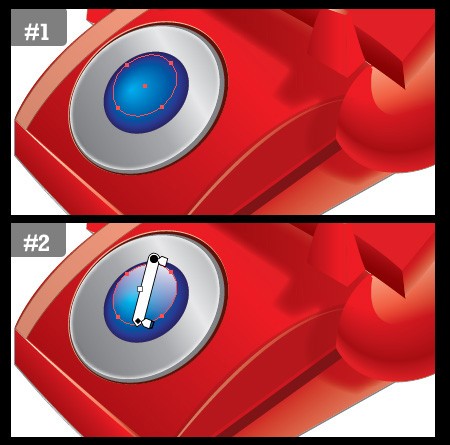
Step 22Then Draw a small oval, color by using Gradient tool (G). Colors i used, #201d63 for dark blue & #11baee for light blue
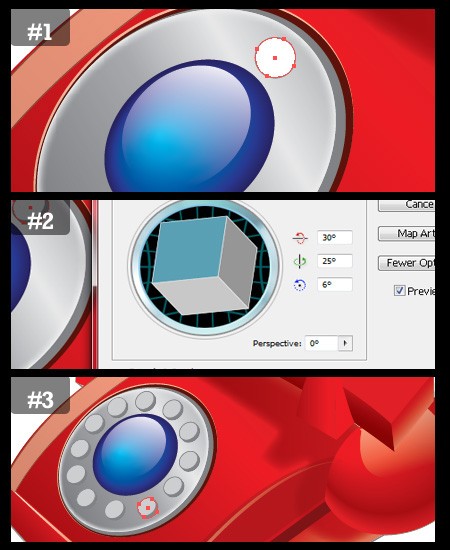
Step 23Apply a shining effect with Gradient tool. Draw a oval and then you can color this by using Gradient tool.
step 24Now Create a white color oval and go to Effect > 3D > Extrude & Bevel… Make adjustments as i shown in #2. Then Copy this and paste it 11 times. So you will see a picture like #3.
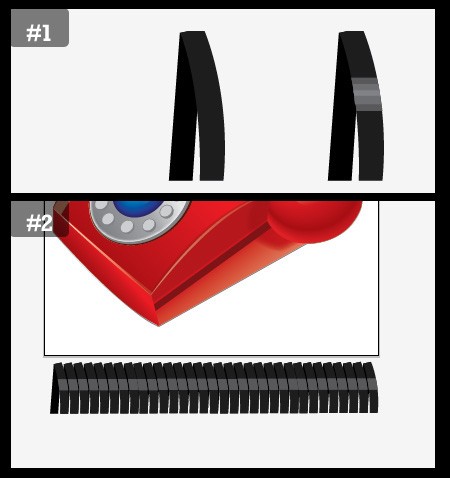
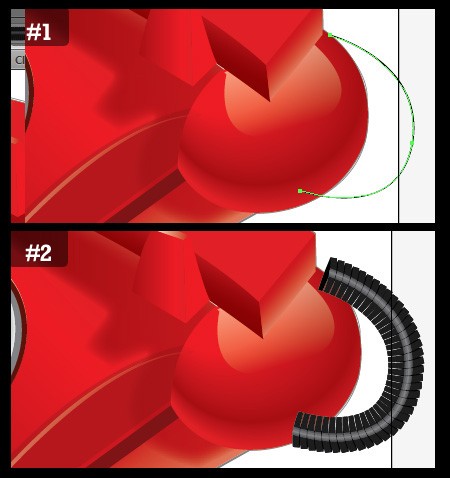
Step 26Now we want to draw wire which is connected phone and the receiver. This is quite simple. Take Pen tool (P) and draw these shapes as given in #1. Then Copy, paste for many times. So it should be like a rolled wire.
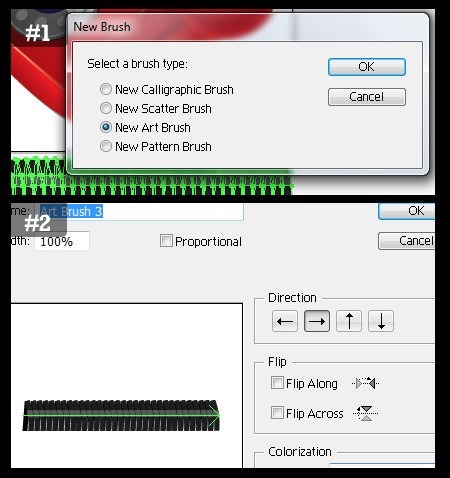
Step 27Now select all the shapes which we created previous step and create a New Art Brush. (This option is found in brush window)
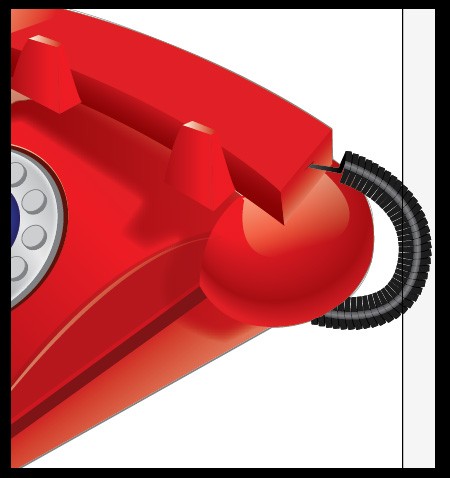
Step 28Take Pen tool and draw a line like this with no fill color and black line color. Then select that line and choose new brush that we created.
Step 29Now select this wire and Choose Expand Appearance. (Object > Expand Appearance) Erase unnecessary parts by using Eraser (Shift+E) and draw some shapes to show that wire is connected.
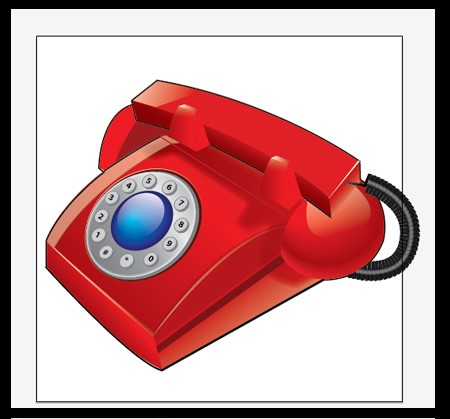
Step 30Almost We done. Now We need to place numbers and some outlines to make this phone beautiful.
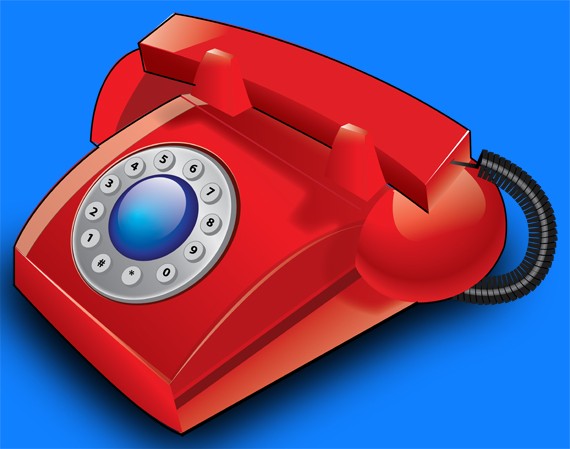
That’s all!Draw a shadow to your phone and background color as well. I hope you enjoyed this tutorial. Thank you for reading.
|
| How to Create your own BuddyPress theme (Part-1) Posted: 14 Jun 2010 03:00 AM PDT
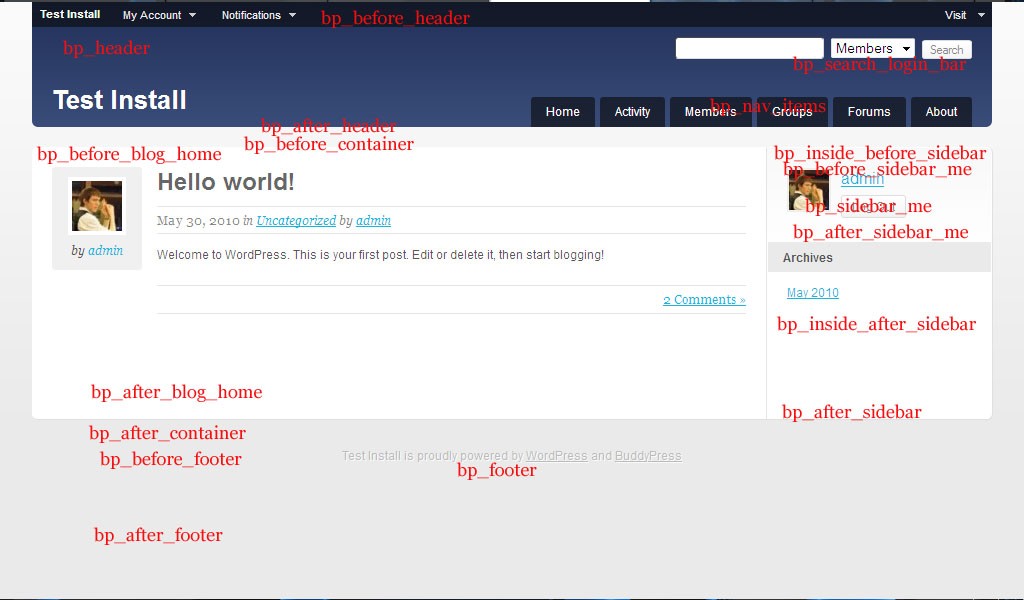
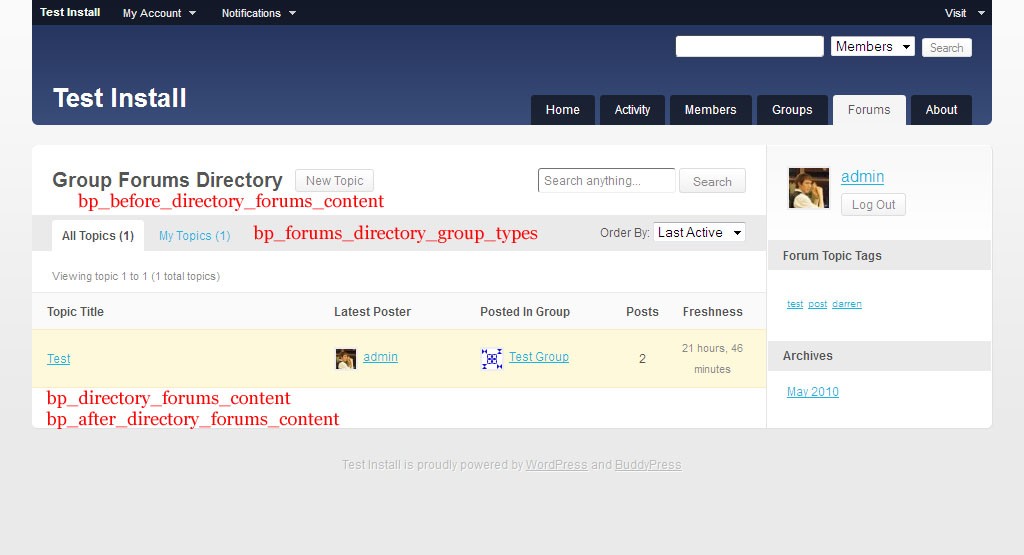
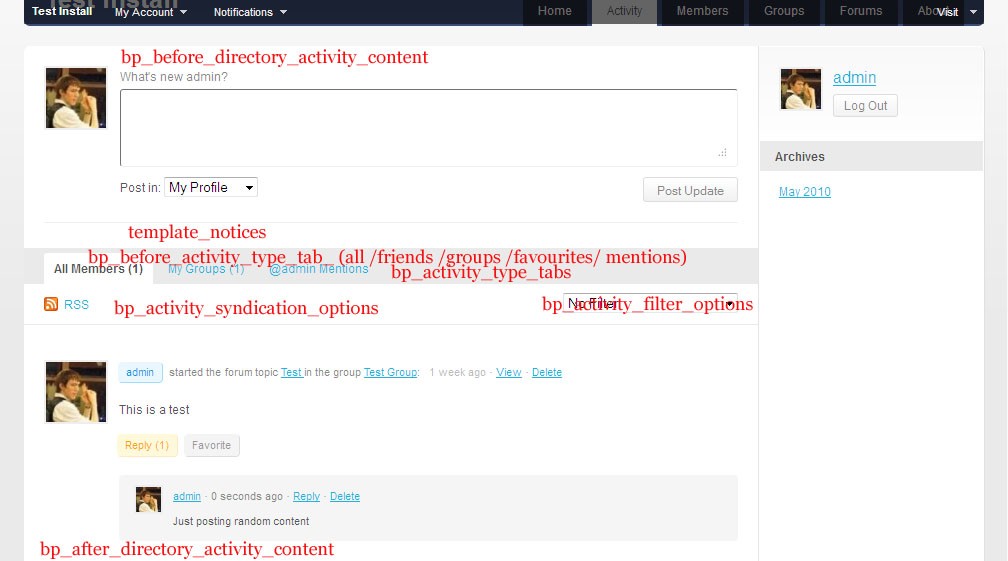
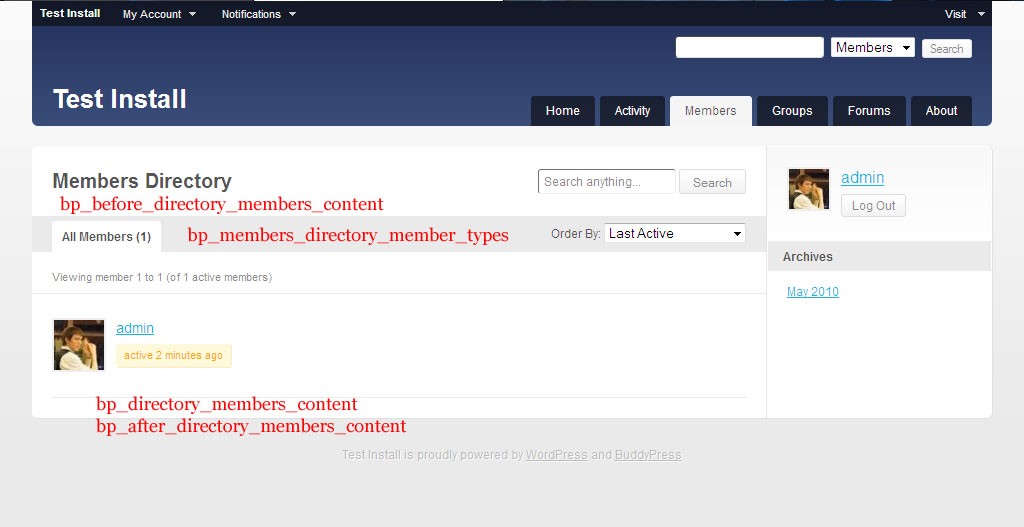
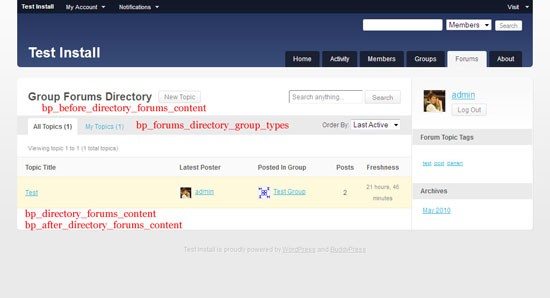
In this 2nd guide of the series we’ll be making a bp-default child theme, which will only contain 2 files, this is to ensure your theme is as future proofed for BuddyPress as possible. Although we will be limited to the amount that can be done with these two files, you’d be surprised how much they can do. These 2 files are style.css functions.php Create a new folder in wp-content/themes/ bearing the name of your theme, and create the above files, leave them empty for now. I've called the theme "bp-child" for this tutorial. (I'll be referring to this theme as bp-child from now on. This is the theme that will be used on the BuddyPress site. You can name your theme whatever you like, just be sure to remember you aren’t using bp-child when I write the themes folder hierarchy. In your newly created style.css add the following code /* Theme Name: bp-child Theme URI: Description: Author: Author URI: Version:3.0.2 Template: bp-default Tags: */ Styling your themeTechnically you now have a working theme, but if you take a look at it, it has no styling, though it does include all the BuddyPress functionality included in the default theme. Most of the work we do now in this tutorial will be to style this new BuddyPress child theme. If you only want to make a few changes to the default BuddyPress theme then you can import the default themes styling using: /* Inherit the default theme styles */ @import url( ../../plugins/buddypress/bp-themes/bp-default/_inc/css/default.css ); To style the admin bar we can import the adminbar.css file from bp-default using /* Inherit the default theme adminbar styles */ @import url( ../../plugins/buddypress/bp-themes/bp-default/_inc/css/adminbar.css ); You can find these to files in /wp-content/plugins/buddypress/bp-themes/bp-default/_inc/ As importing style sheets is very inefficient, I recommend copying the code from these files into your style.css. By cutting down on the amount of style sheets you use, you are helping speed up your sites loading time. Every file that needs loads is another http request visitors must make when loading your site. (Although this will probably not be noticeable on its own, these inefficient practises do add up) CSS ResetAs browsers don’t apply css exactly the same way as each other. Making a style compatible with the major web browsers can be a pain. Adding a css reset to your css can make life allot easier when trying to make your site load properly in different browsers. BuddyPress includes a css reset style sheet in its default theme which you could import with @import url( ../../plugins/buddypress/bp-themes/bp-default/_inc/css/reset.css ); But as you’ve heard above @import isn’t as efficient as some other methods. You can copy the reset style sheet into your style.css if you so wish. /* -------------------------------------------------------------- Reset default browser CSS. Based on work by Eric Meyer: http://meyerweb.com/eric/tools/css/reset/index.html -------------------------------------------------------------- */ /* v1.0 | 20080212 */ html, body, div, span, applet, object, iframe, h1, h2, h3, h4, h5, h6, p, blockquote, pre, a, abbr, acronym, address, big, cite, code, del, dfn, em, font, img, ins, kbd, q, s, samp, small, strike, strong, sub, sup, tt, var, b, u, i, center, dl, dt, dd, ol, ul, li, fieldset, form, label, legend, table, caption, tbody, tfoot, thead, tr, th, td { margin: 0; padding: 0; border: 0; outline: 0; font-size: 100%; vertical-align: baseline; background: transparent; } body { background:#fff; line-height: 1; } ol, ul { list-style: none; } blockquote, q { quotes: none; } blockquote:before, blockquote:after, q:before, q:after { content: ''; content: none; } /* remember to define focus styles! */ :focus { outline: 0; } /* remember to highlight inserts somehow! */ ins { text-decoration: none; } del { text-decoration: line-through; } /* tables still need 'cellspacing="0"' in the markup */ table { border-collapse: collapse; border-spacing: 0; } a img { border: none; } Tips for finding what css you need to editAlthough I’ve supplied a diagram showing the main div ids and classes, when compared to the total amount in the theme it doesn’t show all the smaller divs and more importantly where in the style sheet you can find the css you want to edit. FirebugFirebug is a great add-on for Firefox which allows you to click an element and it will show you the html that its consisted off, as well as the css used to render it, and what line to find it on. Adding functions to your child themeYou can add files to your new child theme, which will be used instead of bp-defaults although in this tutorial as its only minor edits being made its best to stick to the 2 core files in your theme. Later in the series when we’re making more advanced changes we can add more files if needed. So far functions.php has just been left there blank, now we’ll put it to good use! Note: Any code in the functions.php file in bp-default will still be loaded even if it’s not present in your child themes functions.php Add php // to the 1st line // to the last line ?> All code mention in regards to funtions.php will go in between these two lines. <h3>Adding a Favicon</h3> To add a favicon to your theme add the following code to functions.php [php] function bpchild_favicon() { ?> php echo bloginfo('stylesheet_directory') ?>/images/favicon.ico" /> php } add_action('wp_head', 'bpchild_favicon'); You must then place the favicon.ico in your child themes folder in /images/favicon.ico, alternatively you can edit the above code to reflect the location of your favicon. Using the same above technique we can also add a style sheet for IE function bpchild_ie7() { ?> php } add_action('wp_head', 'bpchild_ie7'); Adding activity to your homepageInstead of the usual BuddyPress homepage which displays the main blogs latest posts, you may like to display the latest activity of your site. To do this add the following code to your functions.php // adds the latest activity to the homepage function bpchild_activity() { ?> <h2>Recent Activity on php bp_site_name() ?></h2> php if ( bp_has_activities() ) : ?> <div class="pagination"> <div class="pag-count">php bp_activity_pagination_count() ?></div> <div class="pagination-links">php bp_activity_pagination_links() ?></div> </div> <ul id="activity-stream" class="activity-list item-list"> php while ( bp_activities() ) : bp_the_activity(); ?> <li class="<?<span class=">php</li> bp_activity_css_class() ?>" id="activity-"> <div class="activity-avatar"> <a href="<?<span class=">php</a><a href="<?<span class="> bp_activity_user_link() ?>"></a> php bp_activity_avatar( 'type=full&width=100&height=100' ) ?> </a> </div> <div class="activity-content"> <div class="activity-header"> php bp_activity_action() ?> </div> php if ( bp_get_activity_content_body() ) : ?> <div class="activity-inner"> php bp_activity_content_body() ?> </div> php endif; ?> php // Add code for comments here ?> php do_action( 'bp_activity_entry_content' ) ?> </div> </li> php endwhile; ?> <!--<span class="hiddenSpellError" pre=""-->ul> php else : ?> <div id="message" class="info"> php _e( 'Sorry, there was no activity found. Please try a different filter.', 'buddypress' ) ?> </div> php endif; ?> Note the above code it only the standard activity loop, and does not contain any comments or meta, which. You can add the full activity loop to your homepage with the following code below line 35 of the above code (after the line containing php // Add code for comments here ?> ) <div class="activity-meta"> php if ( is_user_logged_in() && bp_activity_can_comment() ) : ?> <a href="<?<span class=">php</a><a href="<?<span class="> bp_activity_comment_link() ?>" class="acomment-reply" id="acomment-comment-"> ()</a> php endif; ?> php if ( is_user_logged_in() ) : ?> php if ( !bp_get_activity_is_favorite() ) : ?> <a href="<?<span class=">php</a><a href="<?<span class="> bp_activity_favorite_link() ?>" class="fav" title=""></a> php else : ?> <a href="<?<span class=">php</a><a href="<?<span class="> bp_activity_unfavorite_link() ?>" class="unfav" title=""></a> php endif; ?> php endif;?> php do_action( 'bp_activity_entry_meta' ) ?> </div> php if ( bp_activity_can_comment() ) : ?> <div class="activity-comments"> php bp_activity_comments() ?> php if ( is_user_logged_in() ) : ?> <form action="" method="post" id="ac-form-" class="ac-form"> <div class="ac-reply-avatar">php bp_loggedin_user_avatar( 'width=25&height=25' ) ?></div> <div class="ac-reply-content"> <div class="ac-textarea"> <textarea id="ac-input-" class="ac-input" name="ac_input_"> </div> <input name="ac_form_submit" type="submit" value="<?<span class=" />php _e( 'Post', 'buddypress' ) ?> →" /> <input name="comment_form_id" type="hidden" value="<?<span class=" />php bp_activity_id() ?>" /> </div> php wp_nonce_field( 'new_activity_comment', '_wpnonce_new_activity_comment' ) ?> </form> php endif; ?> </div> php endif; ?> For info on editing the loop to mean your needs the BuddyPress Codex has plenty of info to help you out. Adding activity to your homepageInstead of the usual BuddyPress homepage which displays the main blogs latest posts, you may like to display the latest activity of your site. To do this add the following code to your functions.php // adds the latest activity to the homepage function bpchild_activity() { ?> <h2>Recent Activity on php bp_site_name() ?></h2> php if ( bp_has_activities() ) : ?> <div class="pagination"> <div class="pag-count">php bp_activity_pagination_count() ?></div> <div class="pagination-links">php bp_activity_pagination_links() ?></div> </div> <ul id="activity-stream" class="activity-list item-list"> php while ( bp_activities() ) : bp_the_activity(); ?> <li class="<?<span class=">php</li> bp_activity_css_class() ?>" id="activity-"> <div class="activity-avatar"> <a href="<?<span class=">php</a><a href="<?<span class="> bp_activity_user_link() ?>"></a> php bp_activity_avatar( 'type=full&width=100&height=100' ) ?> </a> </div> <div class="activity-content"> <div class="activity-header"> php bp_activity_action() ?> </div> php if ( bp_get_activity_content_body() ) : ?> <div class="activity-inner"> php bp_activity_content_body() ?> </div> php endif; ?> php // Add code for comments here ?> php do_action( 'bp_activity_entry_content' ) ?> </div> </li> php endwhile; ?> </ul> php else : ?> <div id="message" class="info"> php _e( 'Sorry, there was no activity found. Please try a different filter.', 'buddypress' ) ?> </div> php endif; ?> Note the above code it only the standard activity loop, and does not contain any comments or meta, which. You can add the full activity loop to your homepage with the following code below line 51 of the above code (after the line containing php // Add code for comments here ?> ) <div class="activity-meta"> php if ( is_user_logged_in() && bp_activity_can_comment() ) : ?> <a href="<?<span class=">php</a><a href="<?<span class="> bp_activity_comment_link() ?>" class="acomment-reply" id="acomment-comment-"> ()</a> php endif; ?> php if ( is_user_logged_in() ) : ?> php if ( !bp_get_activity_is_favorite() ) : ?> <a href="<?<span class=">php</a><a href="<?<span class="> bp_activity_favorite_link() ?>" class="fav" title=""></a> php else : ?> <a href="<?<span class=">php</a><a href="<?<span class="> bp_activity_unfavorite_link() ?>" class="unfav" title=""></a> php endif; ?> php endif;?> php do_action( 'bp_activity_entry_meta' ) ?> </div> php if ( bp_activity_can_comment() ) : ?> <div class="activity-comments"> php bp_activity_comments() ?> php if ( is_user_logged_in() ) : ?> <form action="<?<span class=">php</form> bp_activity_comment_form_action() ?>" method="post" id="ac-form-" class="ac-form"> <div class="ac-reply-avatar">php bp_loggedin_user_avatar( 'width=25&height=25' ) ?></div> <div class="ac-reply-content"> <div class="ac-textarea"> <textarea id="ac-input-<?<span class=">php</span> bp_activity_id() ?>" class="ac-input" name="ac_input_<?php bp_activity_id() ?>"></textarea> </div> <input name="ac_form_submit" type="submit" value="<?<span class=" />php _e( 'Post', 'buddypress' ) ?> →" /> <input name="comment_form_id" type="hidden" value="<?<span class=" />php bp_activity_id() ?>" /> </div> php wp_nonce_field( 'new_activity_comment', '_wpnonce_new_activity_comment' ) ?> </form> endif; ?> </div> endif; ?> For info on editing the loop to mean your needs the BuddyPress Codex has plenty of info to help you out. Show a different homepage to logged in membersYou may also like to show members of your site different information. Such as a nice welcome! function member_welcome() { ?> <?php if ( is_user_logged_in() ) : ?> Welcome back! endif; ?> <?php } add_action('bp_before_sidebar_me', 'member_welcome'); Want to add some content somewhere else to BuddyPress?Although I’ve shown how to add some changes to the bp-default theme I couldn’t cover as many changes as I’d like, that and all you creative people have probably thought of something better that you want to do. I recommend reading the guides I’ve linked to, and then you can refer to the images below which shows some of the BuddyPress hooks, all laid out for easily reference. (Click on the images for full view)
Some useful readingTwo great posts by one of the greats in WordPress themes Ian Stewart Using Filter Hooks in WordPress Child Themes Using Action Hooks in WordPress Child Themes we also wrote about plenty of resources in regards to child themes 20 Wordpress Theme Frameworks And Starting Resources Although this guide was wrote with BuddyPress in mind, a lot of this guide can apply to creating a normal WordPress child theme. In step 2 we’ll start adding extra theme files to our child theme in order to customize it even further. If you have any questions your more than welcome to ask in the comments section. I look forward to seeing all your BuddyPress themes soon! |


| You are subscribed to email updates from Graphic and Web Design Blog To stop receiving these emails, you may unsubscribe now. | Email delivery powered by Google |
| Google Inc., 20 West Kinzie, Chicago IL USA 60610 | |
0 comments:
Post a Comment