1stwebdesigner |

| The Essential Guide to WordPress 3.0 Custom Taxonomies Posted: 17 Jun 2010 02:00 PM PDT
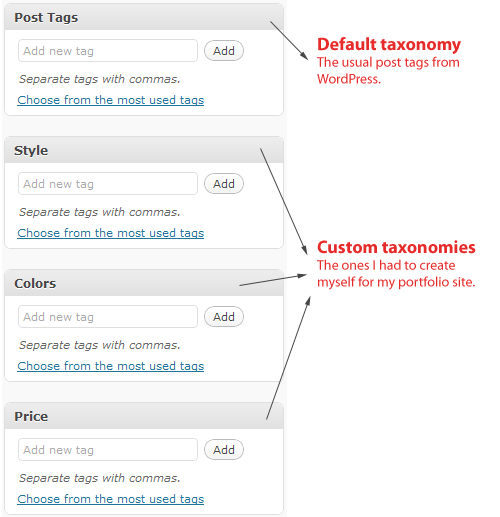
Recently, I’ve started working on my portfolio WordPress theme, and I needed to define different information for each project/template, like price, colors, style, etc. For this thing, I needed to create three more taxonomies which are looking like this:
Creating a new taxonomyThis is as simple as it is to look at the picture above. All you have to do is to copy the code below, in your functions.php. If your theme doesn’t have one, which I don’t think it hasn’t already one, just create the file yourself. Now, this is the code you have to write for each taxonomy you are creating: <?php register_taxonomy('test', 'post', array( 'hierarchical' => false, 'label' => 'test', 'query_var' => true, 'rewrite' => true)); ?> Just replace “test” with the name of the taxonomy you wish to create. That’s how you create custom taxonomies. The’ll just appear in the Dashboard below the Post Tags. Using the new taxonomiesWe have created them, but as well as tags and categories, you need some code if you want to output them in your article. That’s a little code snippet that goes into your WordPress loop, just like the post tags and categories: <?php echo get_the_term_list($post->ID, 'people', 'People: ', ', ', ''); ?> See it yourselfBelow are some examples of what we were talking about in this tutorial:
I hope you have understood what taxonomies are. I’m sure you have heard about them before, but never wondered what they are, but what about using them for creating a nice t-shirt store? Using Custom Taxonomies to create a T-shirt store
Now that you have learned how to use custom taxonomies, we will use them for creating a T-shirt store. This won’t be a fully functional one, we will just build up the part that is using custom taxonomies. 1. PreparationsFirst of all we need a theme. We will use the new WordPress 3.0 default theme, called Twenty Ten. In order to get this theme and have it properly working, you need to download WordPredd 3.0 RC2. To get this version, scroll down to the bottom of the page, and the last one should be WP 3.0 RC2. Do not be worried working with WP 3.0, it has the same template tags. Next, you will need a local server, so the best way to create it, is using WAMP, or just build up your own environment following this previous tutorial on 1stWebDesigner. Now that you have your local server up and running, just install WordPress. 2. Editing the Twenty Ten themeNow we need to create our custom taxonomies. First of all, think about what custom taxonomies you will need. For a T-shirt store we need to provide:
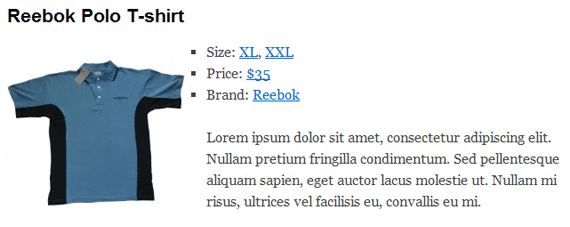
So, just open up the Twenty Ten functions.php file and create those custom taxonomies. I suggest to write the code at the end of the file for avoiding to break the default functions that the theme has. You can see the code that you will need and as It is, without any PHP tags: // Custom taxonomy for Size register_taxonomy('Size', 'post', array( 'hierarchical' => false, 'label' => 'Size', 'query_var' => true, 'rewrite' => true)); // Custom taxonomy for Price register_taxonomy('Price', 'post', array( 'hierarchical' => false, 'label' => 'Price', 'query_var' => true, 'rewrite' => true)); // Custom taxonomy for Brand register_taxonomy('Brand', 'post', array( 'hierarchical' => false, 'label' => 'Brand', 'query_var' => true, 'rewrite' => true)); After creating the custom taxonomies, we need to modify the loop too. So this will be a little difficult, because you need to take care to not break any of the theme’s code. Don’t worry, I’ll guide you through this. Modifying the loop. Open up the index.php file from the 2010 theme. After you have opened it, you will see a tag that is calling the loop.php file: <?php /* Run the loop to output the posts. * If you want to overload this in a child theme then include a file * called loop-index.php and that will be used instead. */ get_template_part( 'loop', 'index' ); ?> We will need to completely delete this, and create a our own loop. So, instead loop tag, copy and paste this following code: <?php if (have_posts()) : while (have_posts()) : the_post(); ?> <div id="post-<?<span class="> <pre><?php the_ID(); ?>" ></pre> </div> <h1><a href="<?php the_permalink(); ?>"></a> <div> <!--Insert custom field and custom taxonomies code here--> <pre><?php wp_link_pages( array( 'before' => '</pre> <div>' . __( 'Pages:', 'twentyten' ), 'after' => '</div> ' ) ); ?> </div><!-- .entry-content --> </div> <pre><?php endwhile; else: ?></pre> <div id="post-<?<span class="> <pre><?php the_ID(); ?>" ></pre> </div> <h1 class="entry-title">Nothing here...</h1> <div class="entry-content"> Sorry, no T-shirts avaiable for sale. Try coming back later. </div><!-- .entry-content --> </div> <?php endif; ?> This is the loop that we will use. The ID and class are some theme specific styles. You have to notice that I have removed the meta data. Now, we will need to add the codes that will retrieve our custom taxonomies and we will need to make use of custom fields too, to retrieve t-shirt thumbnail. Add them exactly where you see the HTML comment in the above code. Now, here’s the code that we need: <img src="ID, 'post-icon', true); ?>" alt="Icon for Post #" /> <ul> <li><?php echo get_the_term_list($post->ID, 'Size', 'Size: ', ', ', ''); ?></li> <li><?php echo get_the_term_list($post->ID, 'Price', 'Price: ', ', ', ''); ?></li> <li><?php echo get_the_term_list($post->ID, 'Brand', 'Brand: ', ', ', ''); ?></li> </ul> <?php the_content(); ?> Notice that the custom field name is “thumb”. For using this custom field you need to create a new one with the name thumb, and the value of it is the link to your thumb. Now that we have everything set, what about trying to publish a sample post. Take a look at mine:
ConclusionSo, you have learned how to use custom taxonomies, and you have created a little T-shirt store. Well, not a fully functional one, but it’s a good start :) If you have any questions regarding this tutorial please do not hesitate to ask via comments. I’ll try to solve all your problems. Thank you! |
| How To Get Master Grade In Finances Being a Freelancer Posted: 17 Jun 2010 03:00 AM PDT
Make a budget
Picture by Linusb4 Making a budget is crucial. You have to have plans and goals financially no matter what you do. This is sometimes underestimated, but you have to make one if you really want to succeed. With a budget you can see if you are on track or not, what you need to change, where you have big costs and so on. It’s a great way of keeping an overview of your business. Anyone can make a budget, it doesn’t take a degree in economy. All you need is to get an overview of all the money that come in and go out and put them into system. Track your time
Picture by Nathan Sudds To be able to make a living from freelancing you need to track the time spent on each project. If you bill too few hours, you won’t be able to earn enough to keep going. If you bill too much, well – then you can most likely say goodbye to your clients. Getting a time management application for this can be a very good idea, unless you are into doing it old-school with a pen and paper. Just pick whichever system that works for you, and make sure to also include time spent on research and other preparations for specific projects. Set your hourly rates properly
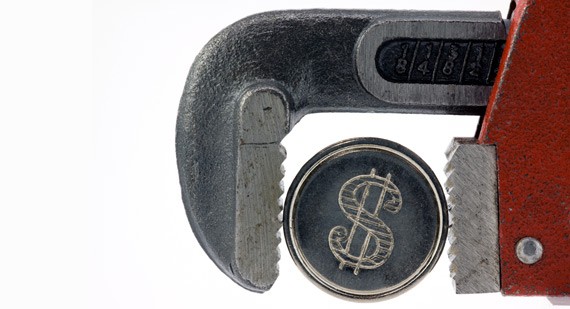
Picture by Ivan Prole Many sell their services too cheap trying to get into the market. This usually will lead you to failure within short time. To be able to set your hourly rates how they have to be, you must have a full overview of what everything costs for you and divide it into hours. Then you will be able to see what you have to make to get even. After this you will have to make a decision on how much you should have left. In many countries there are set average tables for what freelancers usually get paid in different niches, so you may want to check that out as well. To save you some of that work, check out the hourly rate calculator over at Freelanceswitch. CLICK HERE to visit it. Make offers that are easy to understand
Picture by Rose Ann When a client is getting an offer you should take some extra time while calculating it. Make sure to include everything and make your own copy of the offer to keep – with explanations to how you’ve calculated it. This way it can be easily altered if the clients wants something else included or if you need to have a look at it yourself afterwards. This way you do a very important part of the job beforehand. This will also help you when you are going to send out the bills. Make offers that can be altered
Picture by Jakub Krechowicz Make sure to include in your offers (at least the bigger time-consuming ones) that the price can be changed by up to a certain percent due to market changes or unexpected costs. The usual percentage to use seems to be around 10%. This way you will cover some extra work in case it turns out that something is a bit more time-consuming than you thought at first. Bill your clients regularly
Picture by Shaun W To not lose track of how much clients owe you, you have to get set routines for billing. If possible you should have a specific date monthly to send out the bills, or have a routine of sending them out due to the agreement with your client. This way you will have a good sense of how much you have coming in and make sure it doesn’t take too long before you get paid. And while you’re at it – make a routine for how to send reminders to those who haven’t paid in time. Invest in your business
Picture by Thiago Miqueias A certain amount of what comes in should be spent on your business. This can be upgrading software or your own knowledge by taking a class or buying books/magazines. For most freelancers it’s very important to stay updated on the latest technology and what goes on in the market. Because of this you should have a post in your savings that is marked for that purpose. Marketing
Picture by Will Thomas Another thing you would want to spend some money on is the marketing of your business. This can be done be either by investing of your time to do certain things for yourself and/or paying someone else to do it. It can be the redesign of your website and portfolio or a simple thing as buying an ad through an advertisement system. With all the competition in the market it’s very unlikely that your products will sell themselves from day one. Save
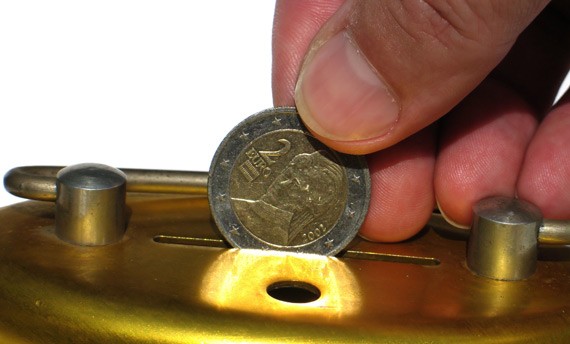
Picture by Sanja Gjenero I repeat this a lot in many of my articles, and it can’t be mentioned too many times. You have to put a savings post into your budget. No matter how well you earn – it won’t help you much in critical moments if you’ve spent everything. You will run into situations when you need to repair equipment or buy something new. You may also experience that a client doesn’t pay when he’s supposed to – or that a project takes more time than expected. Because of this, that buffer of savings can be very valuable. Shop smart
Picture by Yaroslav B When it comes to office supplies, coffee, equipment + + , shopping smart can make a huge difference in your budget. Don’t get the cheapest of everything if it takes away quality. But there’s often someone selling that exact keyboard you’re getting a little bit cheaper, a cheaper insurance company and so on. What may seem like a tiny dollar here and there can quickly turn into hundreds and even thousands of dollars over a whole year. You should also think through it before going out to eat every day. Buying something in bigger quantities can help a lot. Insurance
Picture by Piotr Dorabiala Make sure you have insured yourself, along with your equipment. This monthly/yearly fee can seem “unneccessary” if nothing happens, but when that moment comes when you need it – you will see that this is an investment in the safety of your future. Check out different insurance companies, listen to the advice you get and get offers from different ones before you decide. Thinking that nothing bad ever will happen to you is an unrealistic thought that can cost you a lot of money and maybe your business if not taken seriously. Be prepared to adjust
Picture by Colin Brough If you have a budget with set plans for the next months or year, there is always the chance that something will not go as expected. The good thing is that you have a budget that you can monitor occasionally to see the signs early on. Because of this you should aim to have the ability to adjust on short notice. Be prepared to work extra hours in some periods to make ends meet, and be prepared to put in extra hours during the end of deadlines. We hope these tips were useful to you. Remember that there can be variations from country to country when it comes to laws and regulations. Still most of these tips should apply to most freelance workers out there and hopefully be helpful advice on your road to success! Thank you for reading this article, we would highly appreciate your comments. Don’t forget to share this article if you found it to be an interesting read! |


| You are subscribed to email updates from Graphic and Web Design Blog To stop receiving these emails, you may unsubscribe now. | Email delivery powered by Google |
| Google Inc., 20 West Kinzie, Chicago IL USA 60610 | |
0 comments:
Post a Comment